Step by Step procedure to Change upload limit for phpMyAdmin
Step 1. Access PhpMyAdmin from cyberpanel
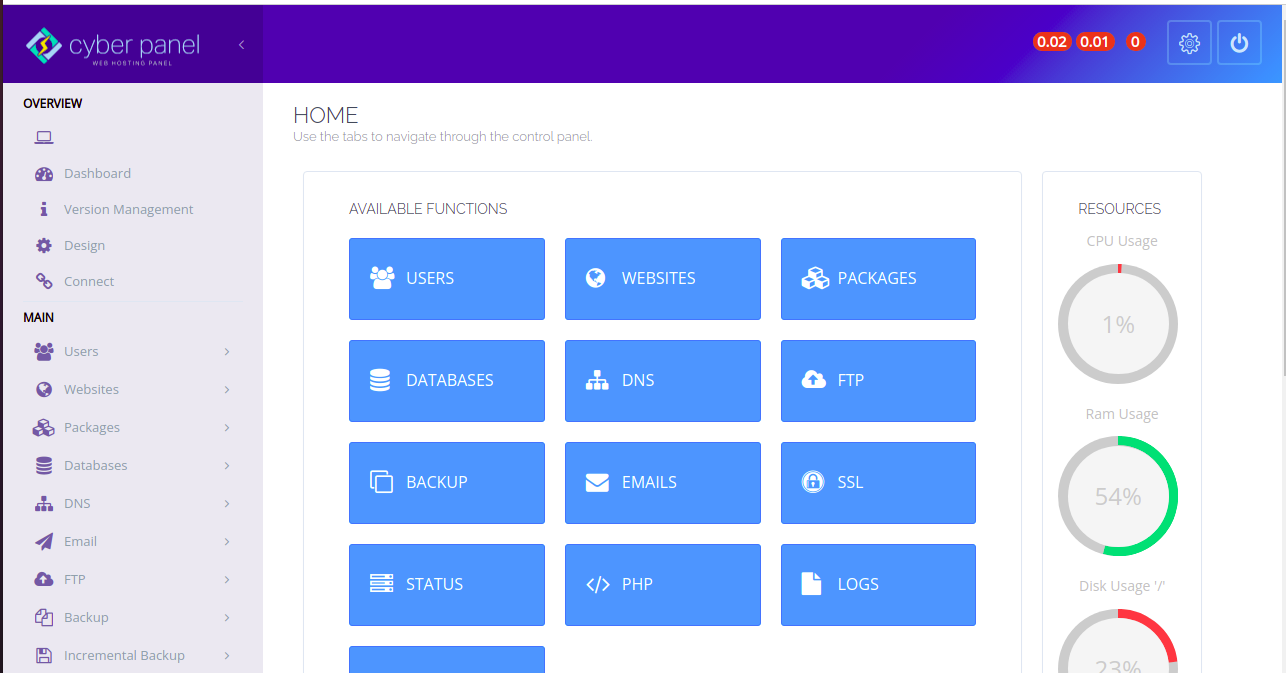
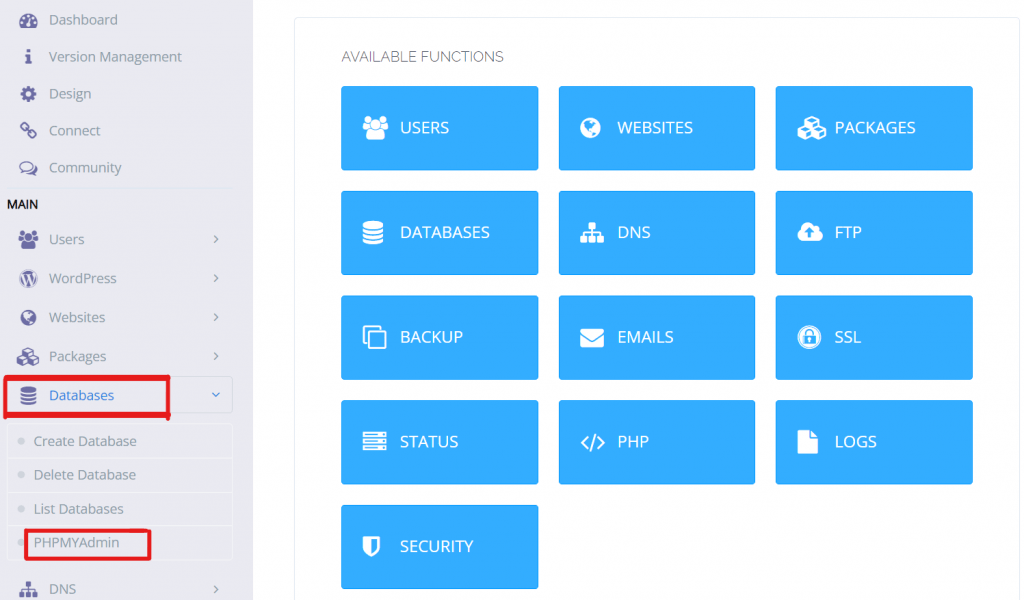
Open the Cyberpanel Dashboard. Go to Databases –> PHPMYADMIN
This will redirect you on the PhpMyAdmin.
Step 2. Check the Max PHP limit.
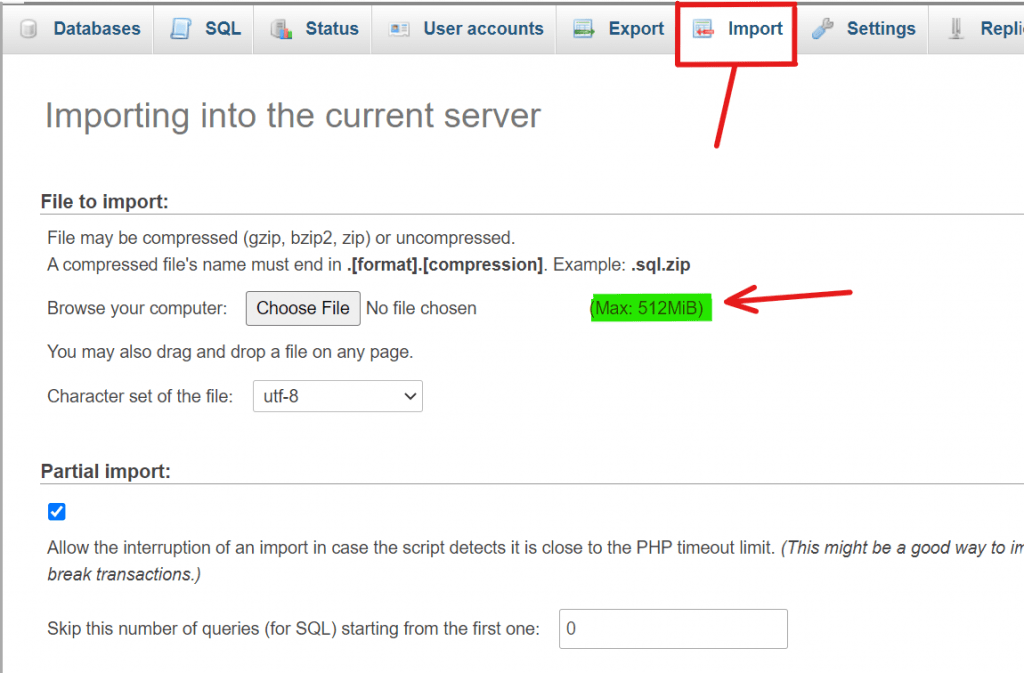
Go to the PhpMyAdmin dashboard Click on the “Import“. You will see the upload limit size.
Step 3. Check PHP version.
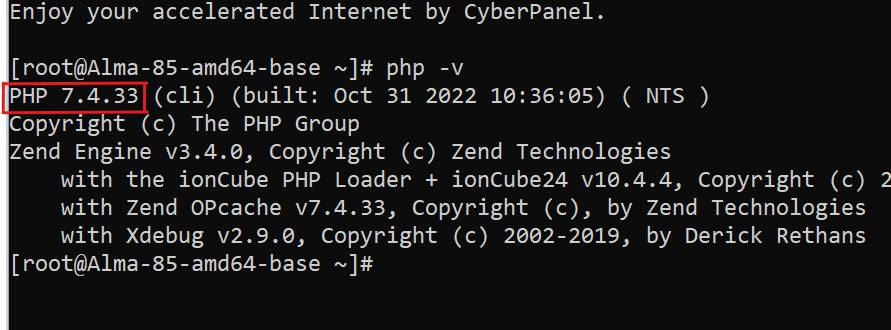
Open SSH terminal Run Command “php -v” and you will get to know the PHP version.
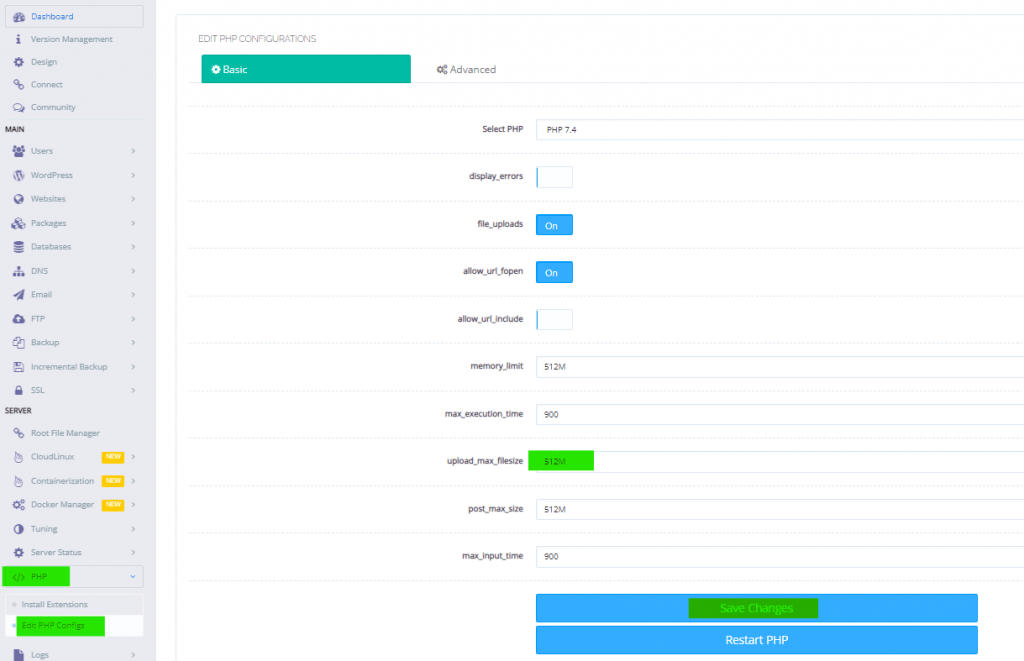
Step 4. Change limit in cyberpanel
Open Cyberpanel dashboard. Go to PHP–>Edit PHP configs Select the PHP version 7.4 (which you found in your terminal) Set the “upload_max_size” you want and save . Then click on the RESTART PHP.
The upload size of PHP will be changed. Go to the PHPMYADMIN dashboard you will see the changes will be done.
There are a lot of tasks on the server and Linux level which you have to set and do regular bases and for that Linux offers you a cron job feature in this article we will learn How to run a cron job in Linux?
What is a cron job?
A cron job is a Linux utility that allows you to schedule a command or script to be executed automatically at a specified time and date. Cron is a daemon that runs in the background and checks a configuration file called a crontab for scheduled tasks. When a task is scheduled, cron executes the command or script specified in the task.
Cron jobs are commonly used to automate system maintenance tasks, such as backing up databases or log files, sending emails, and running system updates. They are also used to schedule recurring tasks, such as fetching data from a remote server or running a report.
To create a cron job, you need to create a crontab file and specify the time and date when the job should be run, as well as the command or script to be executed. The crontab file uses a specific syntax, which consists of five fields separated by spaces. The fields represent the minute, hour, day of the month, month, and day of the week when the job should be run. You can use asterisks to specify that the job should be run at any time within a given field. For example, an asterisk in the hour field means that the job will be run every hour.
How to run a cron job in Linux?
To run a cron job in Linux, you can use the crontab command to set up a cron job.
Open a terminal and type crontab -e to edit the crontab file. This will open the crontab file in a text editor.
Add a line to the file with the following format:
* * * * * command_to_execute
The asterisks represent the following:
The first asterisk represents the minute of the hour (0-59).
The second asterisk represents the hour of the day (0-23).
The third asterisk represents the day of the month (1-31).
The fourth asterisk represents the month of the year (1-12).
The fifth asterisk represents the day of the week (0-6, where 0 is Sunday).
For example, to run a command at 5:00 AM every day, you would use the following line:
0 5 * * * command_to_execute
Save and close the crontab file. The cron job will now run at the specified time.
Note: The crontab file uses a specific syntax, and it is important to follow it carefully. The incorrect syntax can cause the cron job to fail. For more information about the crontab syntax, you can use the man crontab command to view the manual pages.
Click the “Update” button to save your changes. The page title should now be centered on the page.
If you want to center the page title on all pages, you can add the same style attribute to the h1.entry-title element in your theme’s stylesheet (usually style.css).
Please note that the exact steps may vary depending on your theme and WordPress version. If you’re having trouble centering the page title, you may want to consult your theme’s documentation or reach out to the theme developer for support.
WordPress migration is the process of moving a WordPress site from one hosting platform or domain to another. This can be done manually by exporting and importing content, or by using a plugin or service that automates the process. Some hosting companies and service providers offer free WordPress migration services as part of their packages. It is always best to carefully research and compare options before choosing a WordPress migration service.
As I mentioned earlier, some hosting companies and service providers offer free WordPress migration services as part of their packages. It is always best to carefully research and compares options before choosing a migration service to ensure that it meets your needs and provides the level of support and assistance you require. In addition to checking with hosting companies and service providers, you can also search online for tutorials and guides on how to migrate a WordPress site manually. This can be a good option if you want to save money and have the technical skills to handle the process yourself.
What is a WordPress migration?
WordPress migration is the process of moving a WordPress website from one hosting provider or domain to another. This can be useful if you want to change hosting providers, move your website to a new domain, or merge multiple WordPress websites into a single site. The process typically involves moving the WordPress files and database, as well as updating any links or references to the old domain or location. It’s important to carefully plan and execute a WordPress migration to ensure that your website remains accessible and functional during and after the move.
How to choose WordPress Migration services/plugins?
When choosing a WordPress migration plugin, there are a few key factors to consider:
Ease of use: Look for a plugin that is user-friendly and easy to use. A plugin with a simple, one-click migration process can save you a lot of time and hassle.
Compatibility: Make sure that the plugin is compatible with your current hosting platform and the new host you plan to migrate to.
Features: Consider the features offered by each plugin. Some plugins may offer additional features such as the ability to exclude certain files or tables from the migration process, or the ability to find and replace data in the database.
File size limits: Some migration plugins have limits on the size of the exported file, which may cause issues if your site is particularly large. Make sure to check for any file size limits before selecting a plugin.
Price: Some WordPress migration plugins are available for free, while others may require a paid subscription. Consider your budget and the features offered by each plugin when making your decision.
Ultimately, the best migration plugin for you will depend on your specific needs and the size and complexity of your site. It may be helpful to try out a few different plugins to see which one works best for you.
Free WordPress Migration Services:
There are several WordPress plugins that you can use to migrate your website from one hosting platform to another. Some popular options include:
Duplicator
Duplicator is a popular WordPress plugin that allows you to create a package of your entire WordPress site, including all the files and database tables. This package can then be used to migrate your site to a new host or to clone your site to a new location.
To use Duplicator, you will need to install and activate the plugin on your WordPress site. Once the plugin is activated, you can access it from the “Tools” menu in your WordPress dashboard.
To create a package of your site, go to the “Packages” tab in the Duplicator plugin and click the “Create New” button. The plugin will then scan your site and create a package containing all the necessary files and database tables.
Once the package has been created, you can download it to your computer and use it to migrate your site to a new host. To do this, you will need to install WordPress on the new host and then upload and extract the package using the Duplicator plugin.
It’s important to note that Duplicator only creates a package of your site, it does not actually migrate it for you. You will need to follow the steps outlined above to complete the migration process.
Migrate Guru is a WordPress plugin that allows you to easily migrate your website from one hosting platform to another. The plugin automates the migration process and provides a simple, one-click solution for moving your site to a new host.
To use Migrate Guru, you will need to install and activate the plugin on your WordPress site. Once the plugin is activated, you can access it from the “Tools” menu in your WordPress dashboard.
To migrate your site with Migrate Guru, you will need to enter your destination host’s credentials and select the site you want to migrate. The plugin will then handle the rest of the process, including transferring all the files and database tables to the new host.
Migrate Guru is designed to be a simple and user-friendly solution for migrating WordPress sites. It can save you a lot of time and hassle compared to manually transferring your site to a new host. However, it’s important to note that Migrate Guru does not offer as many advanced features as some other WordPress migration plugins, such as the ability to exclude certain files or tables from the migration process.
All-in-One WP Migration is a WordPress plugin that allows you to easily migrate your website from one hosting platform to another. The plugin exports your entire WordPress site as a single file, which you can then import to your new host.
To use All-in-One WP Migration, you will need to install and activate the plugin on your WordPress site. Once the plugin is activated, you can access it from the “Tools” menu in your WordPress dashboard.
To create an export file of your site, go to the “Export” tab in the All-in-One WP Migration plugin and click the “Export to” button. The plugin will then create a single file containing all the necessary files and database tables for your site.
Once the export file has been created, you can download it to your computer and use it to migrate your site to a new host. To do this, you will need to install WordPress on the new host and then use the All-in-One WP Migration plugin to import the export file.
All-in-One WP Migration is a user-friendly solution for migrating WordPress sites, as it provides a simple one-click export and import process. However, it’s important to note that the plugin has a file size limit for the exported file, which may cause issues if your site is particularly large. In such cases, you may need to use a different plugin or a manual migration process.
BackupBuddy is a WordPress plugin that allows you to create a full backup of your WordPress site, including all the files and database tables. You can then use this backup to restore your site on a new host or to restore your site in case of a server crash or other issues.
To use BackupBuddy, you will need to install and activate the plugin on your WordPress site. Once the plugin is activated, you can access it from the “Tools” menu in your WordPress dashboard.
To create a backup of your site, go to the “Backups” tab in the BackupBuddy plugin and click the “Backup Now” button. The plugin will then scan your site and create a complete backup of all the necessary files and database tables.
Once the backup has been created, you can download it to your computer and use it to restore your site on a new host. To do this, you will need to install WordPress on the new host and then use the BackupBuddy plugin to restore the backup file.
BackupBuddy is a useful tool for creating a complete backup of your WordPress site, which can be helpful in case of an unexpected issue. However, it is not specifically designed for migrating sites from one host to another, and may not offer as many features for this purpose as some other WordPress migration plugins.
Final Words:
There are a few things you should keep in mind when using a WordPress migration plugin:
Make a backup: It’s important to create a backup of your WordPress site before using a migration plugin. This will ensure that you have a copy of your site in case anything goes wrong during the migration process.
Check compatibility: Make sure that the plugin you are using is compatible with your current hosting platform and the new host you plan to migrate to.
Follow the instructions: Carefully read the instructions provided by the plugin and follow them carefully to ensure a successful migration.
Test the migrated site: After the migration is complete, it’s a good idea to thoroughly test your migrated site to make sure everything is working as it should. This may include testing all the links and features on your site, as well as checking for any broken or missing images or other media.
Update DNS records: If you are changing domain names as part of the migration process, make sure to update your DNS records to point to your new host.
By following these tips, you can help ensure a smooth and successful migration process using a WordPress migration plugin and can choose better WordPress migration services.
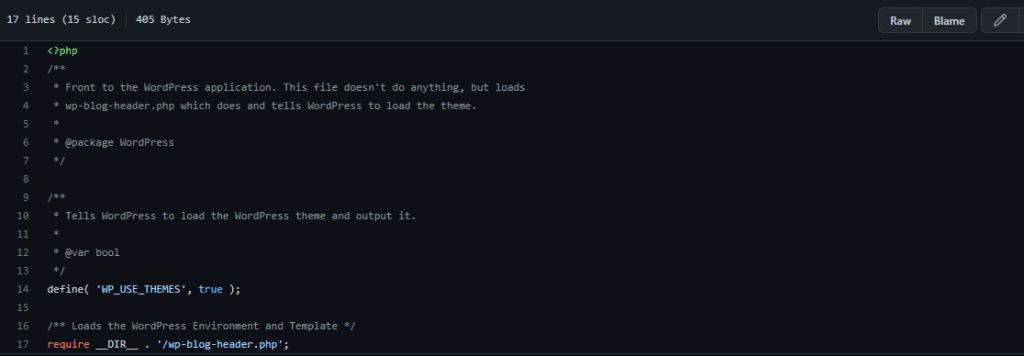
In WordPress, the index.php the file is the main template file for your website. It controls the display of the main content area of your website, and it acts as a fallback template if other templates are not available. we will discuss all information related to WordPress index.php in this blog.
The index.php the file is used to render the home page of your website if you have not set a static home page. It is also used to display the blog page if you have set your front page to display static content and your posts page to display your latest blog posts.
The index.php the file is located in the root directory of your WordPress installation and it is a part of the theme you are using for your website. You can edit the index.php file to customize the way your home page and blog page look. However, it is generally recommended to use a child theme or a custom plugin to make changes to your website, as changes made directly to the index.php file may be lost when you update your theme.
WordPress index.php location
In WordPress, the index.php file is located in the root directory of your WordPress installation. This is the directory where you installed WordPress, and it is typically called “wp-content” or “public_html” on most hosting platforms.
To access the index.php file, you can use a file manager tool provided by your hosting provider or connect to your website via FTP and navigate to the root directory of your WordPress installation.
Once you have located the index.php file, you can edit it using a text editor. It is generally recommended to use a child theme or a custom plugin to make changes to your website, as changes made directly to the index.php file may be lost when you update your theme.
index.php content in WordPress
The index.php file in WordPress controls the display of the main content area of your website. It is a part of the theme you are using for your website and it acts as a fallback template if other templates are not available.
The index.php file typically includes code to display the header, footer, and sidebar of your website, as well as the main content area. The main content area is usually populated with posts or pages from your WordPress website, depending on the settings you have chosen for your home page and blog page.
Sample code:
Here is a simplified example of the basic structure of an index.php file in WordPress:
<?php

get_header();

if ( have_posts() ) {
  while ( have_posts() ) {
    the_post();
    the_content();
  }
}

get_sidebar();
get_footer();
This code will display the header, footer, and sidebar of your website, and it will loop through the posts or pages on your website and display their content in the main content area.
You can customize the index.php file by adding or modifying the code that controls the display of your website. However, it is generally recommended to use a child theme or a custom plugin to make changes to your website, as changes made directly to the index.php file may be lost when you update your theme.
Sometimes you need to reset your LiteSpeed Cache plugin settings to the default settings for some reason. There may be an issue with the cache hit or anything. Here in this article, we will learn How to reset Litespeed cache default settings?
LiteSpeed Cache plugin
LiteSpeed Cache is a WordPress plugin that helps improve the performance of your website by caching pages and posts, reducing the load on your server, and speeding up your website for visitors. It is designed to work with the LiteSpeed Web Server, but it can also be used with other web servers such as Apache. The plugin offers a range of features, including browser and server-side caching, Gzip compression, and support for content delivery networks (CDNs). It also includes options for optimizing your website’s CSS, JavaScript, and HTML, as well as image optimization and lazy loading.
Key features of the LiteSpeed Cache plugin
Some of the key features of the LiteSpeed Cache plugin include:
Browser and server-side caching: LiteSpeed Cache can cache pages and posts on the browser and on the server, allowing for faster page load times and reduced server load.
Gzip compression: The plugin can compress your website’s files using Gzip, which can reduce their size and improve the speed at which they are delivered to visitors.
Support for CDNs: LiteSpeed Cache can integrate with content delivery networks (CDNs), which can help distribute your website’s content across multiple servers, improving its performance and reducing the load on your own server.
Optimization of CSS, JavaScript, and HTML: The plugin includes options for optimizing your website’s CSS, JavaScript, and HTML files, which can reduce their size and improve their performance.
Image optimization and lazy loading: LiteSpeed Cache can optimize your website’s images, reducing their file size and improving their loading times. It also includes lazy loading, which can improve the loading times of pages with many images by only loading images as they are needed.
Reset Litespeed cache default settings:
LS cache offers a reset to the default feature of settings. To do so follow these steps.
Login to your website WordPress admin dashboard using your credentials.
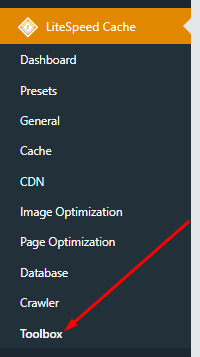
Go to the LiteSpeed Cache -> toolbox
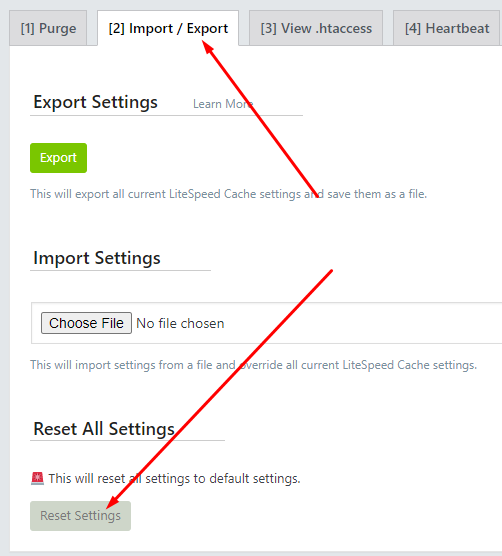
3. Now go to the Import/Export option you can see a reset button you can press that and all will be done.
Show-hide or collapse-expand functionality allows users to hide or show content on a web page by clicking on a designated button or link. This can be useful for displaying large amounts of information in a compact way, or for organizing content into sections that can be revealed as needed. So here in this article, we will learn about show-hide / collapse-expand WordPress.
In WordPress, this functionality can be implemented using plugins, which are add-ons that extend the capabilities of the WordPress platform. There are many different show-hide/collapse-expand plugins available, and the best one for you will depend on your specific needs and preferences. Some popular options include WP Collapse-O-Matic, Simple Show Hide, and Collapse-Pro. To find the right plugin for your site, you may want to do some research and read reviews to compare the features and functionality of different options.
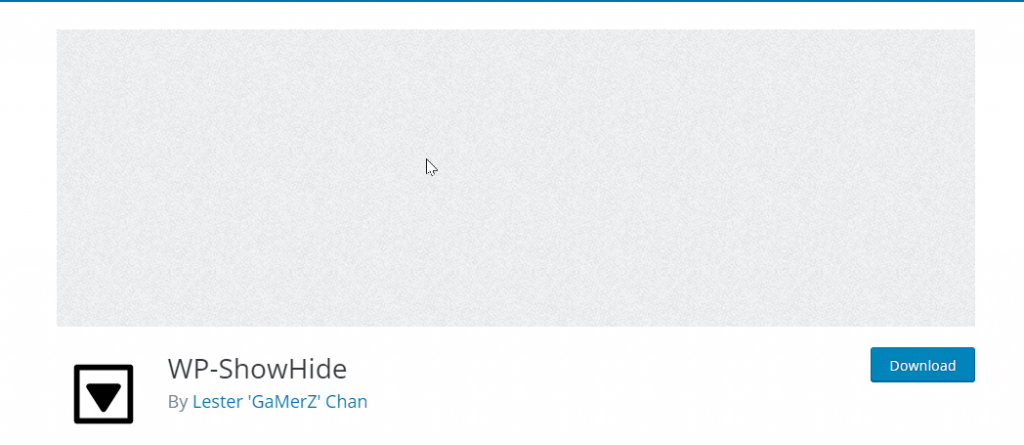
WP-ShowHide
WP-ShowHide is a WordPress plugin that allows you to easily add a show/hide toggle to your WordPress site. This can be useful for hiding or revealing content on your sites, such as spoilers, spoilers, or additional information. To use the plugin, you can follow these steps:
Install and activate the WP-ShowHide plugin on your WordPress site.
Configure the plugin settings by going to Settings > WP-ShowHide in the WordPress admin dashboard. This may include options such as the toggle text, toggle style, and other customization options.
To add a show/hide toggle to your content, you can use the [showhide] shortcode provided by the plugin. The shortcode takes two arguments: the text to show (enclosed in ) and the text to hide (enclosed in ). For example:
[showhide]
[show]Click here to reveal the hidden content.[/show]
[hide]This is the hidden content.[/hide]
[/showhide]
This will display a toggle link with the text “Click here to reveal the hidden content”. When the link is clicked, the hidden content will be revealed.
Note that this is just an example of how to use the WP-ShowHide plugin. You may need to consult the plugin’s documentation or support resources for more detailed instructions and information.
Ultimate Blocks
Ultimate Blocks is a collection of custom blocks for the WordPress block editor (Gutenberg), designed to add additional functionality and design options to your WordPress site. The blocks included in Ultimate Blocks provide a range of features, including tables, testimonials, and call-to-action buttons. The blocks are designed to be easy to use and customize and can be added to any page or post on your site by simply inserting them into the block editor. Ultimate Blocks is a popular plugin among WordPress users and has received positive reviews for its feature-rich blocks and user-friendly interface.
As I mentioned earlier, there are many different show-hide/collapse-expand plugins available for WordPress. Some popular options include WP Collapse-O-Matic, Simple Show Hide, and Collapse-Pro. These plugins allow you to add show-hide/collapse-expand functionality to your WordPress site, allowing you to hide or show content on your pages and posts as needed.
To find the right plugin for your needs, you may want to do some research and read reviews to compare the features and functionality of different options. You can also try out different plugins on your site to see which ones work best for you. Keep in mind that not all plugins are compatible with all versions of WordPress, so be sure to check the plugin’s compatibility before installing it on your site.
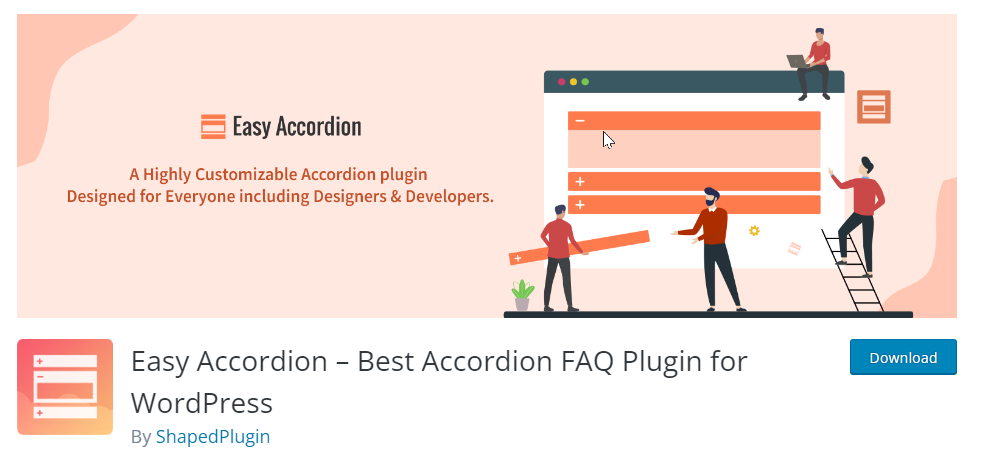
Easy Accordion WordPress plugin:
An accordion is a user interface element that allows users to expand and collapse sections of content. The Easy Accordion plugin is a WordPress plugin that allows you to easily create accordion elements on your WordPress site. To use the plugin, you can follow these steps:
Go to the plugin settings page, which can be found under Settings > Easy Accordion in the WordPress admin dashboard.
Configure the plugin settings as desired. This may include options such as the accordion style, animation settings, and other customization options.
Create a new accordion by going to the Easy Accordion page in the WordPress admin dashboard, and clicking on the “Add New” button.
Enter a title for the accordion, and add the content for each accordion section using the editor provided.
Publish the accordion by clicking on the “Publish” button.
To display the accordion on your site, you can use the shortcode provided by the plugin, or you can use the Gutenberg block editor to add the accordion block to your page or post.
This is just an example of how to use the Easy Accordion plugin. You may need to consult the plugin’s documentation or support resources for more detailed instructions and information.
If you are working on some kind of customizations or developing some kind of theme or plugin in thing in WordPress you must have to read this. here we will discuss how WordPress get blog page permalink works.
WordPress development is made easy for developers due to its built-in functions. If you want to know how to get the blog page URL in WordPress this article is for you.
Details of wordpress get blog page permalink function:
In simple words, this function is used to get the URL or permalinks of one WordPress post to another post.
Syntax:
get_blog_permalink( int $blog_id, int $post_id ): string
If you are working on some kind of customizations or developing some kind of theme or plugin in thing in WordPress you must have to read this. here we will discuss how WordPress get title works.
WordPress development is made easy for developers due to its built-in functions. If you want to know how to get title of any post or page on WordPress this article is for you.
Details of function:
In simple words, this function is used to get any title of the post or page inside the WordPress site. This is used in many customizations and core code.
Syntax:
get_the_title( int|WP_Post $post ): string
in PHP it is written as:
<?php echo get_the_title( $post_id ); ?>
WordPress get title Description
If the post is protected and the visitor is not an admin, then “Protected” will be inserted before the post title. If the post is private, then “Private” will be inserted before the post title.
function get_the_title( $post = 0 ) {
	$post = get_post( $post );

	$post_title = isset( $post->post_title ) ? $post->post_title : '';
	$post_id    = isset( $post->ID ) ? $post->ID : 0;

	if ( ! is_admin() ) {
		if ( ! empty( $post->post_password ) ) {

			/* translators: %s: Protected post title. */
			$prepend = __( 'Protected: %s' );

			/**
			 * Filters the text prepended to the post title for protected posts.
			 *
			 * The filter is only applied on the front end.
			 *
			 * @since 2.8.0
			 *
			 * @param string  $prepend Text displayed before the post title.
			 *                         Default 'Protected: %s'.
			 * @param WP_Post $post    Current post object.
			 */
			$protected_title_format = apply_filters( 'protected_title_format', $prepend, $post );

			$post_title = sprintf( $protected_title_format, $post_title );
		} elseif ( isset( $post->post_status ) && 'private' === $post->post_status ) {

			/* translators: %s: Private post title. */
			$prepend = __( 'Private: %s' );

			/**
			 * Filters the text prepended to the post title of private posts.
			 *
			 * The filter is only applied on the front end.
			 *
			 * @since 2.8.0
			 *
			 * @param string  $prepend Text displayed before the post title.
			 *                         Default 'Private: %s'.
			 * @param WP_Post $post    Current post object.
			 */
			$private_title_format = apply_filters( 'private_title_format', $prepend, $post );

			$post_title = sprintf( $private_title_format, $post_title );
		}
	}

	/**
	 * Filters the post title.
	 *
	 * @since 0.71
	 *
	 * @param string $post_title The post title.
	 * @param int    $post_id    The post ID.
	 */
	return apply_filters( 'the_title', $post_title, $post_id );
}
Restoring a CyberPanel backup is so easy. Here we will discuss How to restore website backup in Cyberpanel?
Restoring a backup of the website in the CyberPanel procedure
Download the backup file.
Upload the file to the server.
Restore from cyberpanel.
Transfer to the user.
1. Download backup file.
Download your backup file from the Gdrive or any backup source where you have stored that backup file. File will be in the format of zip file.
Backup file download
2. Upload the file to the server.
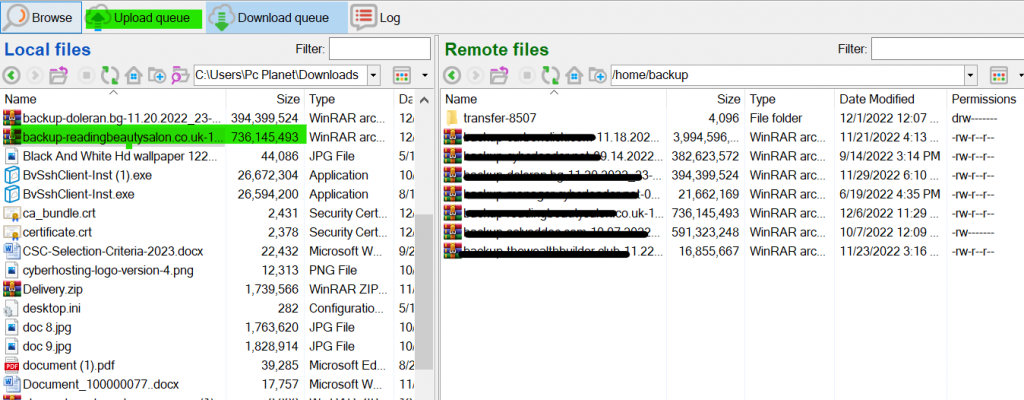
Upload the downloaded zip file to /home/backup folder using SFTP. It will take some time to upload. Drag the file to the folder. Access the SSH.
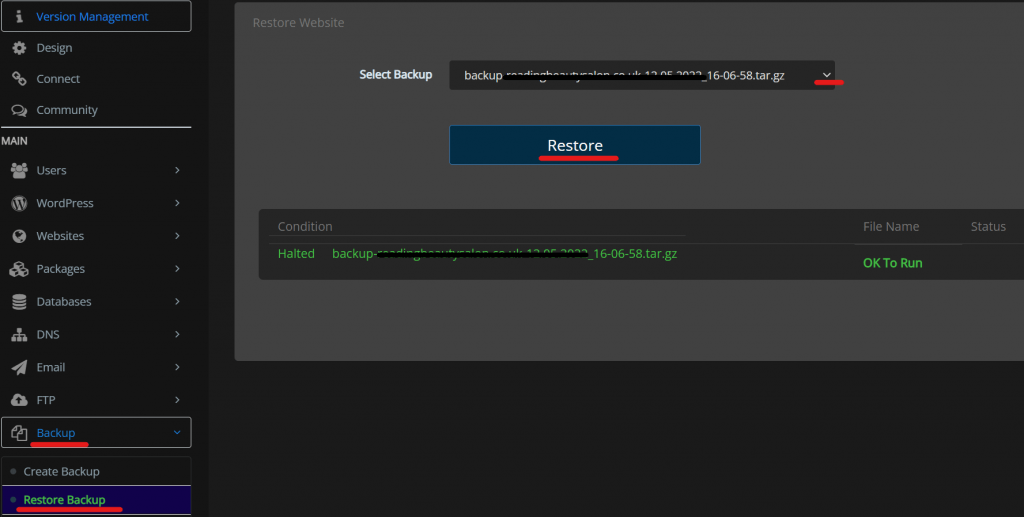
3. Restore website backup in Cyberpanel
After the file is uploaded completely. Open cyberpanel and go to Backup->Restore backup You will see file will be available with the name that you uploaded to the backup folder. Choose the backup file and click on restore.
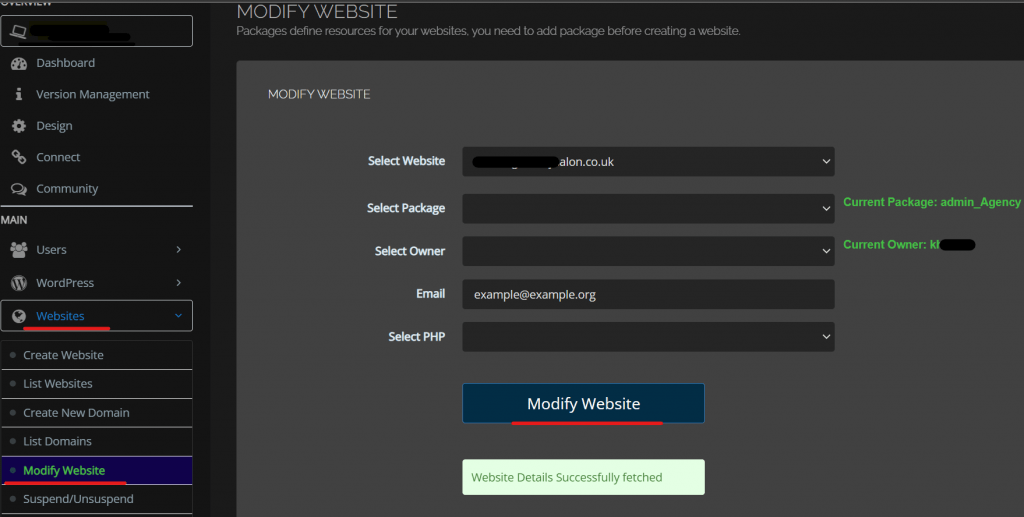
4. Transfer to the User/Client
Now assign the website to the client if you have any other user or client Go To Websites-> Modify Website Select the website and set the owner of the website choose the php version and click on Modify Website.