Factors Affecting WordPress website page Speed

Factors Affecting WordPress website page Speed

Here in this article we are going to discuss Factors Affecting WordPress website page Speed.

Do you like websites which take some time to load? Do you want to visit again on site on which you wait for page to open?

I think no one like to wait for loading of slow sites. Users always want a quick response from the website. After clicking the link they don’t want to wait and waste their time.

Above is the user perspective now if we come to the website owner’s view, the owner never wants to lose his/her visitor from the site. But we know there are a large number of things which affect page speed and load of our website. We know it is not possible to list all but we mention a few things that are common for this.

Factors Affecting WordPress website page Speed

What do we learn in this article?

  1. What is page load and speed?
  2. Why Page speed and load is important?
  3. Factors Affecting WordPress Website Loading Speed.
    1. Unoptimized images
    2. Irrelevant, extra, and outdated Plugins and themes
    3. Cache Plugin and its configurations.
    4. Extra and unoptimized CSS and JS.
    5. Hosting server
  4. How to check Page speed?
  5. How to solve the problems stated above?

What is page load time and speed?

Page speed is the loading speed for your page. It mean that how fast your page loads for your user. Acutely the time between the click by user and the view of page.

You can say that page speed is the page load time or time taken for the first bit. Site speed and page speed are two different things but sometimes we mixed both as one.

Now if we look at load time, Load time is the total time taken to download whole page and display it. When the whole content is there then we can say that this is the load time for our page.

Why Page speed and load is important?

As we know that now the internet is going fast and fast every day. With the increasing speed of the internet websites also need to be fast. As we no if your site is slow then there is no space for your website.

Now users want that website to load fast. So he can get his result as soon as possible. The important issue with having a slow website is that your users will often lose patience and leave. But this is not your user that wants this there are a lot of other important things for which your page speed is important.

Website ranking depends upon different things and these all relate to your page speed. If you want to rank high your site you need to improve your bounce rate, SEO, etc. Google as well as other search engines check all these things.

If your website is fast google always prefer fast site. In this way your SEO score will improve and when your SEO took you up visitor come and they will navigate between the page if your site is fast. This will improve your bounce rate.

Factors Affecting WordPress Website Loading Speed:

There are a large number of factor that affects your website page speed and make it slow here we will discuss the most common factor that affects the page speed. So stay with us to check these:

1: Unoptimized images

The most common mistake that people makes which cause there site slow Is the use of unoptimized images you create an image and upload it without optimizing it is not a good move. You must optimize your image before upload it on your site.

Use of unoptimized images is one of the common mistake made by most of us. We will also discuss how to overcome this issue later.

2: Irrelevant, extra, and outdated Plugins and themes

One of the big reason of getting site slow in WordPress user. The use of irrelevant, extra, outdated and pirated plugins. Sometime people see any new plugin and install it to test and they didn’t remove it, this thing slow down your site. There are also some user who like to use pirated plugin because they don’t want to pay for it that thing is very bad for their speed and security.

Many of us usually don’t like to update plugin scar of being destroy settings. More you have these thing more your site is slow.

When you install WordPress some Default themes also come with that. Most of the user never touch them and also never delete that make more load on server and cause site slow.

3: Cache Plugin and its configurations:

Use of cache plugin is very important to speed up your site. There are a lot of Cache plugin in market you can use them. There are a lot of free and also paid too. Use of cache plugin is is good but the important thing you have to configure it in right way. if you don’t know how to configure it then using this cause extra plugin only.

4: Extra and unoptimized CSS and JS:

The main function or propose to use cache plugin is to optimize extra and unoptimized CSS and JS. But where did it come. Acutely most of WordPress users like to buy ready made themes instant of making there own and all. They buy theme and plugin from any where and use it.

But the bad thing is that themes are not according to your requirement theme and plugin fulfill yours but also have a lot of extra and unoptimized JS and CSS files that caused the slow site issue.

6: Hosting server:

Chose of hosting is one of another important affect on site speed. If you have a big and high traffic site and you host it at a shared plan. then you cant get the required speed.

There are also other things which you need to keep in mind while selecting host. Like if your visitor are from India and your site is hosted in US then this is also a very bad move.

How to check Page speed?

There are a lot of ways to check Page speed of your website. Here we discuss some common page speed tools with are commonly used to check the performance of your website.

Google PageSpeed Insights:

Google PageSpeed Insights

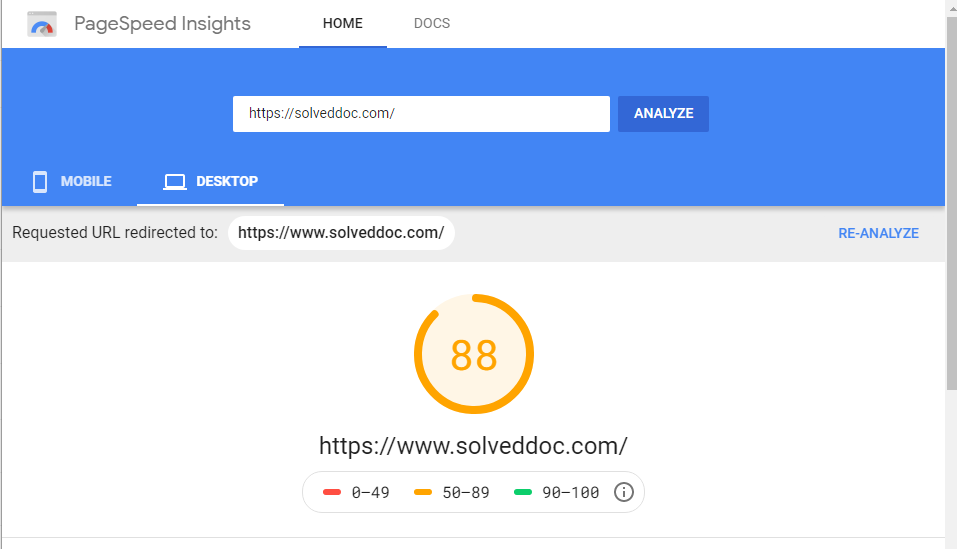
Google PageSpeed Insights is one of the simple and most powerful tool to check the page speed of any website. It gives you both Mobile and Desktop page speed score. So you can easily check and compare the performance of your website.

This Google PageSpeed Insights also give you the issues details and this is very important for your SEO term.

GT Metrix:

GT Metrix:
GT Metrix

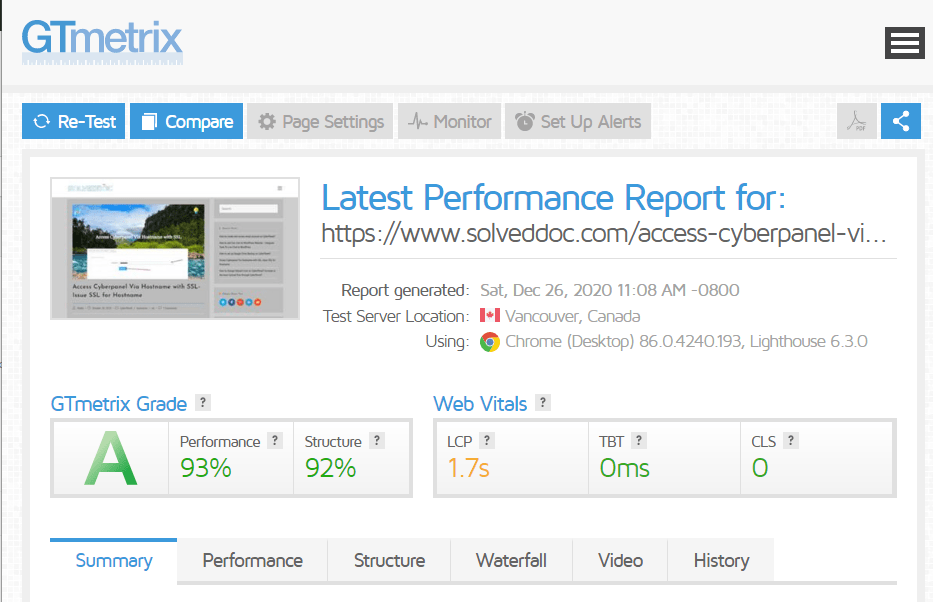
This is an other tool that helps you to check your page speed and helps you to improve you site speed and ranking. GTMatrix is also a great tool to check the performance of you site click here to visit GTMatix and check you page speed.

Pingdom Speed Test:

Pingdom Speed Test:
Pingdom Speed Test

Pingdom Speed Test is also a speed test tool. They says that they are cost effective and reliable uptime and performance monitoring provider for your website. They give you a kind of brief and detailed report about your website.

Web Page Test:

Web Page Test:
Web Page Test

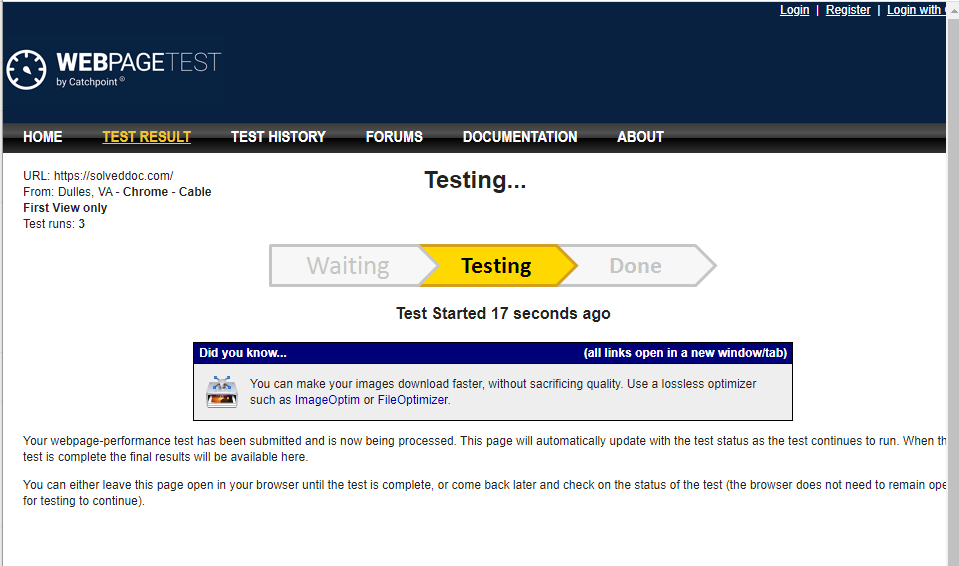
This tool is not simple as other this a a tool which give you a detailed view about your website. But this tool worth look. This will give you information about the Security, First Byte, Keep-Live, Compress transfer, Cache static etc.

There are also many other tools but for now we will discuss only these.

How to solve the problems stated above?

AT the last of this article we will tell you how you can solve the problem stated above.

Optimize your Unoptimized images:

You have a lot of options to optimize your images, you can optimize you images using different ways like you can optimize before and after uploading we will give you name of some plugins and methods through which you can optimize your images before and after uploading to the site.

Optimize your images before upload:

You can optimize your images before uploading. This is one of the core factor from the factors affecting WordPress website page Speed.

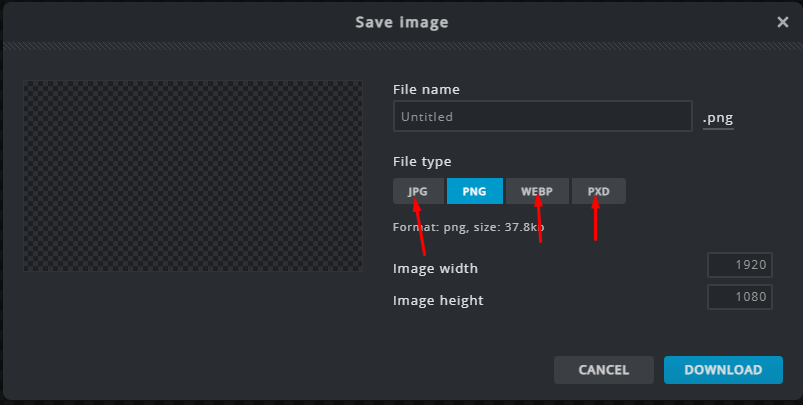
The optimize your images there are few basic thing you have to take care of, Like always use JPG, webp, etc. versions of image files instant of using PNG.

This is a good and intelligent move to optimize images before uploading it on live site. You can optimize your Images before upload using differnt tools. I will state some of them here.

  1. Pixler Online Editor
  2. Adobe Photo Shop
  3. Image optimizer
  4. Tiny PNG
  5. Optimizilla

You can optimize your images before uploading using these tools and editors. there are large number of tutorials to do so. Go get any of these tools and optimize your image before upload.

Optimize your images before upload

Optimize Images Through Plugins:

Better move is you can upload optimize images but if you didn’t do that and after upload you fell that you have to optimize these so in this case you can now optimize your images using plugin.

Here I will mention some plugin through which you can easily optimize your images. Even you have old images and you want to optimize them.

  1. Smush
  2. Optimole
  3. ShortPixel Image Optimizer
  4. Ls Cache
  5. Imagify

Using these plugins you can easily optimize your images by just following some steps.

Optimize Images Through Plugins:
Optimize Images Through Plugins

Remove Irrelevant, extra, and outdated Plugins and themes:

This is one of the main reason and it is very easy to solve this issue.

Just need to login to your system and check how many plugins need Updates. Also check which are the inactive or extra plugins which you don’t need or without those you can easily do your work.

One of the best thing to remember in this section is to remove the default theme mostly people do not remove default theme and keep those.

GO to the admin dashboard and check the inactive plugins under PLUGIN->INSTALLED PLUGIN->INACTIVE.

PLUGIN->INSTALLED PLUGIN->INACTIVE.
PLUGIN->INSTALLED PLUGIN->INACTIVE

Cache Plugin and its configurations:

Now a days there are a lot of cache plugins which you can use to get a speed on your site but the question is how to use these plugins on your site.

I must say configuration of a cache plugin is an important and critical phase. Here are some popular cache plugins.

  1. Ls cache
  2. WP Rocket
  3. Auto Optimizer
  4. Flywheel

You can follow some of these guides to configure these cache plugins.

The Beginner’s Guide to LiteSpeed Cache for WordPress

Find the Best Settings for your Site

Cache Plugin and its configurations:
Cache Plugin and its configurations

Extra and unoptimized CSS and JS:

Using above plugins you can optimize extra CSS and JS but the question is where it came from. Extra CSS come in the Ready made themes so to avoid these better to use a custom theme that gives you the css and js that you needed.

Chose a Good Hosting server:

The best thing and the hard decision to make is the chose of good and reliable server.

If you have a big sized WordPress site and you bought a shared plan that is not a good move at all. There are some things which you need to take care of before buying a server.

  1. Your target location and server location
  2. Your site content and your server capacity
  3. Selection of Server providers
  4. Shared, VPS or dedicated server choice.

These are some steps and thing you need to take care of before doing and looking for speed. these are Factors Affecting WordPress website page Speed. And we also stated how you can remove Factors Affecting WordPress website page Speed.

How to add live chat on WordPress Website – Integrate Tawk.To Live Chat to WordPress

Follow US on Facebook / Twitter Instagram .

How to add Subdomain in CyberPanel?

add subdomain

The process to add Child domain or subdomain in CyberPanel is very easy and short. Here i will tell you how to add subdomain in CyberPanel under any main domain or website.

How to Create Child Domain under main website?

To create child domain for a main or master domain you just need to go to.

Websites->List Websites->Manage

Manage of that website for which you want to create the subdomain.

Websites->List Websites->Manage

And click the Manage button you can also follow this URL:

https://<YOUR IP>:8090/websites/example.com

When you click the manage button you can see the website manager screen. This screen has a a lot of option. Like LOGS, DOMIANS, FILES, CONFIGRATIONS, ETC.

Got to the Domains part and click the Add Domains button.

Add Domains
Add Domains

When you click on this option you are asked to provide the details for the subdomain you want to add.

Details for the subdomain you want to add

After providing the details like:

  1. Domain name
  2. Path (Leave it empty)
  3. Select PHP version
  4. In additional features (Select SSL, DKIM, Open_basedir Protection)

Click the Create Domain button and you will receive a success massage from the panel.

Create Domain
Create Domain

Once child domain is created from here. Now you can list child domain from two ways.

  1. Go to website-> List child Domain
website-> List child Domain

2. From the Websites-> List Websites -> Manage-> List Domains

Websites-> List Websites -> Manage-> List Domains

Read more about child domain: How to create, delete and manage Child Domains in CyberPanel?

Follow US on Facebook / Twitter Instagram .

How to Integrate Google AdMob to your React Native Application?

Do you want to integrate your AdMob to React Native Application?

If you want to earn from your React Native Applications you need to integrate AdMob with your React Native Application. So Google AdMobs helps you to earn from your applications.

Mostly React Native Packages are installed using a single command. In this article, i will tell you the simplest way to install, Integrate, and use AdMob in your react native application.

Create AdMob Account:

First of all you must have a AdMob account. Go to this Article and check how you can create Admob account. The process of creating Admob account is very straight and simple. In this Article All steps are mentioned and described briefly.

How to Install React Native AdMob:

For the integration of Admob with react native first of all we have to Install React native AdMob in your project its is very easy to do so here we discuss the steps :

There are different packages to integrate Admob with your React Native Project but here I discuss that one which I personally use and I think have easy integration than Others.

React-native-admob is bossily a react-native module for Google AdMob Banners, Interstitials, and Rewarded Videos, and also DFP Banners. To install this module Run the command stated below.

npm i @talaikis/react-native-admob

In older versions of React native, you need to configure this module manually but now This fork is a working version for RN 0.60+. Don’t link this package, auto-linking works fine. No need to do extra linking at all.

Open your already created application and install this module using the line stated above.

Open your already created application and install this module using the line stated above.

Once installation process is done. Nothing to do other than this.

React native AdMob Types:

React native AdMob Allows four types of Ads units for its user:

  • AdMobBanner,
  • AdMobInterstitial,
  • PublisherBanner,
  • AdMobRewarded,

AdMobBanner,

AdMobBanner is the Banner Add for your Application you can add it as sticky location on at any place on any page of your applicatio.

To read more about this click here.

Usage

import {
  AdMobBanner,
 } from 'react-native-admob'

// Display a banner
<AdMobBanner
  adSize="fullBanner"
  adUnitID="your-admob-unit-id"
  testDevices={[AdMobBanner.simulatorId]}
  onAdFailedToLoad={error => console.error(error)}
/>

AdMobInterstitial,

This type of React-native AdMob has imperative API. You can use this at any function call.

To ready more Click Here.

Usage

import {
  AdMobInterstitial
} from '@talaikis/react-native-admob';

  componentDidMount() {
  AdMobInterstitial.setTestDevices([AdMobInterstitial.simulatorId]);
  AdMobInterstitial.setAdUnitID('ca-app-pub-your_ad-uint');

  AdMobInterstitial.addEventListener('adLoaded', () =>
    console.log('AdMobInterstitial adLoaded'),
  );
  AdMobInterstitial.addEventListener('adFailedToLoad', error =>
    console.warn(error),
  );
  AdMobInterstitial.addEventListener('adOpened', () =>
    console.log('AdMobInterstitial => adOpened'),
  );
  AdMobInterstitial.addEventListener('adClosed', () => {
    console.log('AdMobInterstitial => adClosed');
    AdMobInterstitial.requestAd().catch(error => console.warn(error));
  });
  AdMobInterstitial.addEventListener('adLeftApplication', () =>
    console.log('AdMobInterstitial => adLeftApplication'),
  );

  AdMobInterstitial.requestAd().catch(error => console.warn(error));
}

componentWillUnmount() {
  AdMobInterstitial.removeAllListeners();
}


showInterstitial() {
  AdMobInterstitial.showAd().catch(error => console.warn(error));
}

  componentWillUnmount() {
    AdMobRewarded.removeAllListeners();
  }

PublisherBanner,

This is just Like AdMobBanner with the addition of 2 extra properties:

Click here for more details:

Usage:

import {
  PublisherBanner,
  } from 'react-native-admob'
 
 <PublisherBanner
  adSize="fullBanner"
  adUnitID="your-admob-unit-id"
  testDevices={[PublisherBanner.simulatorId]}
  onAdFailedToLoad={error => console.error(error)}
  onAppEvent={event => console.log(event.name, event.info)}
/>

AdMobRewarded,

In comparison to the AdMobBanner and PublisherBanner which have a declaritive API, the AdMobRewarded has an imperative API, just like the AdMobInterstitial.

Click Here to read more:

Usage:

import {
  AdMobRewarded,
  } from 'react-native-admob';
 

componentDidMount() {
  AdMobRewarded.setTestDevices([AdMobRewarded.simulatorId]);
  AdMobRewarded.setAdUnitID('your ad unit');

  AdMobRewarded.addEventListener('rewarded', reward =>
    console.log('AdMobRewarded => rewarded', reward),
  );
  AdMobRewarded.addEventListener('adLoaded', () =>
    console.log('AdMobRewarded => adLoaded'),
  );
  AdMobRewarded.addEventListener('adFailedToLoad', error =>
    console.warn(error),
  );
  AdMobRewarded.addEventListener('adOpened', () =>
    console.log('AdMobRewarded => adOpened'),
  );
  AdMobRewarded.addEventListener('videoStarted', () =>
    console.log('AdMobRewarded => videoStarted'),
  );
  AdMobRewarded.addEventListener('adClosed', () => {
    console.log('AdMobRewarded => adClosed');
    AdMobRewarded.requestAd().catch(error => console.warn(error));
  });
  AdMobRewarded.addEventListener('adLeftApplication', () =>
    console.log('AdMobRewarded => adLeftApplication'),
  );

  AdMobRewarded.requestAd().catch(error => console.warn(error));


}

componentWillUnmount() {
  AdMobRewarded.removeAllListeners();
}

showRewarded() {
  AdMobRewarded.showAd().catch(error => console.warn(error));
}

How to change Upload Limit on CyberPanel? Increase or decrease Upload Size through CyberPanel?

How to create a staging or clone of the WordPress site from CyberPanel?

Sometime you may need to create a clone or staging site of your WordPress site to make changes and test them. CyberPanel allows to create staging or clone site easily.

In this article, I will tell you how you can create a staging or clone of your WordPress site from CyberPanel.

You can create a staging site from CyberPanel and after doing that you can merge it back to the Original or master site.

Always keep backup before doing anything. So if you lost anything you can restore. The process of creating a staging site is very easy to follow along to do so.

Create a Clone or create a Staging for your site:

Step 1: Log in to CyberPanel and Go to Manage Website

Create a clone or staging site in cyberpanel is very easy. I will write the steps below to do so.

The first thing to do is login to your cyberpaner using your credentials on port 8090.

Then go to the Websites->List Websites->Manage

 login to your cyberpaner using your credentials on port 8090

Step 2: Create a clone or Staging site

In the manage Dashboard, you can see the CLONE/STAGING button press that to process.

Create a clone or Staging site

Add the Domain name which you want to use as staging or clone.

Add the Domain name which you want to use as staging or clone

It will take some time and once staging is done it will show you this screen.

It will take some time and once staging is done it will show you this screen

Now you must have to set A records for the staging domain you create Like staging.yourdomain.com. Visit your DNS manager and add A record for this staging site. No need to add any other records. A record is enough for staging.

In cyberpanel got to Websites->List Child Domains you can check the staging site.

Push back, Copy or sync site to Master:

Once you did all changes to staging and now you want to sync the staging back with the master site CyberPanel allows to do this very easy to do so follow steps:

Go to the Websites-> List Child Domains:

Now on this page, you can see your staging site press the Manage button in front of your site.

you can see your staging site press the Manage button in front of your site

Now you are in the management dashboard of the staging site. You can see COPY/SYNC TO MASTER from here you can push back your staging to the original.

You can see COPY/SYNC TO MASTER from here you can push back your staging to the original.

Here you can chose the options:

  1. Copy complete Data
  2. Sync Database
  3. Copy Changed Files
Copy complete Data

Chose any option from them according to your requirement. Once the process of sync or coping is done now go back to your original site and check the changes if you have any cache plugin clear cache and then check the changes.

How to set up Google Drive Backup on CyberPanel?

How to Create a Website and install WordPress on CyberPanel one-click installation?

In this article, I am going to tell you how to install WordPress on CyberPanel. This article is about the one-click installation of WordPress on CyberPanel.

I will briefly describe how to create a website on CyberPanel. And then we will go toward the installation of WordPress on CyberPanel. The main theme is how you can create a website and install WordPress on CyberPanel.

if you are new on CyberPanel and want to know the basic Information and usage of CyberPanel then do not leave the article i will explain some basic at the end of article.

How to create a new Website on CyberPanel?

Creating a website on CyberPanel is very simple and easy. Here the all steps to create a Website on CyberPanel are listed.

Go to the Websites-> Create Website Option in CyberPanel Menu:

Can navigate to this ULR to Create new web site:

https://your_IP:8090/websites/createWebsite
 Websites-> Create Website Option in CyberPanel Menu

Provide the following details here

  • Select Package (Default )
  • Select Owner (Admin or any other)
  • Domain name (example.com without www)
  • Email (Your email address (youremail@xyz.com))
  • Select PHP (Latest is recommended )
  • SSL (Always check)
  • DKIM (Always check)
  • Open Basedir Protection (Check )
  • Create Mail Domain (Check if you want to you on same server)
Select Package
Select Owner
Domain name
Email
Select PHP
SSL
DKIM
Open Basedir Protection
Create Mail Domain

After providing all information press Create Website Button. It will take sometime to complete and will show the confirmation massage once its Done.

How to install WordPress on your domain from CyberPanel?

When creation of your website on cyberpanel is done. Time to install WordPress on that site using CyberPanel. Just Follow these steps and do it quickly.

  1. Go to the Websites-> list websites

Can follow this URL to list all websites

https://your_IP:8090/websites/listWebsites
How to install WordPress on your domain from CyberPanel?

2. Click the Manage button to navigate to the manage website dashboard

Navigate to this URL to list all websites

https://your_IP:8090/websites/listWebsites
Manage button to navigate to the manage website dashboard

3. On the management dashboard to the last section there you found WordPress click on that.

You can also get access the dashboard through this Url

https://your_IP:8090/websites/yoursite.com
management dashboard to the last section

4. Once you click this button now you can see a screen asking for the WordPress details.

  • Blog Title (Your site Title)
  • Login User (Username)
  • Login Password (Password)
  • Email (your email address)
  • Path (Leave empty )

you can visit this URL to install WordPress.

https://Your_IP:8090/websites/yourdomain.com/wordpressInstall
WordPress details

Just Provide the information and click Install Now. It take some time and your site is there. you can check by visiting your site.

How to create an AdMob account?

How to Install Node Js on Windows?

You want to Install node js on windows 10 machine?

To start the guide to install node js on your windows 10 machine. First of all, we have to know what actually node js is. Before knowing how to install node js on your windows 10 know about the node js.

Basic node js is a JavaScript runtime environment. It simply means that the node js run-time environment includes everything you need to execute a program written in JavaScript. Now I would like to mention some points about node js for better understanding.

What is node js?

  1. Node js is free and opensource environment.
  2. Node js uses javascript on the server.
  3. Node js can generate dynamic pages, can do many operation on databases and its is available for different platforms (Operating Systems).

How to Install Node js on windows 10?

In order to install node js to your windows 10 machine. You need to follow different steps.

Download Node.js

In order to install node js on your windows 10, you have to download the Node js. To do so click here or visit this link https://nodejs.org/en/download/ in your favorite browser. Here you can see this screen.

Download Node.js

You can see the latest and current version always chose the current version from them because that is the stable one then chose the windows installer from the operating systems. you can also download:

Windows Installer (.msi)
Windows Binary (.zip)
Source Code

In 32 and 64 bits depending on your operating system.

Install Node js on windows 10:

Once your download completed now its time to install it on your machine to do so follow these steps:

  1. Click on the download file and then click install.
Install Node

2. You will receive a screen that asks you to run Wizard to install node js. Press Next.

Run Install Node

3. Now accept the License Agreement. To go to the next step.

Agreement Install Node

4. You can specify the location in your computer where you want to install the node js. By default its C:/Program Files/nodejs/ and leave as its and click Next.

Path Install Node

5. In this step you can see which node js packages you are going to install and what is disk usage, and all. Click Next to proceed.

Install Node next

6. In this step you can allow node js to Automatically install the necessary tools. you can follow the instruction from the link given on-screen. Then press Next.

Auto Install Node

7. All setup is done Press Install to install node js on your windows 10.

Install Node

Allow the installation and this installation may take some time to complete wait until the status bar show completion.

Install Node js status

8. All done now your node js is installed and you can press Finish and go ahead.

Install done Node

Verification of node js installation

Once the installation process has done you need to verify the installation of your node js on windows 10. to do so just run a simple command:

npm -v
Node js version

You can see the installed version it’s mean your installation is complete. Now your system is good to go.

How to migrate WordPress Site using Migrate Guru Step by Step guide

How to install OpenLiteSpeed on Centos?

Do you know how to install OpenLiteSpeed on Centos?

First of all, I would like to tell you that what is OpenLiteSpeed? I know most of you know that what is OpenLiteSpeed but it’s my habit to discuss things before going to deep. So OpenLiteSpeed is the Open Source edition of LiteSpeed Web Server Enterprise.

In this article, we will discuss step by step how to install OpenLiteSpeed on Centos.

How To Install OpenLiteSpeed:

First of all, you need to add the LiteSpeed repository to your centos. You can do it by using the following command.

rpm -ivh http://rpms.litespeedtech.com/centos/litespeed-repo-1.1-1.el7.noarch.rpm

Once you added the repository now you can install the OpenLiteSpeed on your server easily. To do so you have to run the command:

yum install openlitespeed

Now what? if you want to install any specific version of OpenLiteSpeed. In that case you can use this command:

yum install openlitespeed-x.x.x

Replace the x value with your required version. Like 1.6.5 or something. You can access the web server on:

http://your_ip:7080

Setup Administrator Password:

Now your LiteSpeed web server is installed. You have to set a password for the OpenLiteSpeed web server in order to access it. You can set the password by using this command:

/usr/local/lsws/admin/misc/admpass.sh

Use sudo if you don’t have root rights. you can also use this to change the OpenLiteSpeed web server password. When you run this command this will ask you User name [admin]: put admin here

OpenLiteSpeed web server password

And after that, it will ask for a password add a password and confirm that.

change OpenLiteSpeed web server password

Now your web server is go to go.

Some common commands for OpenLiteSpeed:

Here some common commands that you must need to know about the OpenLiteSpeed.

  1. To check the status of OpenLiteSpeed you can use this command.
Systemctl status lsws 

2. To stop the OpenLiteSpeed service use this command.

Systemctl stop lsws 

3. To start the OpenLiteSpeed service use this command

Systemctl start lsws 

4. To restart the OpenLiteSpeed service use this command

Systemctl restart lsws 

Directories and Logs for OpenLiteSpeed:

Now I think it’s very important to tell you about directories and logs of OpenLiteSpeed. Maybe you want to do some testing on it. Joke apart never try to do tests on anything you have not enough knowledge.

The default OpenLiteSpeed installation directory is: /usr/local/lsws

You can also start OLS using this command:

/usr/local/lsws/bin/lswsctrl start

You can also stop OLS using this command:

/usr/local/lsws/bin/lswsctrl stop

If you faced any error on OLS and want to find what is that then you can check the error log in /usr/local/lsws/logs/error.log.

Some more information about OpenLiteSpeed:

Well, the free version of LiteSpeed web servers. Although both OpenLiteSpeed and LiteSpeed ENT. are developed by the same developers. But there must be some difference between them. You can imagine a price thing and a paid thing must be different from each other.

OpenLiteSpeed has almost all the features that LiteSpeed Ent have. But there must be some difference. The main difference is OpenLiteSpeed requires a restart to load any new .htaccess file. While LiteSpeed Ent does this Automatically.

How to Install a WordPress Plugin?

How to Upgrade CyberPanel to the latest version?

If you want you upgrade your Cyberpanel to latest version then you are at right place.

Here we tell you how to upgrade CyberPanel to the latest version. this is pretty easy to upgrade CyberPanel. You can get the latest Upgraded CyberPanel through just one command.

Upgrade CyberPanel To latest version:

Here the command to upgrade the cyber panel to the latest version.

sh <(curl https://raw.githubusercontent.com/usmannasir/cyberpanel/stable/preUpgrade.sh || wget -O - https://raw.githubusercontent.com/usmannasir/cyberpanel/stable/preUpgrade.sh)

But if you do not want the latest released version. You want to install any other specific version then use another command which allows you to update the cyber panel to a specific version.

https://raw.githubusercontent.com/usmannasir/cyberpanel/<branch name>/cyberpanel_upgrade.sh

<branch name> is the name of the branch you want to install like 2.0.1

From the first command, you can also upgrade the Cyberpanel to a specific version for this you have to take care of a thing, and what id that?

sh <(curl https://raw.githubusercontent.com/usmannasir/cyberpanel/stable/preUpgrade.sh || wget -O - https://raw.githubusercontent.com/usmannasir/cyberpanel/stable/preUpgrade.sh)

When you run this command and at a point, they ask for a version you can give the version like 2.0.2 or any you want. And if you want to upgrade to the version which is not released yet get and find the version from the CyberPanel team and provide the version when this command asks for version.

Cyberpenel developers are very fast and good at updating. And introducing new features for CyberPanel users. I think they are always in a hurry to launch a new version. And trust me, they always introduce the best in the new version CyberPanel. That’s why I like them. But I don’t think auto-upgrade is possible for CyberPanel. You will need to update when they release the new version. Here I will give you a very easy way to upgrade the cyber panel. Believe me, it has only one command.

How to install OpenLiteSpeed on Centos?

How to Install CyberPanel On Centos?

How to install CyberPanel? I know everyone who came on this article will know that what is CyberPanel and want to know how to install CyberPanel. Some of you have basic knowledge and some are experts hehe.

But If you are totally new here then let me tell you that CyberPanel is a control panel. Basically, CyberPanel is a hosting control panel like the other the popular one c-panel.

Introduction of CyberPanel:

CyberPanel is a free and open-source next-generation hosting control panel. CyberPanel is Powered by LiteSpeed technologies. And mostly use by the LiteSpeed web servers. Basically CyberPanel is free but here is the twist. CyberPanel has two versions CyberPanel and CyberPanel Enterprise. There is not a huge difference between the CyberPanel and cyber panel Ent. CyberPanel Ent comes with LiteSpeed ent so that makes the difference. See here what the official web site of Cyberpanel said about CyberPanel ent.

Here in this article, I am going to tell you how to install CyberPanel on Centos. I will discuss about the installation on other Operating systems and flavors of Linux but in this, I will stay with centos.

Requirements for installation (Hardware and General requirements ):

CyberPanel requirements for installation are not so high and complicated. We discuss the main here:

  1. A server or machine with Centos
  2. Minimum 1 GB Ram
  3. SHH access with root
  4. 10GB Disk Space.

How to install CyberPanel?

CyberPanel Installation is very easy and its just one command installation. When you search for how to install cyberpanel you will foun a bunch of commands and different steps. But i perfer only one command to install CyberPanel and that command is:

sh <(curl https://cyberpanel.net/install.sh || wget -O - https://cyberpanel.net/install.sh)    

This will do have for you now you have to take care of some processes while installing CyberPanel. These are

Install Specific Version Of CyberPanel:

Now sometime you have to install a specific version of CyberPanel. This is a bit tricky. First of all, you have to wget (download) the specific branch of CyberPanel you want to install using this command:

wget https://raw.githubusercontent.com/usmannasir/cyberpanel/<branchname>/cyberpanel.sh

Now you have to assign it executable Permissions. Using this command:

chmod +x cyberpanel.sh

Now execute for installation:

./cyberpanel.sh  

How to Upgrade CyberPanel to the latest version?