Here you will get all details about CyberPanel logs. I will clear all points on which time which logs you need to check.
CyberPanel Main logs:
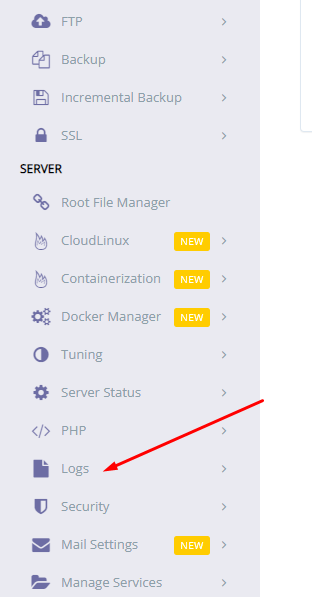
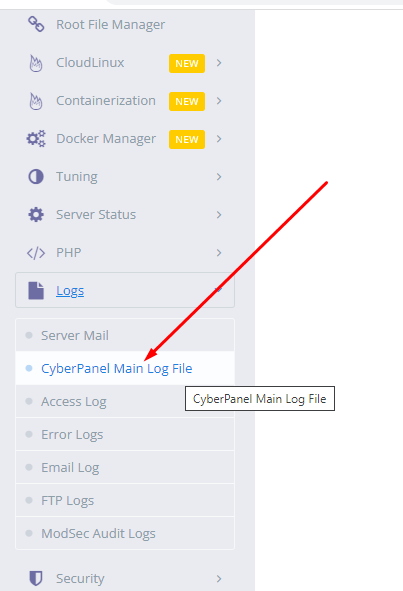
Where to check cyberpanel main logs:
Login to cyberpanel and go to Cyberpanel dashboard.
Click on logs
and then click on cyberpanel main log
When you need to check:
You need to check CyberPanel’s main logs when any issue related to Cyberpanel happens like SSL for the website, backup, creation of backup, etc.
when SSL cyberpanel issues. we need to check cyberpanel logs
Error logs
Where to check error logs:
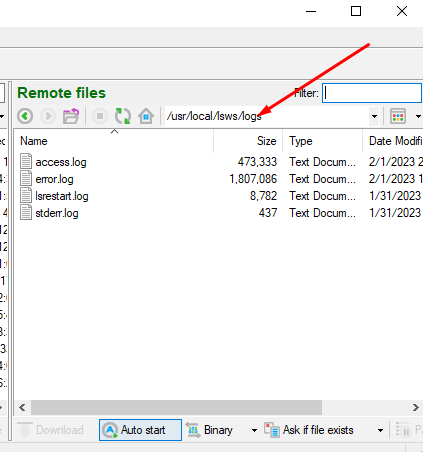
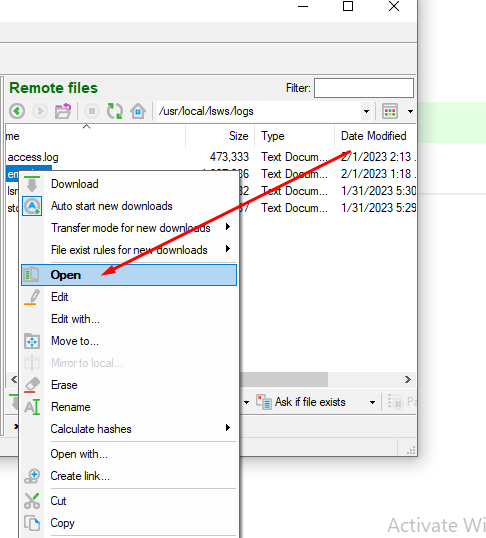
login to bitwise SSH client and click on New SFTP window
And go to the /usr/local/lswsl/logs directory
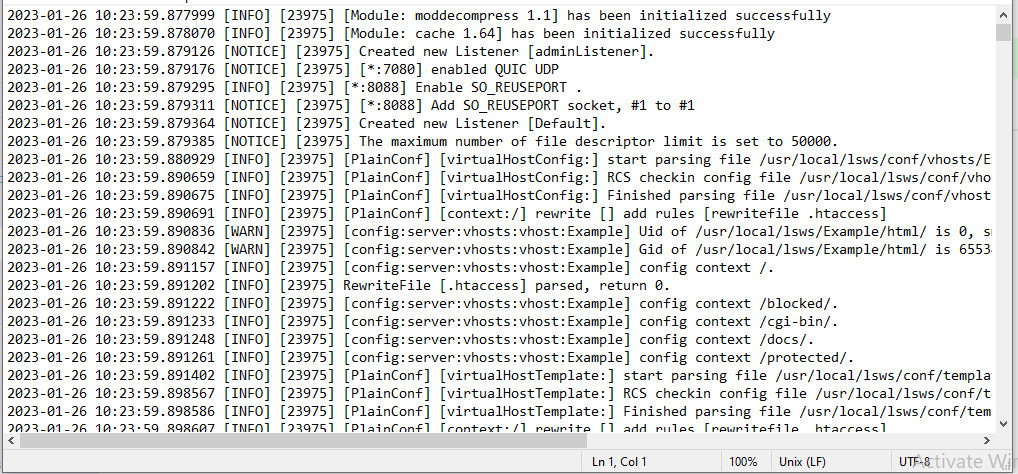
And here you will find error.log file open that and you can check all logs
error log will be like this you can also open error logs from the terminal using the command
cat /usr/local/lswsl/logs/error.log
When you need to check:
Error logs help you to debug and solve website-level issues. Like 500 errors on site, 521, 404, 403 and cont connection
STDERR Logs
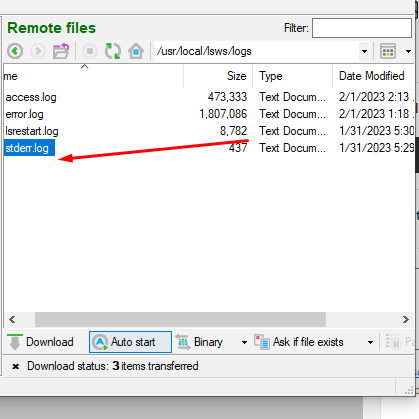
Where to check the Stderr log
login to bitvise SSH client and click on the New SFTP window
And go to the /usr/local/lswsl/logs directory
And here you will find stderr.log file open that and you can check all logs
you can also open stderr logs from the terminal using the command
cat /usr/local/lswsl/logs/stderr.log
When you need to check:
Stderr is the standard error message that is used to print the output on the screen or windows terminal. Stderr is used to print the error on the output screen or window terminal.
Email Logs
Where to check cyberpanel main logs:
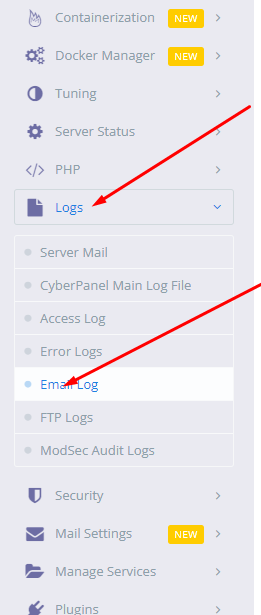
login to cyberpanel go to the dashboard
Click on logs and the email logs
When you need to check:
Use Email Log to find and review email messages that people in your organization send and receive. You can find all messages within a specific time range, or search for messages by sender, date, or message ID
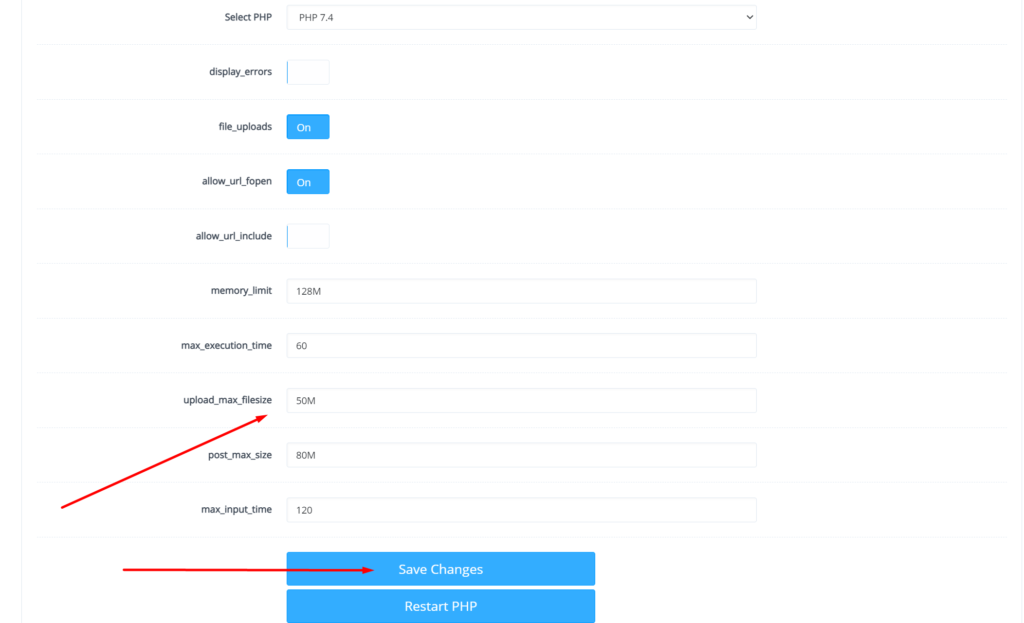
Change PHP upload limit is not big deal in CyberPanel you just need to follow this short article and all will go good. In cyberpanel upload_max_filesize is just a matter of few clicks. So now to increase upload limit just follow few steps:
Step-1 Login CyberPanel:
Login to your CyberPanel on port 8090 and any other if you have changed. URL will be like:
https://<your-ip>:8090
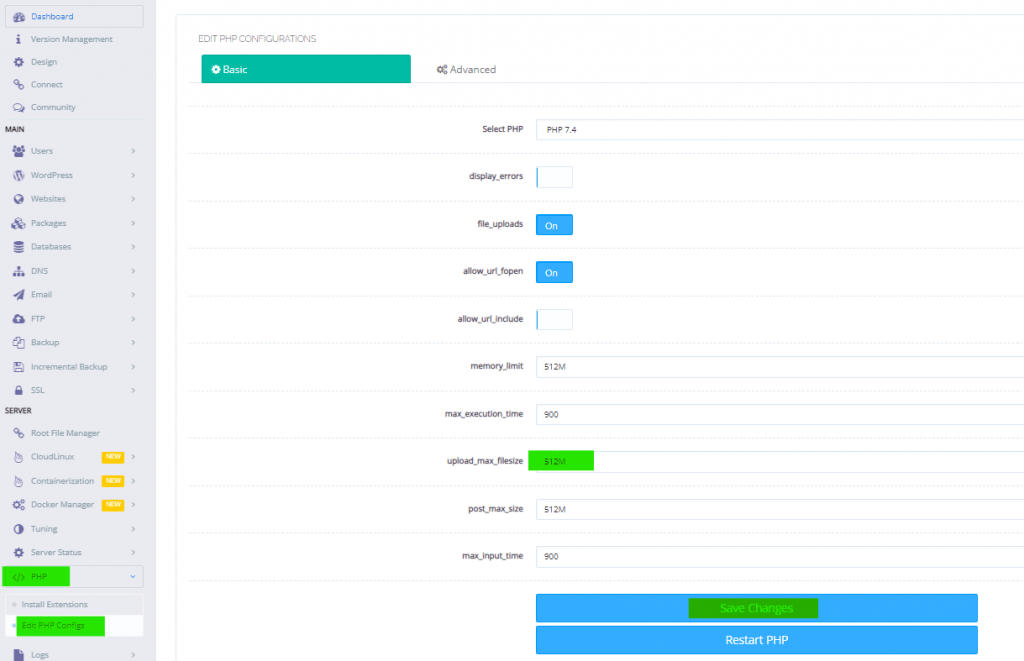
Step-2 Go to Edit PHP Configs
Go to PHP → Eidt PHP Configs → Basic, and select the version of PHP on which you want to change values of the required data.
Step-3 Change PHP upload limit CyberPanel
Set the limit in upload_max_filesize according to your choice and then click on Save Changes
After doing that also press the Restart PHP button this thing will apply all changes on server level and you can now good to go with it.
We have an other article on this as well check here. For old version CyberPanel official guide is here.
Cyberpanel remote backup stores files on another server. This helps to retains the files from the loss or any other attack. That provides users with a system for the backup, storage, and recovery of website files.
Procedure to Perform Remote Backup
Setup a Remote server
Enable API access
Setup Remote backup
Setup a Remote server
Organize a remote server which you want to use for the backup purpose. Create a new server with cyberpanel (Remote server)
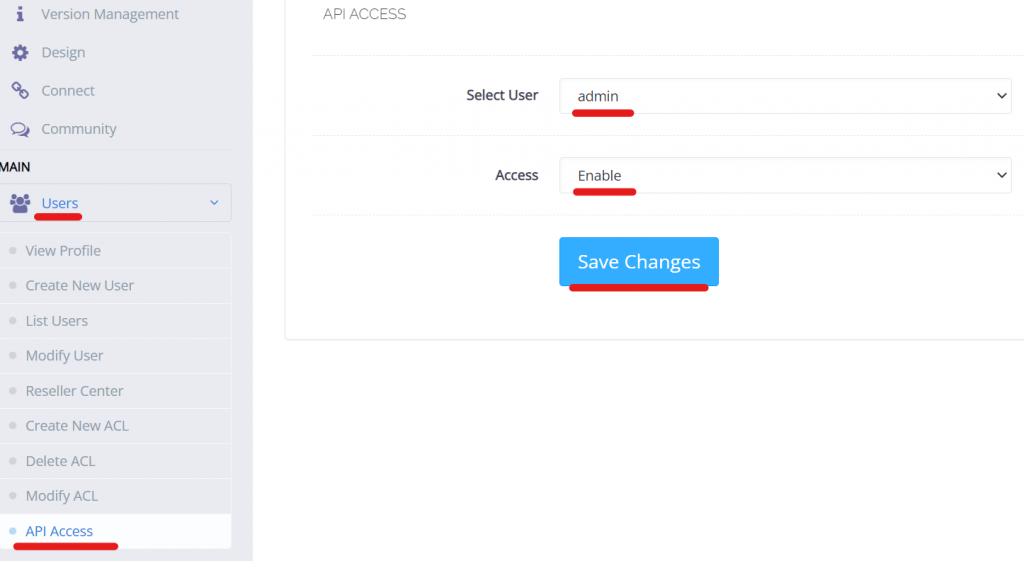
Enable API access
Go to Cyberpanel where you are managing your websites
Open Users –> API Access->
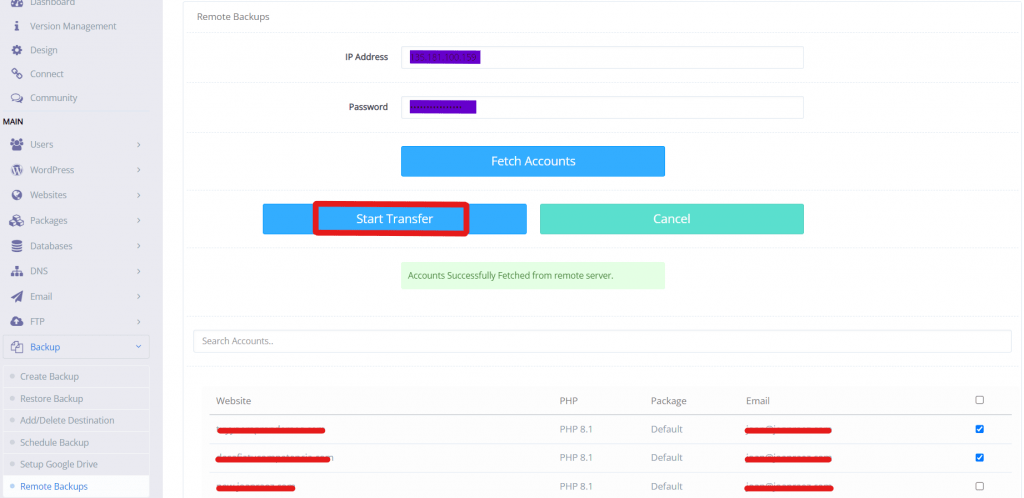
Setup a Remote backup.
Open a remote server
Go-To Backup–>Remote backup
Enter the Server IP Address and Password of the server where the domain exist
Fetch Record from that server .
Select the website for which you want to create backup. (You can also choose multiple sites)
Then click on Start Transfer.(I will take some time if the size is large)
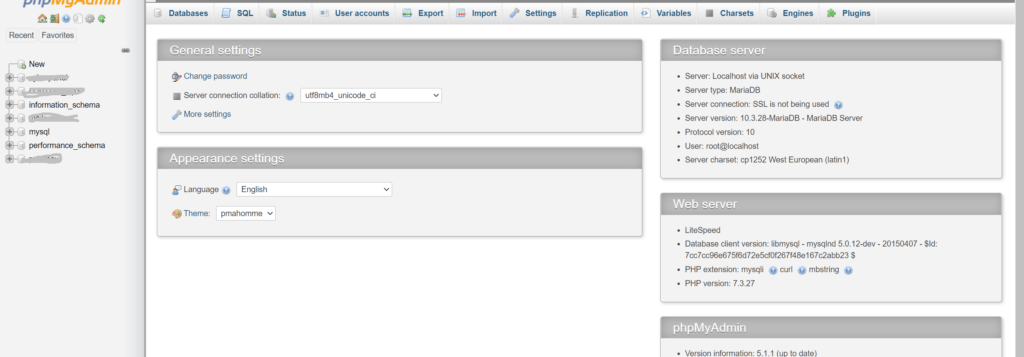
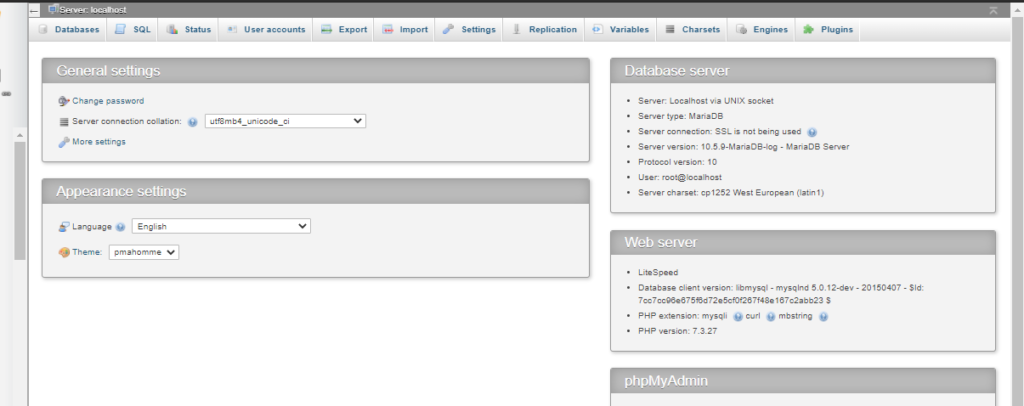
Step by Step procedure to Change upload limit for phpMyAdmin
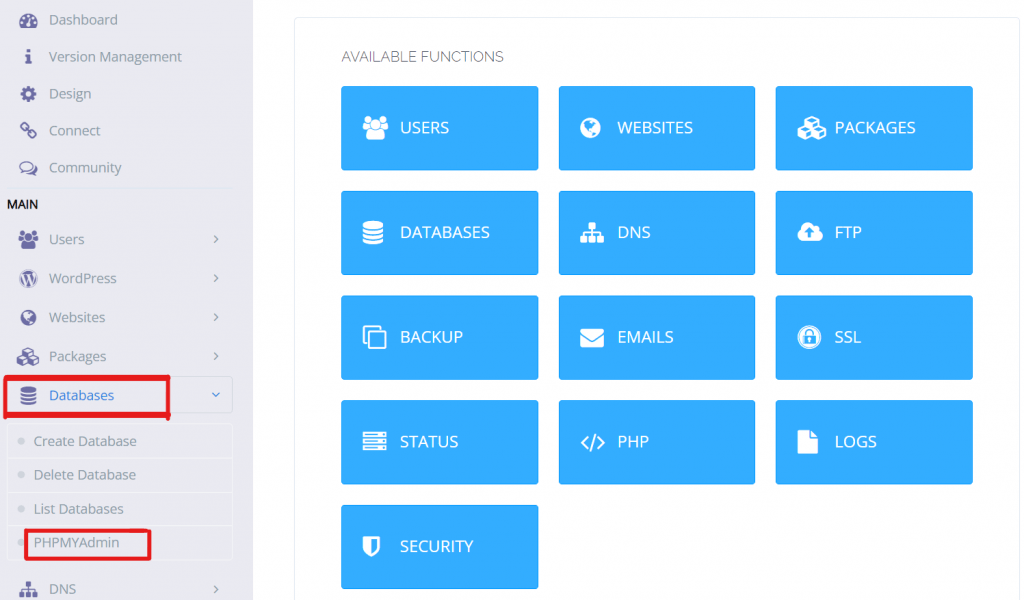
Step 1. Access PhpMyAdmin from cyberpanel
Open the Cyberpanel Dashboard. Go to Databases –> PHPMYADMIN
This will redirect you on the PhpMyAdmin.
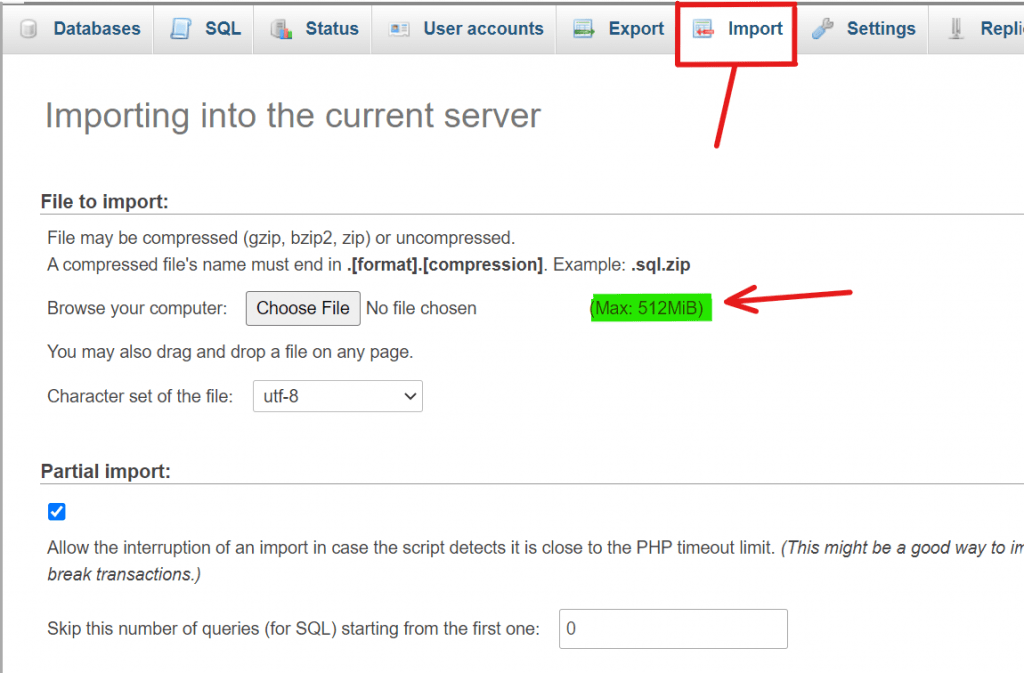
Step 2. Check the Max PHP limit.
Go to the PhpMyAdmin dashboard Click on the “Import“. You will see the upload limit size.
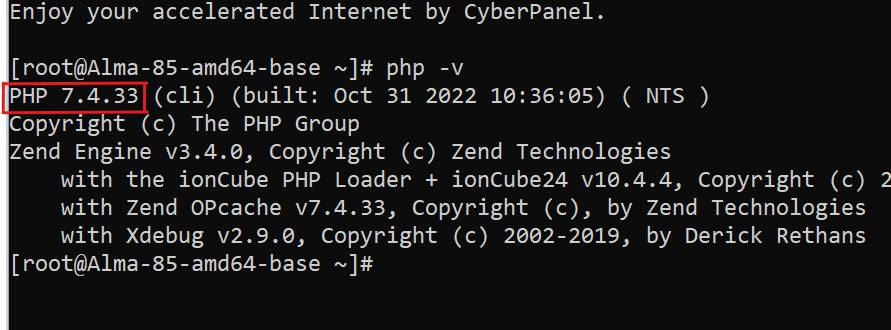
Step 3. Check PHP version.
Open SSH terminal Run Command “php -v” and you will get to know the PHP version.
Step 4. Change limit in cyberpanel
Open Cyberpanel dashboard. Go to PHP–>Edit PHP configs Select the PHP version 7.4 (which you found in your terminal) Set the “upload_max_size” you want and save . Then click on the RESTART PHP.
The upload size of PHP will be changed. Go to the PHPMYADMIN dashboard you will see the changes will be done.
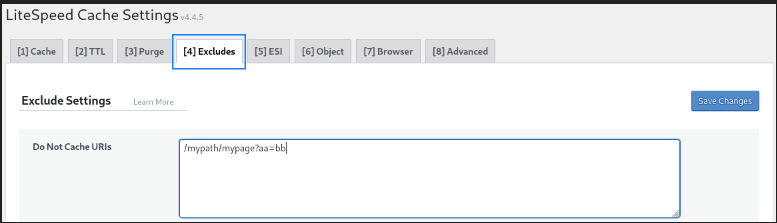
In some cases you need to exclude some pages from being cached from Litespeed. in this article, we are going to discuss How to exclude a specific page from LiteSpeed Cache?
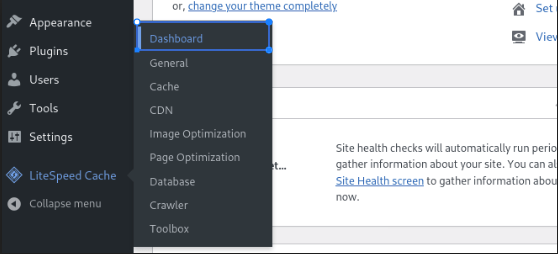
Login to the Word Press dashboard, click on Lite Speed cache, and then click the Dashboard button.
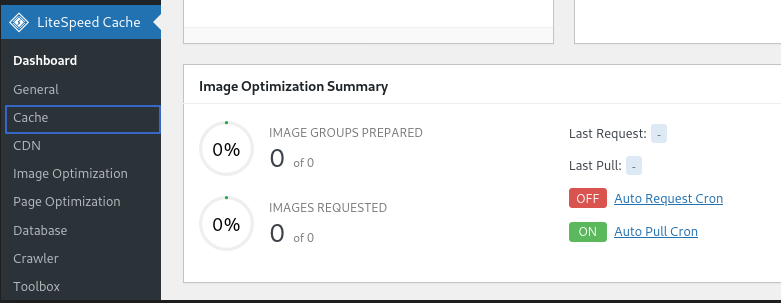
After clicking the Dashboard button select the cache option.
When you click on the cache, you will see LiteSpeed Cache Settings. Select the Excludes button and paste the URL for the page you want to exclude.
In this article, we are going to write how you can install CyberPanel, how you can access CyberPanel, what are the features of CyberPanel and all. This is a CyberPanel Complete Tutorial.
How to install CyberPanel:
First of all, we make the server and copy the server IP, and go to the terminal and write in terminal ssh root@ and paste the IP address.
Write CyberPanel installation command, CyberPanel installation command given below. (I) wget -O installer.sh https://cyberpanel.net/install.sh Then you run tp this script following the next command: (ii) chmod 755 installer.sh (iii) sh installer.sh Finally, you have to choose the right option to complete the installation: CyberPanel Installer
(1) Install CyberPanel.
(2) Exit. Please enter the number[1-2]:
(1) Install CyberPanel with OpenLiteSpeed.
(2) Install Cyberpanel with LiteSpeed Enterprise.
(3) Exit. Please enter the number[1-3]:
You can easily install CyberPanel on your system by selecting option 1.
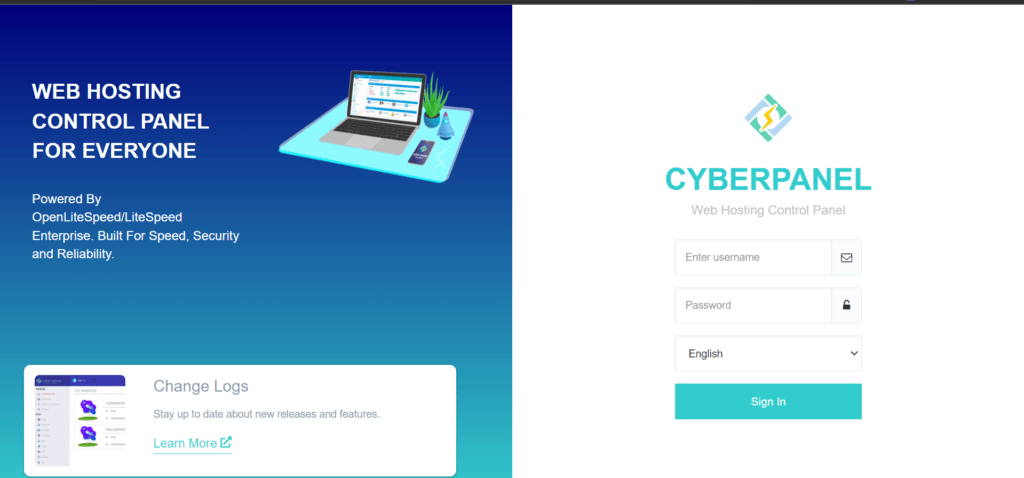
(2) How to Access CyberPanel:
After you have successfully installed CyberPanel on your system. You can access your server’s IP address on port 8090.For example https://YourIPAddress:8090. Then show this image.
After showing this image you can log in with your user name and password:
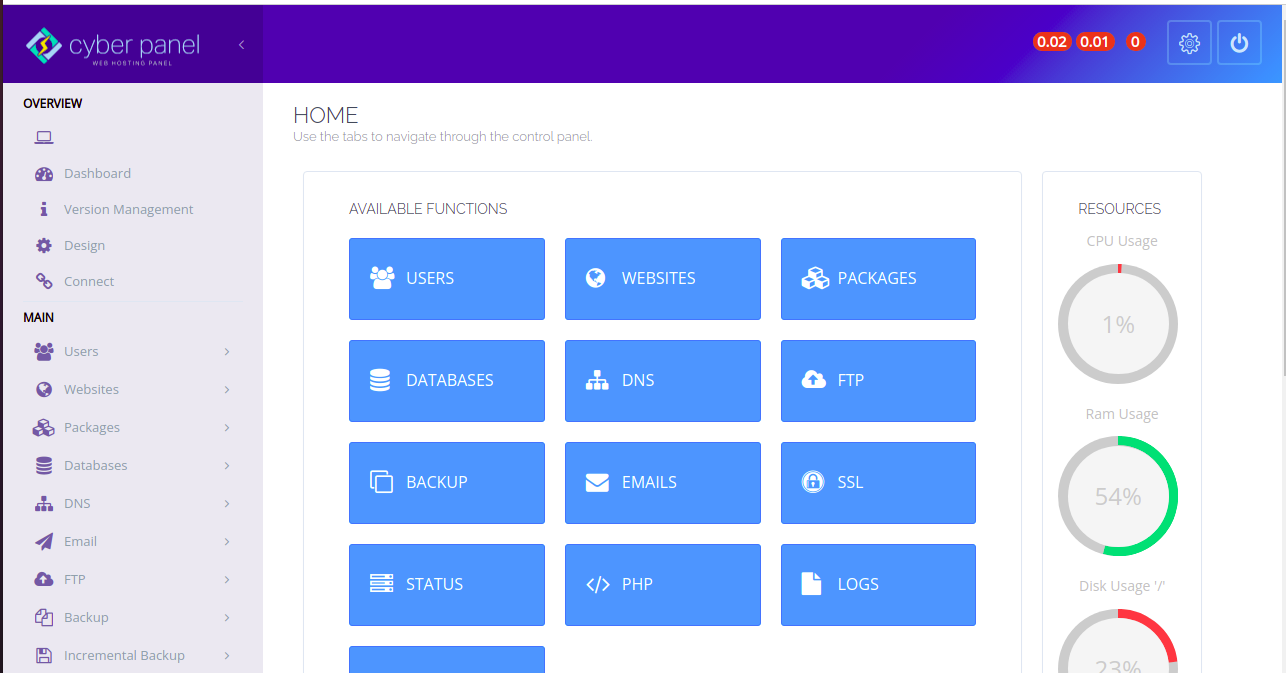
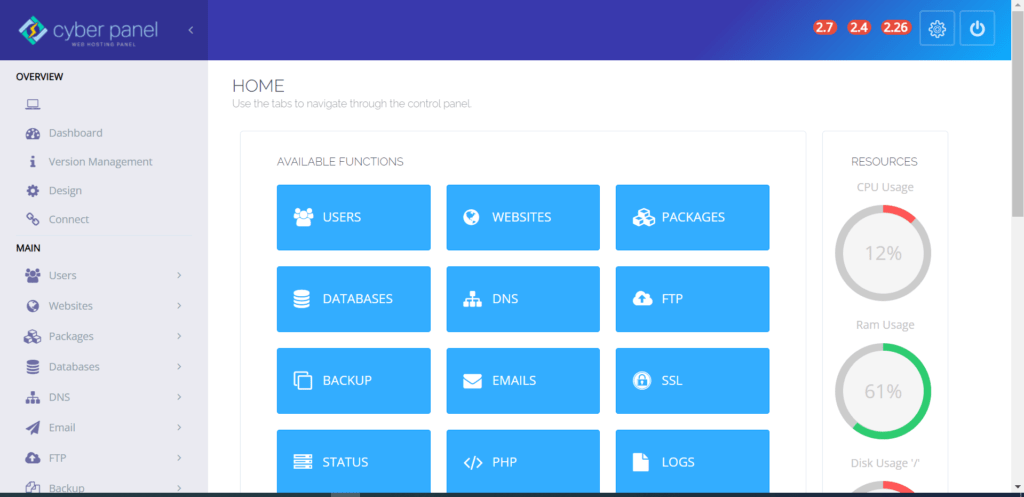
After Browsing shows the front dashboard of CyberPanel and shows this image.
How to use CyberPanel Complete Tutorial
After entering the dashboard, We discuss overview features.
there are five features in the overview menu:
we discuss one by one feature in an overview.
1. Ip Address
In the overview, the first item is the IP address of the server
Using this server IP address, we access the CyberPanel.
On this page, you can manage versions and or upgrade to the latest version of CyberPanel.
CyberPanel Complete Tutorial:
Current Version2.1 <–> Build2 = Latest Version2.1 <–> Latest Build2
4. Design
The fourth thing of the CyberPanel overview is design.
CUSTOM CSS
Any CSS added here will apply to the whole dashboard design.
5. Connect
The fifth thing of the CyberPanel overview is to connect.
The CaberPanel cloud is accessible through Connect.
2. Main:
A second thing that CyberPanel shows in the dashboard is the main:
The first thing is users in the main.
(I) View Profile.
ACCOUNT DETAILS:
List the account details for the currently logged-in user.
(ii) Create User:
The second thing of the CyberPanel Users is to Create user:
CREATE NEW USER
Create root, reseller, or normal users on this page.
(iii) List users:
The Third thing of the CyberPanel Users is to list users:
LIST USERS List Users that you own.
We can also make users create a user list.
(iv) Modify users:
The fourth thing of the CyberPanel Users is to modify users:
In this section, we discuss how to modify users in CyberPanel.
Modify existing user settings on this page.
(v) RESELLER CENTER:
The fifth thing of the CyberPanel Users is to reseller centers:
A reseller center allows us to change the owner of the center:
Change the owner of users and change websites limits.
Reseller center picture is given below in which see how to change owner and websites limit.
(vi)CREATE NEW ACL:
The sixth thing of the CyberPanel Users is to create a new acl:
Create a new Access Control definition, that specifies what CyberPanel users can do.
How to create a new ACL picture is given below:
(vii) Delete ACL:
The seventh thing of the CyberPanel Users is to create a delete ACL:
This page can be used to delete ACL.
Delete ACL method picture is given below:
(viii) MODIFY AN ACL:
The eighth thing of the CyberPanel Users is to create a modified ACL:
In this section, we learn how to modify ACL in CyberPanel.
On this page, you can modify an existing ACL.
(IX) API ACCESS:
The ninth thing of the CyberPanel Users to how to access the API of CyberPanel:
Allow/Remove API access for the account, this affects Cloud Platform Connection and Third-Party Modules.
In this section, we learn how to access APIs and enable and disable API.
(2) Websites:
The second thing is websites in the main.
(I) Create websites:
In this section we learn how to create a website in CyberPanel:
On this page, you can launch, list, modify and delete websites from your server.
(ii) LIST WEBSITES:
List of website section we can create a website and we can show already created a website lists;
(iii) CREATE CHILD DOMAIN:
In this section, we learn how to create a child domain and child domains are owned by a master website.
The child domain creation method picture is given below.
(iv) LIST CHILD DOMAINS:
On this page, you can launch, list, modify and delete child domains from your server.
in this section, we can open the file manager and manage our websites and open our website to the child domain name.
list of child domain if I click manage button we go this file picture is given below.
(v) MODIFY WEBSITE:
modify website option we can modify the website.
Packages define resources for your websites, you need to add packages before creating a website.
Modify website method image is given below:
(vi) SUSPEND/UNSUSPEND WEBSITE:
This page can be used to suspend/unsuspend websites.
(vii) DELETE WEBSITE:
This page can be used to delete a website, once deleted it can not be recovered.
(3) Packages:
The third thing is packages in the main section:
(I) Create packages:
Packages define resources for your websites, you need to add packages before creating a website.
First of all, we make package admin then we proceed next.
After assigning the package name then we ask how you need to Diskspace, Bandwidth, Email Accounts, Database, FTPs, Child Domain, and allow FQDN as child Action delete and edit.
(ii) LIST PACKAGES:
List Packages and delete or edit them.
Make packages and see how many things you should assign in packages.
(iii) Delete Packages:
Packages define resources for your websites, you need to add packages before creating a website.
The packages can be deleted if needed.
(iv) MODIFY PACKAGE:
We can modify the packages if we need to
(4) Databases:
The fourth thing is Databases in the main section:
(I) CREATE DATABASE:
Create a new database on this page.
The database creation picture is given below.
(ii) LIST DATABASES:
Listed Databases or their passwords can be changed or a password can be generated In CyberPanel generates.
Database lists are given below in this picture.
(iii) DELETE DATABASE:
Delete an existing database on this page.
(iv) Phpmyadmin:
PHPMyadmin gives you access to your database.
(5) DNS:
The Domain Name System (DNS) is the phonebook of the Internet. When users type domain names such as ‘google.com’ or ‘nytimes.com’ into web browsers, DNS is responsible for finding the correct IP address for those sites. Browsers then use those addresses to communicate with origin servers or CDN edge servers to access website information. This all happens thanks to DNS servers: machines dedicated to answering DNS queries.
(I) CREATE NAMESERVER:
You can use this page to setup nameservers using which people on the internet can resolve websites hosted on this server.
(ii) CONFIGURE DEFAULT NAMESERVER :
If any server is created by default we can configure the default server.
(iii) Create DNS Zone:
Zones begin at a domain and can extend down into subdomains so that multiple subdomains can be managed by one entity.
(iv) DELETE DNS ZONE :
we can delete the DNS zone. This page can be used to delete DNS Zone. Deleting the DNS zone will remove all its related records as well.
(v) ADD/MODIFY DNS ZONE:
On this page, you can add/modify DNS records for domains whose DNS zone is already created.
(vi) Cloudflare:
On this page, we can add Cloudflare records.
(6) Email:
The sixth thing is email in the main section;
(I) Create Email:
Select a website from the list, to create an email account.
(ii) LIST EMAIL ACCOUNTS:
List Emails Accounts. Change their passwords or delete them.
After creating emails, we can see the list of emails and we can delete or edit their password.
(iii) DELETE EMAIL ACCOUNT:
Select a website from the list, to delete an email account.
(iv) SETUP EMAIL FORWARDING:
This page helps you set up email forwarding for your emails.
On this page, we can forward the email to the destination or path.
(v) CHANGE EMAIL PASSWORD:
You can change the password by selecting an email address and adding the website to the list.
(vi) DKIM MANAGER:
This page can be used to generate and view DKIM keys for Domains.
on this page, we select a website and DKIM generates two keys one key is a public key and another key is the private key and then we can use these keys.
(vii) Web Email:
on this page, we can access web email.
(7) FTP:
FTP means “File Transfer Protocol” and refers to a group of rules that govern how computers transfer files from one system to another over the internet. Businesses use FTP to send files between computers, while websites use FTP for the uploading and downloading of files from their website’s servers.
(i) Create FTP account:
Select the website from the list, and its home directory will be set as the path to the FTP account.
(ii) DELETE FTP ACCOUNT:
Select the domain and delete its related FTP accounts.
(iii) LIST FTP ACCOUNTS:
List FTP Accounts or change their passwords.
A list of FTP account method pictures is given below.
(8) Backups:
(i) CREATE BACKUPS:
This page can be used to Backup your websites.
The Backup method picture is given below.
(ii) Restore BACKUPS:
This page can be used to restore your websites, Backup should be generated from the CyberPanel Backup generation tool, it will detect all Backups under /home/backup.
(iii) ADD AND DELETE DESTINATION:
On this page, you can set up your Backup destinations. (SFTP)
Set up Backup Destinations are two methods local and SFTP.
(iv) SCHEDULE BACKUP:
On this page, you can schedule Backups to localhost or remote server (If you have added one). You can create a new backup schedule. You can create a daily weekly and never frequency schedule.
(v) SET UP GOOGLE DRIVE BACKUPS:
On this page, you can set up and manage Google Drive Backups.
(vi) REMOTE BACKUPS:
This feature can import website(s) from a remote server.
(9) Incremental Backups:
An incremental backup scenario requires one full backup and then subsequent increments over a period of time. For example, if a full backup was performed on Monday, Tuesday’s incremental will take a snapshot and back up all new or changed files since Monday’s backup.
(I) CREATE/RESTORES BACKUPS:
This page can be used to create incremental backups for your websites.
(ii) ADD/REMOVE DESTINATION:
On this page, you can set up your Backup destinations. (SFTP and AWS)
ADD/remove destination method picture is given below.
(iii) SCHEDULE BACKUP:
On this page, you can schedule Backups to localhost or remote server (If you have added one).
(iv) RESTORE REMOTE INCREMENTAL BACKUPS:
This page can be used to restore remote incremental backups for your websites.
Restore remote incremental backups method image is given below.
(10) SSL:
One common example is when SSL is used to secure communication between a web browser and a web server. This turns a website’s address from HTTP to HTTPS, the ‘S’ standing for ‘secure’. … When data is sent or posted through a browser using HTTPS, SSL ensures that such information is encrypted and secure from interception.
(i) MANAGE SSL:
This page can be used to issue Let’s Encrypt SSL for existing websites on the server.
we can manage SSL.
(ii) HOSTNAME SSL:
Let’s Encrypt SSL for a hostname to access CyberPanel on verified SSL.
(iii) MAIL SERVER SSL:
Let’s Encrypt SSL for MailServer (Postfix/Dovecot).
(3) SERVER:
A server is a computer or system that provides resources, data, services, or programs to other computers, known as clients, over a network. In theory, whenever computers share resources with client machines they are considered servers.
(i) WEB TERMINAL:
Execute your terminal commands.
(ii) CLOUDLINUX:
What Is Linux Cloud Hosting? Linux cloud hosting is all about hosting a website on the cloud hosting platform, using the Linux operating system as the platform. From our definition, we can see that two things are paramount for Linux cloud hosting, and that is the cloud hosting server with the Linux operating software.
(i) CREATE CLOUDLINUX:
CloudLinux and CageFS are available with CyberPanel v.1.8.6, but before using any of its features, you need to convert your operating system to CloudLinux OS. Use the commands below to convert your server to CloudLinux OS.
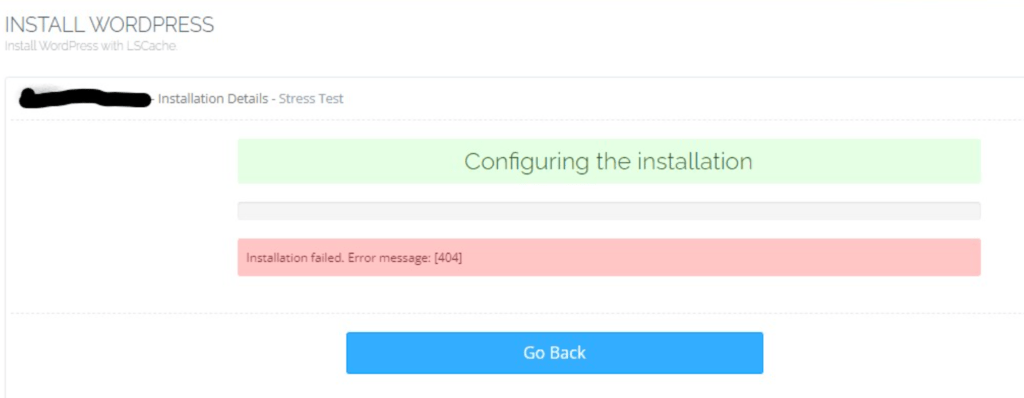
Many users faced WordPress installation error in CyberPanel as it is not working some time throwing installation failed. error message: [404]. In this article, I will tell you a few reasons and possible solutions for this issue.
Sometimes you want to install WordPress from the CyberPanel and it through this error and you are not able to install it. There are a few reasons for this.
WordPress installation error Reasons:
Your CyberPanel installation goes well but may be there is no WP nCLi on your server.
If you have allpied any kind of mysql optimizations may be after that also this function will not work.
Possible Solution:
Update you cyberpanel to the latest version and it may be resolve the non WP CLi issue follow this article to update cyberpanel.
If you want to check MySQL and dont know how to check just access your SSH and go to the /etc/my.cnf or /etc/mysql/my.cnf and paste the content in coment i will check if there is any optimizations or not.
Sometimes for some special patches and bug fixes, you need to upgrade Cyberpanel to any specific branch. Like you got any issue in the stable branch and the team announced that the issue is fixed in another CyberPanel branch then you have to move on that.
In this article, I will tell you the few commands to upgrade CyberPanel to any specific branch.
Step 1: Remove old script:
First, you have to remove the old script file to get new and upgrade. Use the command given below to do this.
rm -rf cyberpanel_upgrade.sh
Step 2: Download specific branch script:
Now in the next step, you have to download the script for new branch you want to install using the command stated below.
To install MailScanner on CyberPanel is very easy and a few click process. MailScanner is one of the core requirements for the email system now. And CyberPanel has a MailScanner which you can install from the CyberPanel dashboard.
In CyberPanel MailScanner is done by the community and this feature have a goof version but i am not sure that if it is 100% stable. So maybe MailScanner causes any issue in your mail server.
To install MailScanner on CyberPanel follow these steps.
Login to CyberPanel :
Login to your Cyberpanel account using your CyberPanel credentials. You have to visit the link:
https://<your-ip>:8090
Provide username and password and log in.
Install MailScanner on CyberPanel:
To install MailScanner on the server just follow these steps.
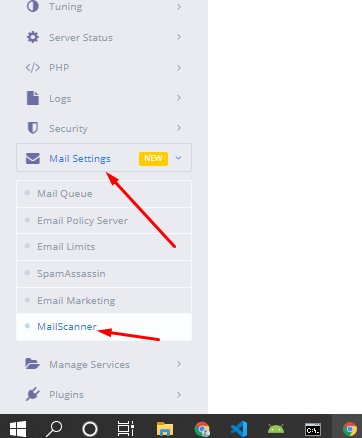
After login to CyberPanel dashboard just go to the Mail Settings-> MailScanner
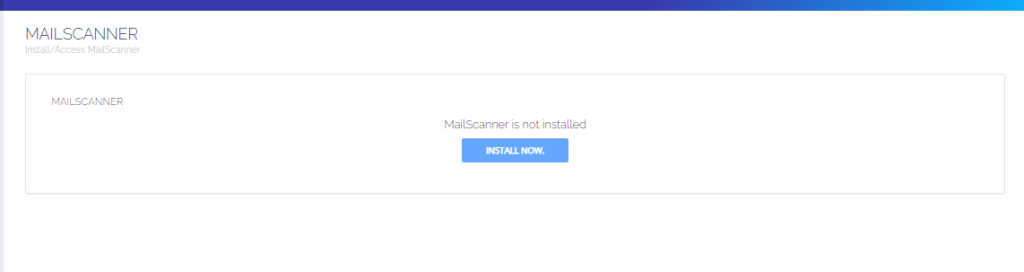
2. On the next screen you can see you have an Install button just press that and your MailScanner will be installed.
The installation process will take some time to complete and once the installation is done you can access the mail scanner on the server.
After clicking this button your Mailscanner is installed. And now you can access your MailScanner by clicking Access Now button.
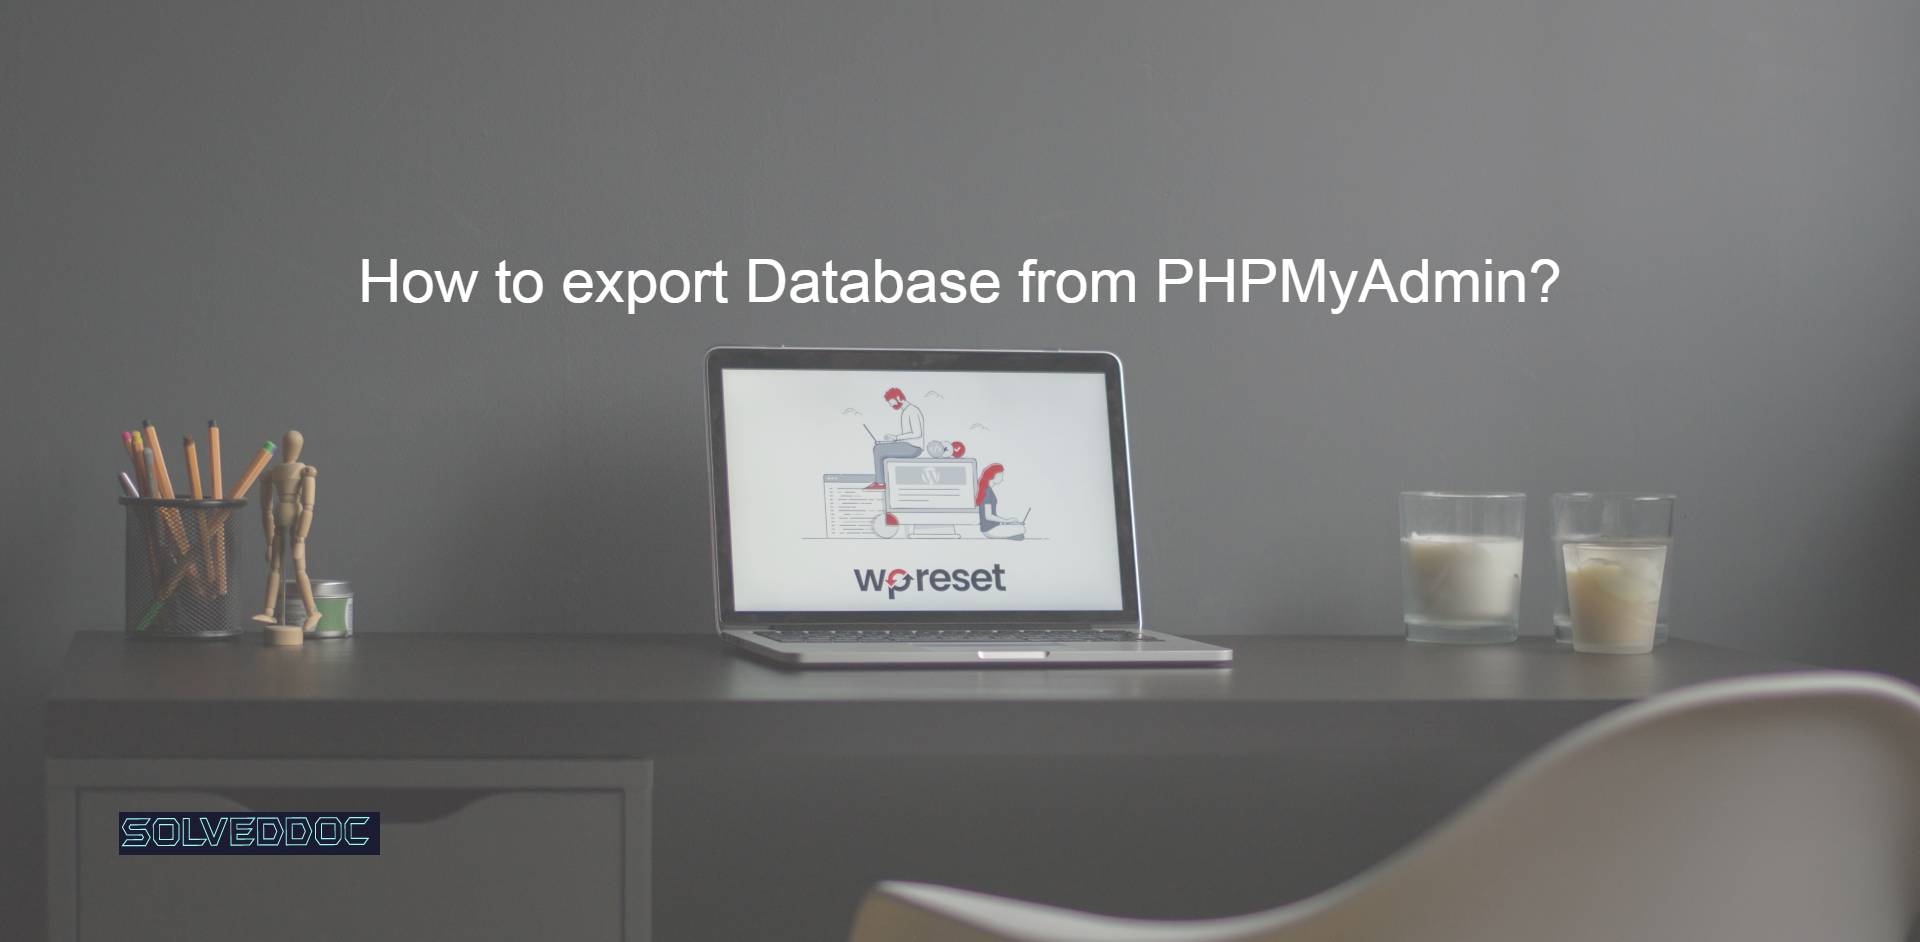
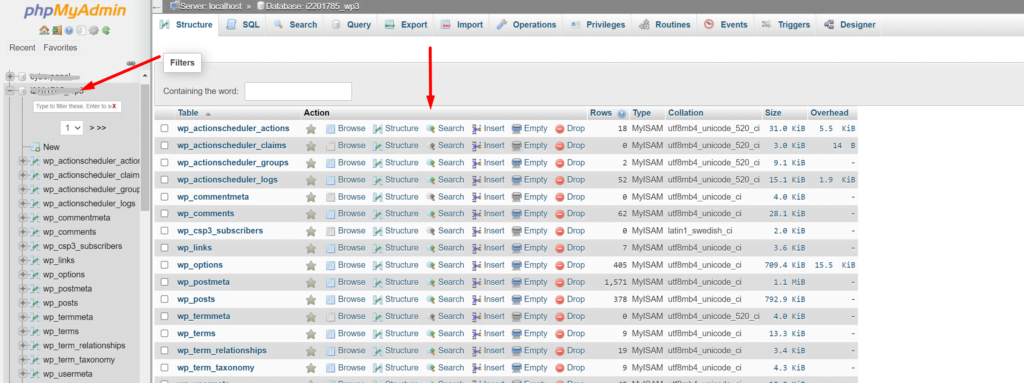
While transferring your website from one server to another you may need to export your database in some cases. In this article, I am going to show you how to export Database from PHPMyAdmin.
Exporting a database is just a few-click process. Just login to your PHPMyAdmin dashboard providing username and password. to export Database from PHPMyAdmin
You can see all the database you have created In your database is there.
Select the database you want to export. To select a database click on it. And you can see all the tables of your database on your screen.
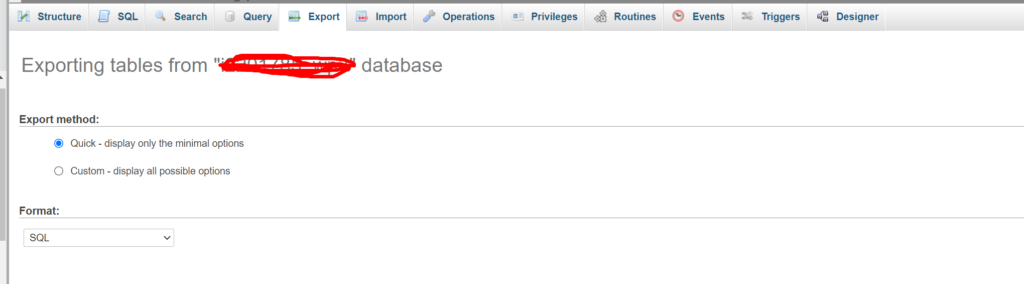
Now from the top bar click on the Export button to start theexport database.
Now you have to select the type of file in which you want to export your database. After selecting file type click on the Go button on the right bottom side.
on clicking the Go button process will start and you can see the download progress on your browser.
Sometime after update you faced PHPMyAdmin blank page error CyberPanel. In this article i will tell you the shortest way to resolve PHPMyAdmin blank page error CyberPanel.
You have to do few steps to resolve this issue.
You have to load your default PhpMyadmin script and replaced it with the present script.
1.Login to SSH. Change directory to the phpmyadmin using this command.
cd /usr/local/CyberCP/public/phpmyadmin
2. Here you have one simple file and one the working config file. Rename the working config to the new file like config.inc.php.old using this command.
mv config.inc.php config.inc.php.old
3. Now rename simple file to the working file and try to access phpmyadmin from the CyberPanel.
mv config.sample.inc.php config.inc.php
Go to the PhpMyAdmin page of your CyberPanel and check now.
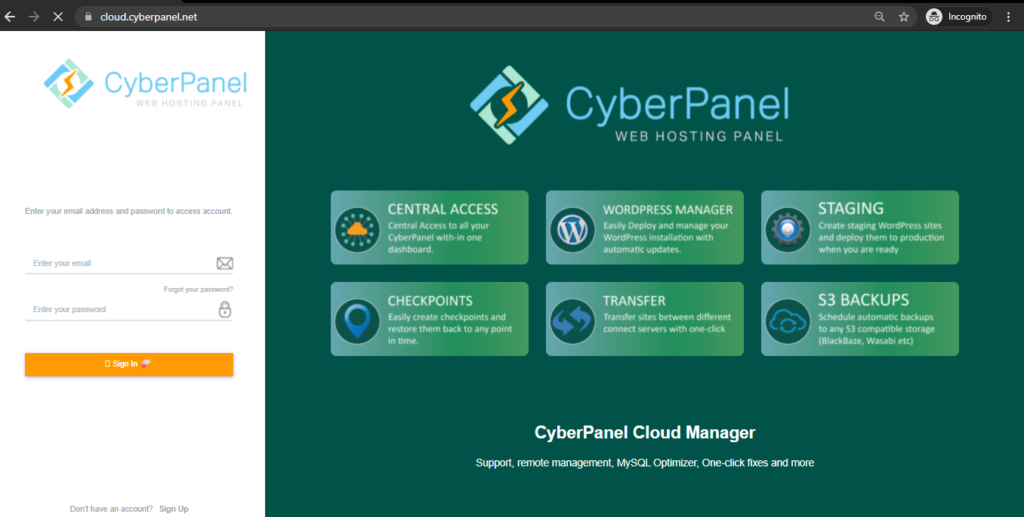
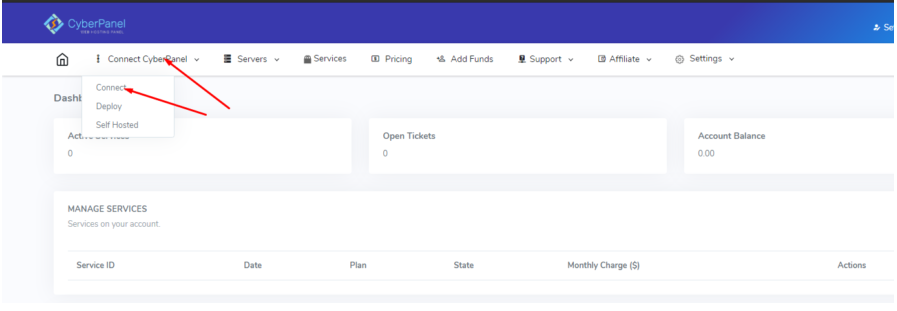
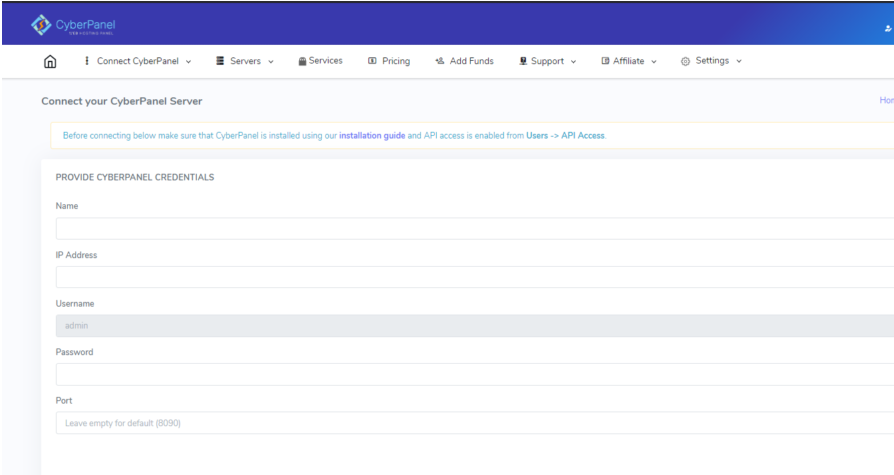
CyberPanel Cloud is not only a support platform but it have a lot of paid features there. In this article we will tell you how to connect CyberPanel with CyberPanel Cloud?
CyberPanel cloud have a lot of paid features and l3 level support but there are also some free features like email debugger, CyberPanel upgrade, etc.