How to force redirect HTTP to HTTPS website in CyberPanel?
In this article we will tell you how to force redirect HTTP to HTTPS website in CyberPanel?
What is HTTP?
HTTP stand foe Hypertext Transport Protocol. When you enter http:// in your address bar in front of domain, it tells the browser to connect over HTTP. HTTP use TCP(Transmission control protocol), generally over port 80, to send and receive data packets over ther web.
What is HTTPS?
HTTPS stands for Hypertext Transfer Protocol Secure (also referred to as HTTP over TLS or HTTP over SSL). When you enterhttps://in your address bar in front of the domain, it tells the browser to connect over HTTPS. Generally sites running over HTTPS will have a redirect in place so even if you type inhttp:// it will redirect to deliver over a secured connection. HTTPS also uses TCP (Transmission Control Protocol) to send and receive data packets, but it does so over port 443, within a connection encrypted by Transport Layer Security (TLS).
Redirect from HTTP to HTTPS
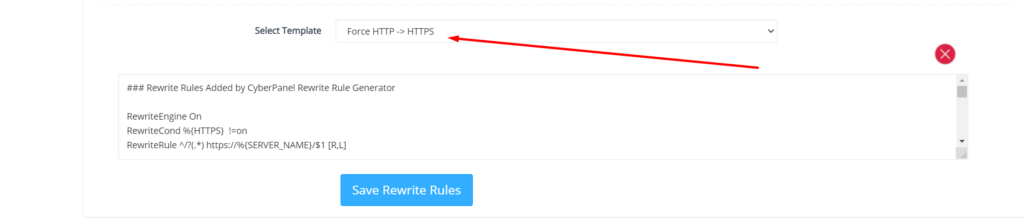
if you forcefully redirect your website HTTP to HTTPS in Cyberpanel, you will need to add a rewrite rule to that website in order to have it automatically forward to HTTPS instead of HTTP.
In CyberPanel you can forcefully redirect HTTP to HTTPS website using rewrite rules.
To add this:
Force redirect HTTP to HTTPS website in CyberPanel:
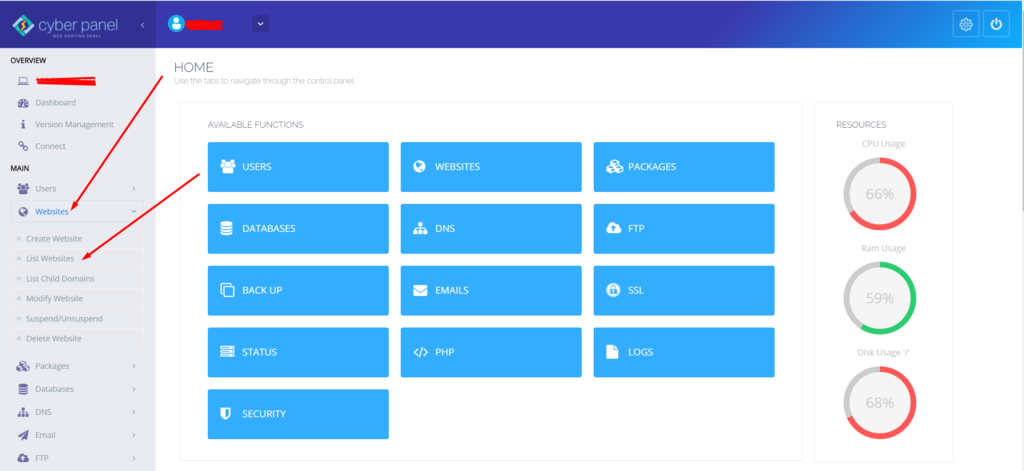
Select Websites on the left menu
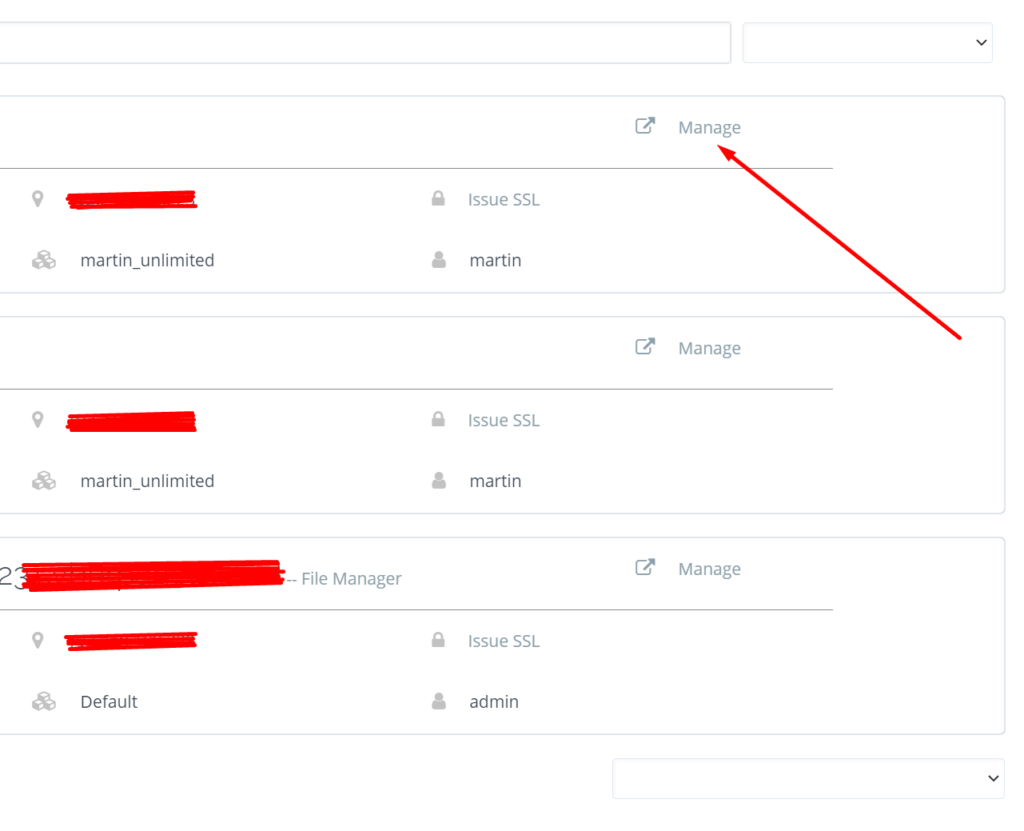
2. Choose the SSL enabled website from the list
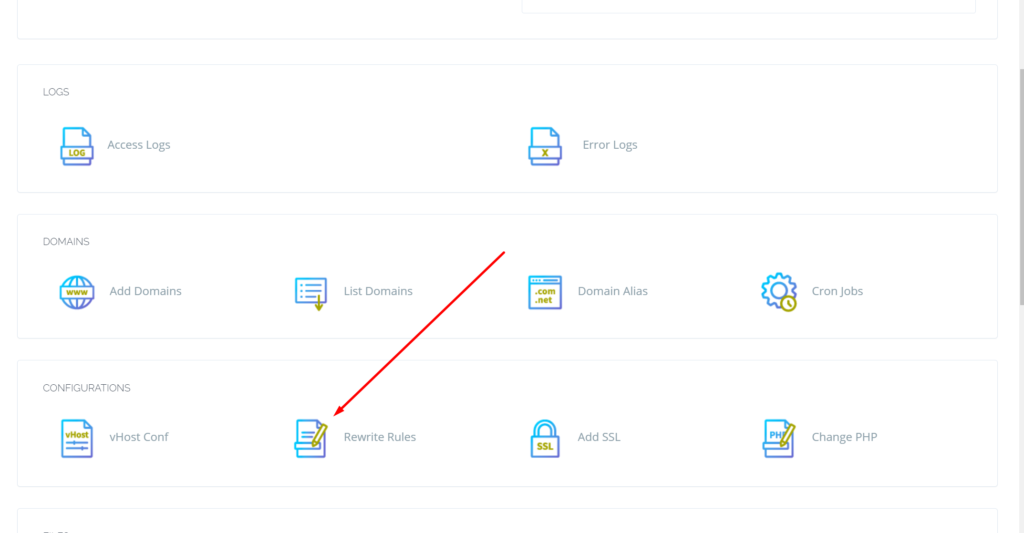
3. Select “Rewrite Rules” in the Configuration section
A lot of users install ImunifyAV but after some issue, if they want to uninstall they do not know how to do this. Here in this article, we will tell you How To Uninstall Or Stop ImunifyAV?
ImunifyAV – an intelligent antivirus and security monitoring tool for websites with one-click automatic malware cleanup, domain reputation monitoring, and blacklist status check. Read more about ImunifyAV
A lot of users install ImunifyAV but after some issue, if they want to uninstall they do not know how to do this. Here in this article, we will tell you How To Uninstall Or Stop ImunifyAV?
In this artical we provide the way where you can able to uninstall or Stop ImunifyAV.
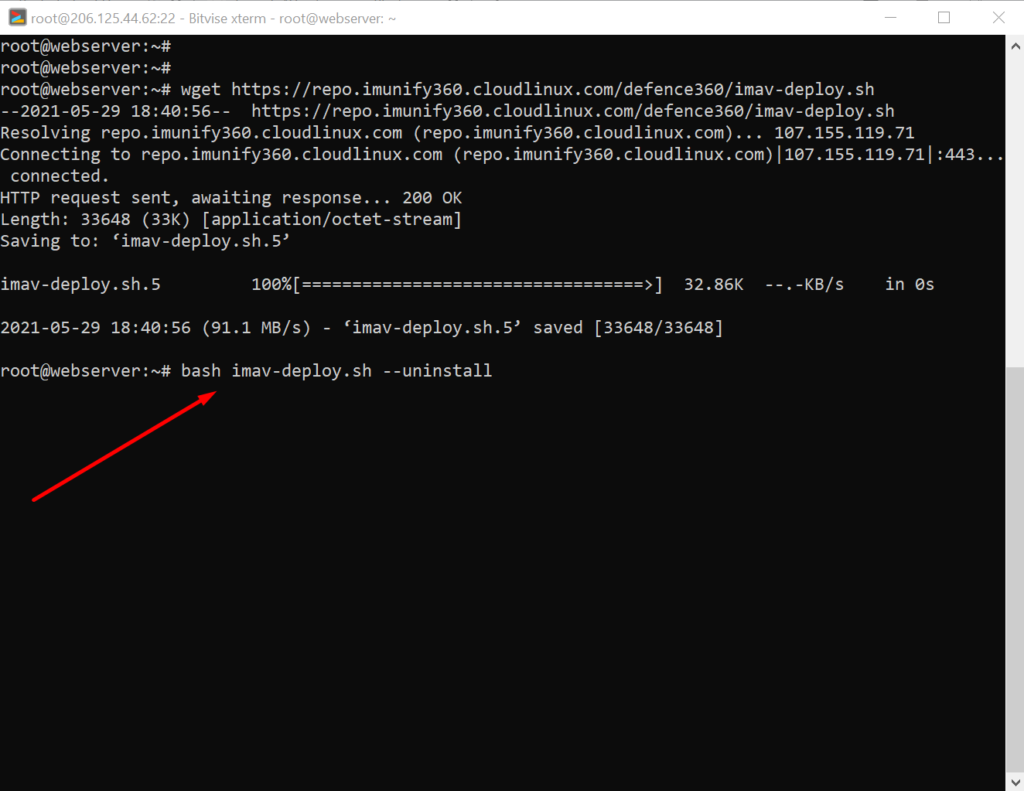
Uninstall ImunifyAV:
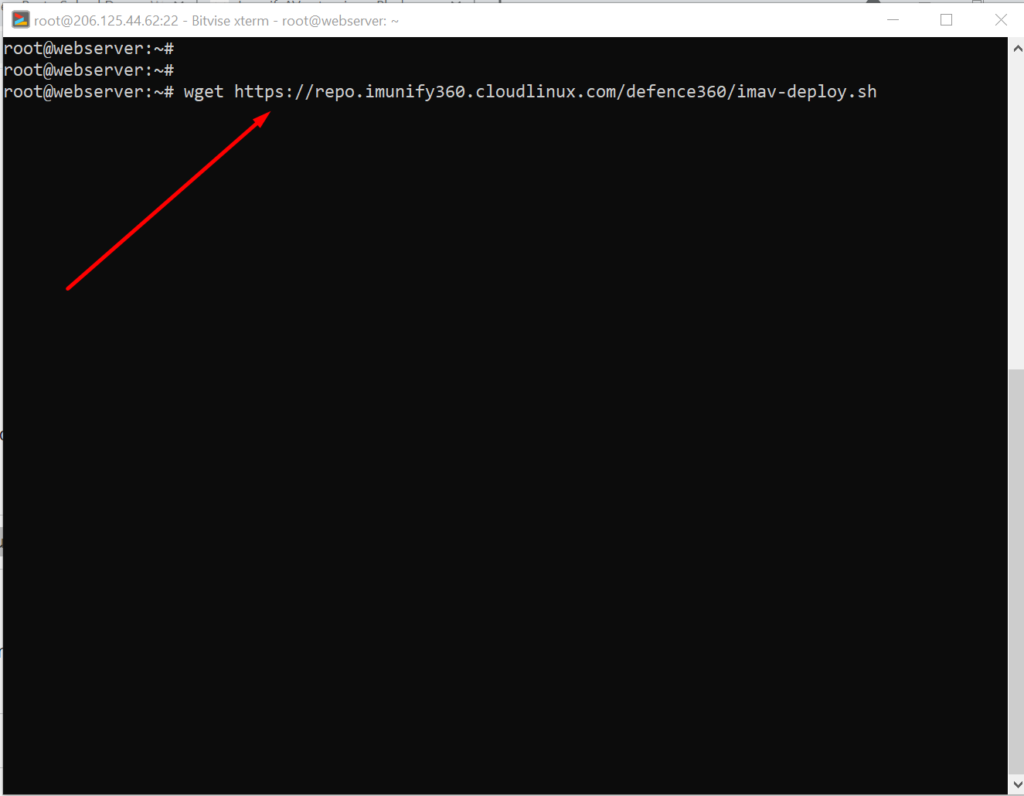
To uninstall ImunifyAV, you need to first download the imav-deploy.sh script with the following command:
How to solve the can’t upload the file on file manager issue in CyberPanel?
if you are uploading a file on file manager in CyberPanel. and getting some error there. Follow this short solution for can’t upload the file on CyberPanel file manager.
Solution
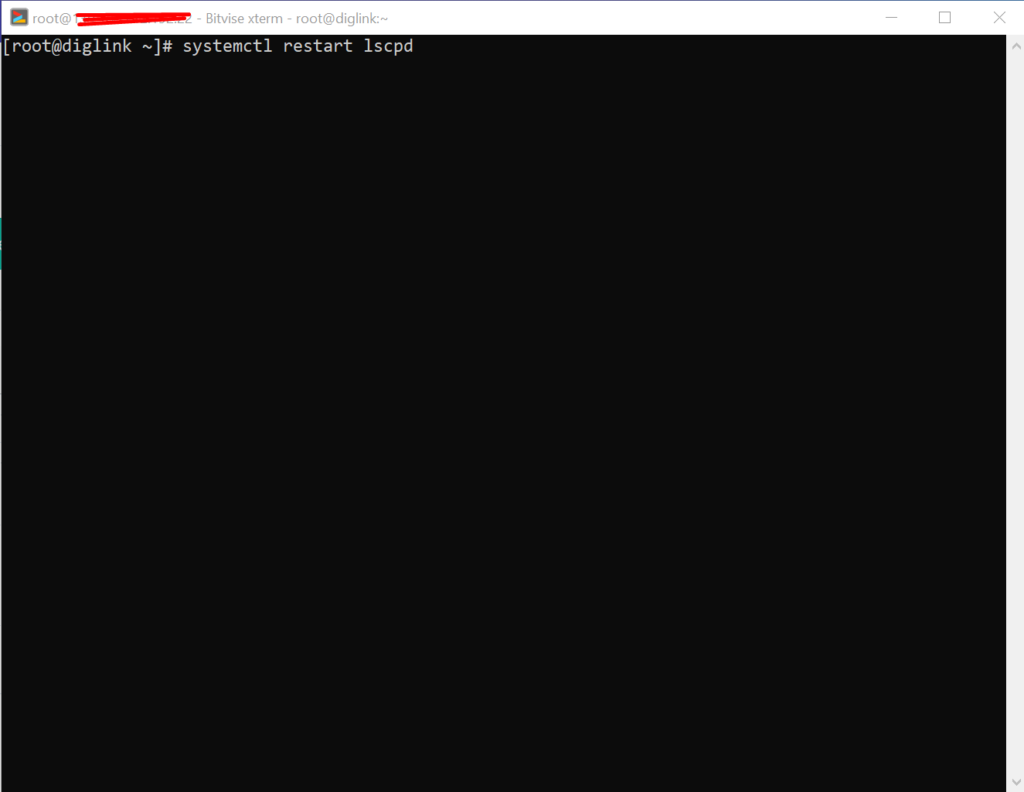
There is very easy and short solution for this issue. Access your root through Bitvise or putty open your terminal(CLI) and run this Command
Systemctl restart lscpd
This simple command will restart all of your CyberPanel services and now if you can try you can easily upload any file but there may be upload limit issue if so you can follow this tutorial to solve that Link below.
How to fix Fix WordPress 404 permalink OpenLiteSpeed- 404 error on OpenLiteSpeed
If you host your WordPress websites with OpenLiteSpeed you may get a 404 error on the permalink of your website. here in this article, I will explain how you can fix ix WordPress 404 permalink OpenLiteSpeed.
OpenLiteSpeed is the free version of LiteSpeed Enterprise and this free version is not as stable as the paid version. Not OpenLiteSpeed WordPress permalink often gives 404 error. When you move site from one server to another or made any change this error comes up. Here i will discuss few methods to solve this issue.
Methods to fix WordPress 404 permalink OpenLiteSpeed:
Method 1 Fix Permissions:
If you are using CyberPanel and you did any change of website after that 404 error come to the site you can fix it by doing few thing.
Fix permissions from the file manager
Restart OLS
Fix Permissions from the file manager:
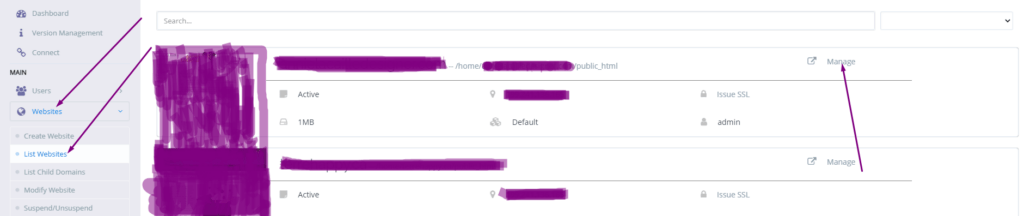
To fix permission you have to log in to your cyber panel then go to the Websites-> List website select the domain for which you have to fix the issue then press the Manage button present in front of the website.
Manage Website
On the Website Dashboard you can see File Manager press to access the file manager.
File Manager
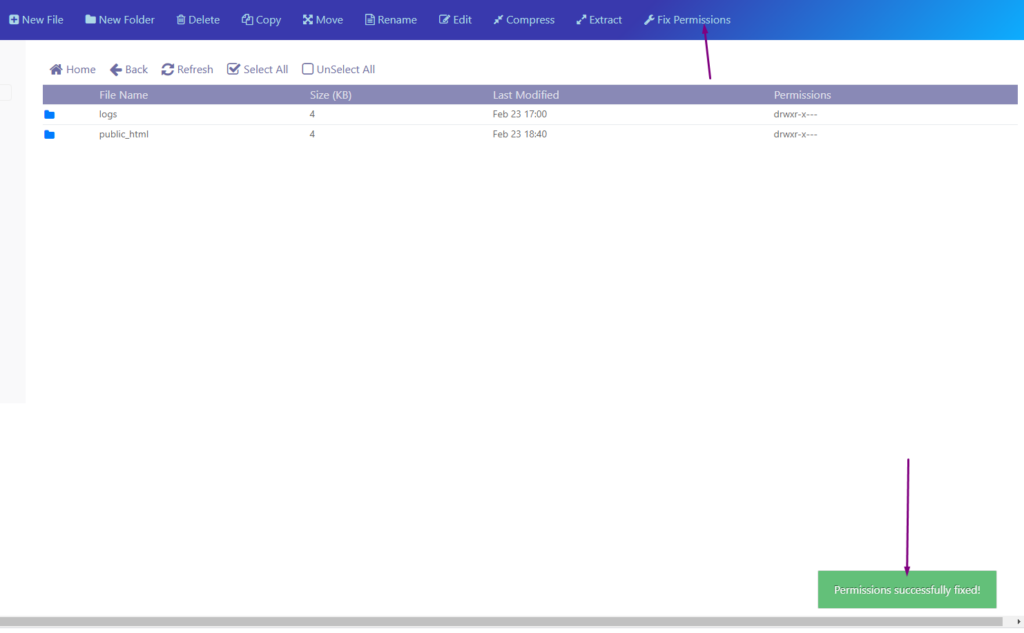
In file manager click Fix Permission button and you can see the success massage in green color.
Fix Permission
After doing all now its time to restart OLS.
Restart OpenLiteSpeed:
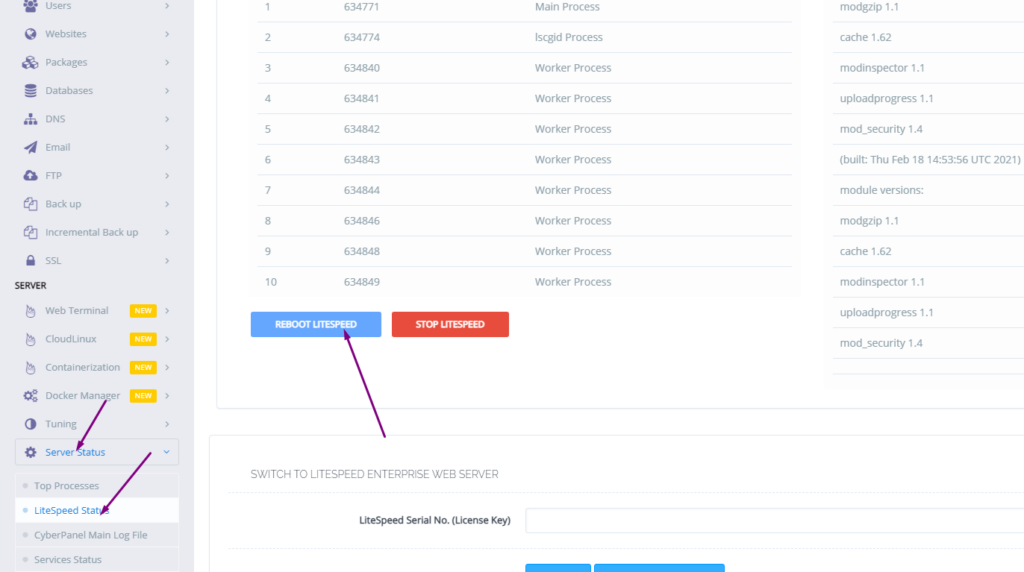
To restart OLS from CyberPanel you have to go on Server Status ->LiteSpeed Status and then you see two-button shutdown and reboot. Press the Reboot button and you can see a success message.
Restart OpenLiteSpeed:
Method 2 htaccess:
An other reason is the missing rules in htaccess for WordPress. To check htaccess rules. Go to the Public_html folder of the website. If you have CyberPanel go to the Website->List Websites then press Manage button.
Then go to the file manager from the Website Dashboard.
File Manager
In file manager open and open .htaccess file and see if there is rules or if the file is empty.
Do you know how to change CyberPanel Admin Password? Read this short article to check and know how to change or reset the admin password on CyberPanel.
Methods to Change or reset CyberPanel Password:
Reset Cyberpanel Password using Command line.
Change Password From CyberPanel
Reset CyberPanel Password using Command line
Mostly you use this method when you don’t have your CyberPnael Credentials are forgotten your CyberPanel password. And you have root SSH access to your system.
To change the Cyberpanel password from the command line you just need to run a simple command.
adminPass Your_New_Password
This command helps you to reset your password easily without having any CyberPanel access.
Reset CyberPanel Password using Command line
Change Password From CyberPanel:
If you have your CyberPanel admin account access and you want to change it you just need to follow these easy steps.
Login to your cyberpanel account using your credentials on port 8090.
https://<your_ip>:8090
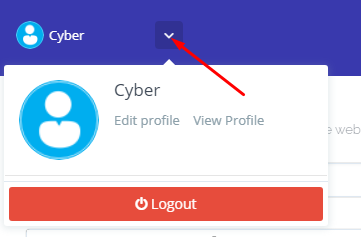
Once you login into your account clicks on the arrow on the top of your cyber panel account.
CyberPanel Profile
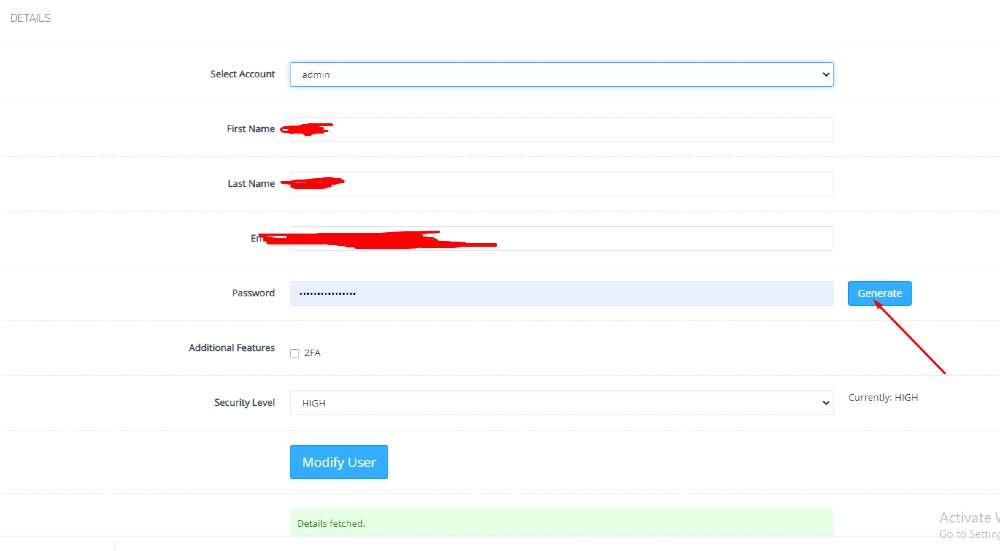
Then click the Edit Profile button. You can see a screen that ask you to select the account for which you want to change the password of CyberPanel.
Edit Profile
On this page, you can see you can change the password for your account and you can easily generate a password by clicking the generate password button.
Generating a password is a good move because CyberPanel auto-generate password will always generate a strong password.