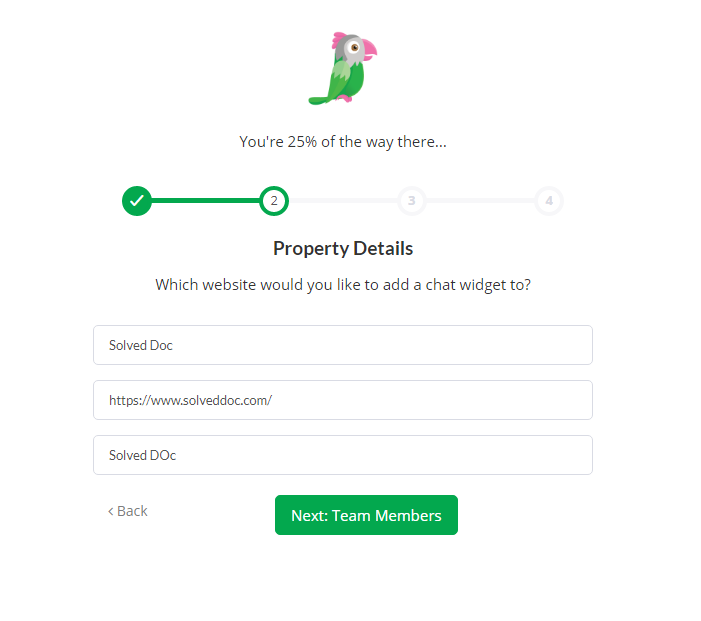
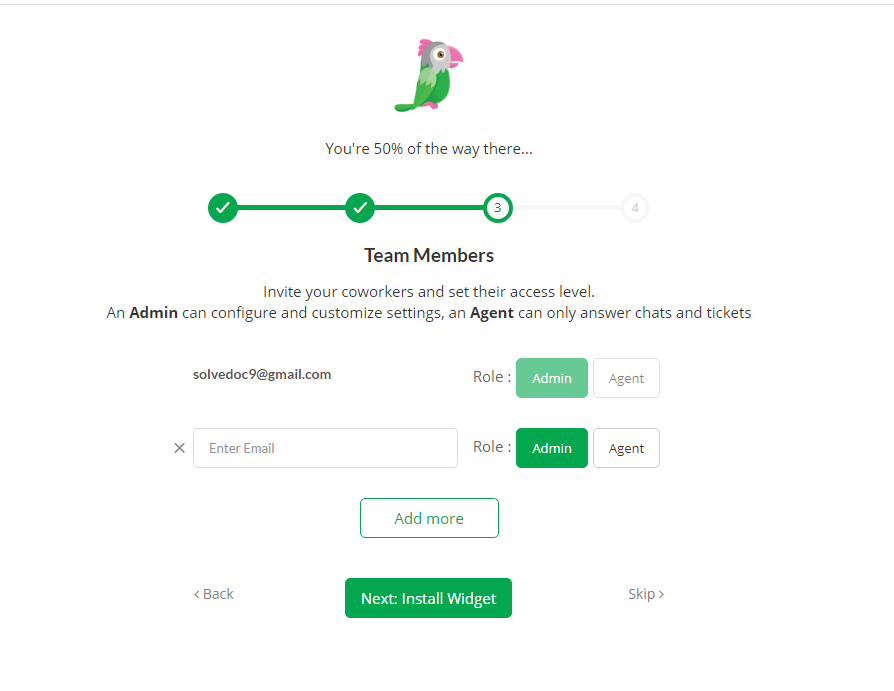
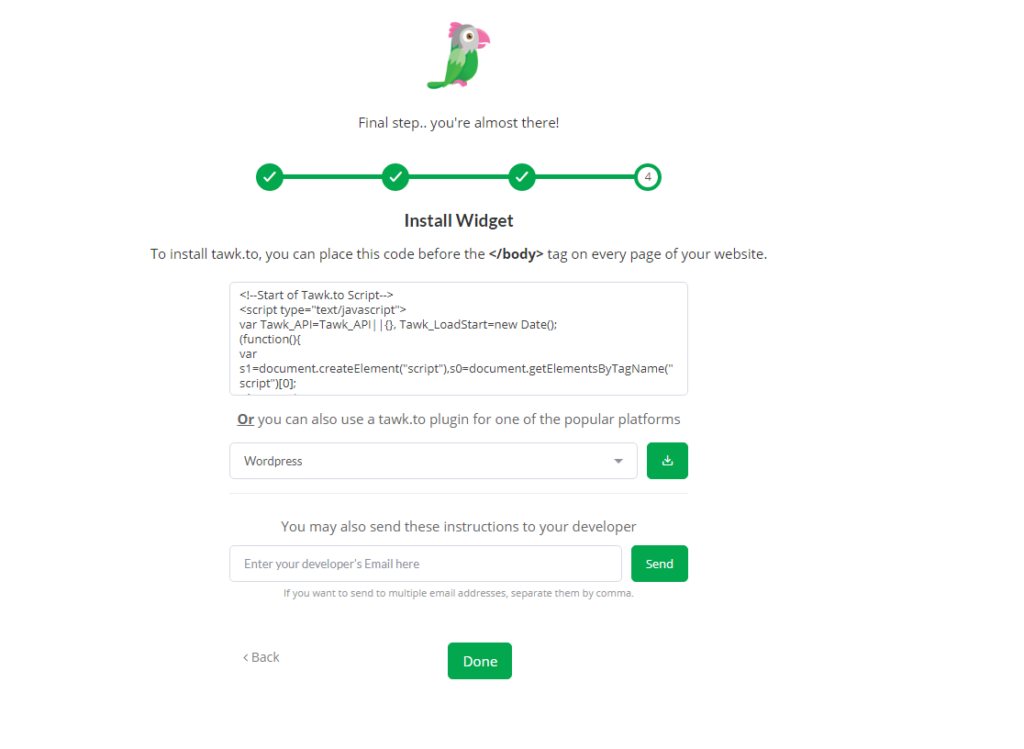
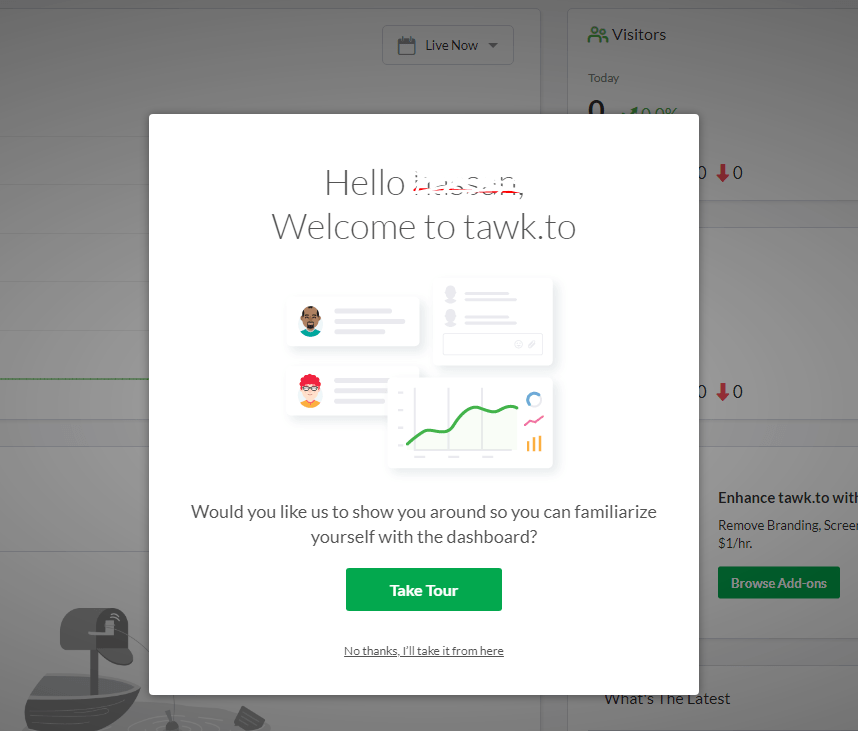
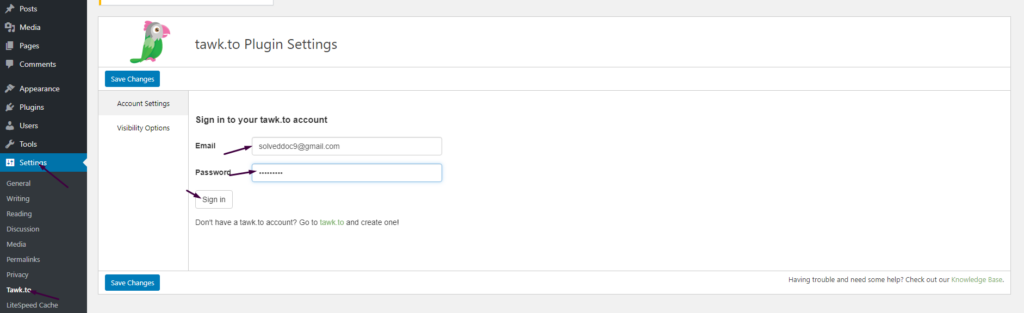
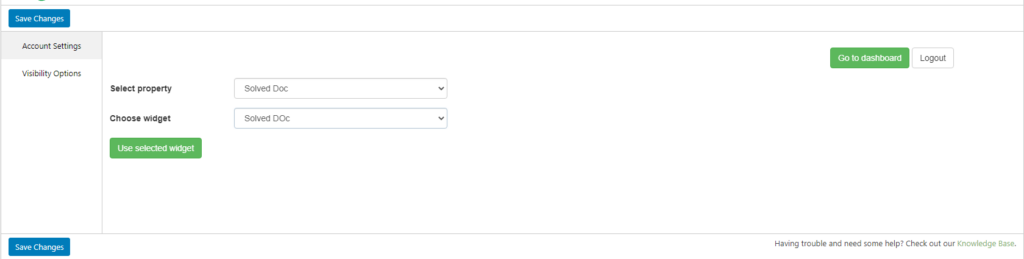
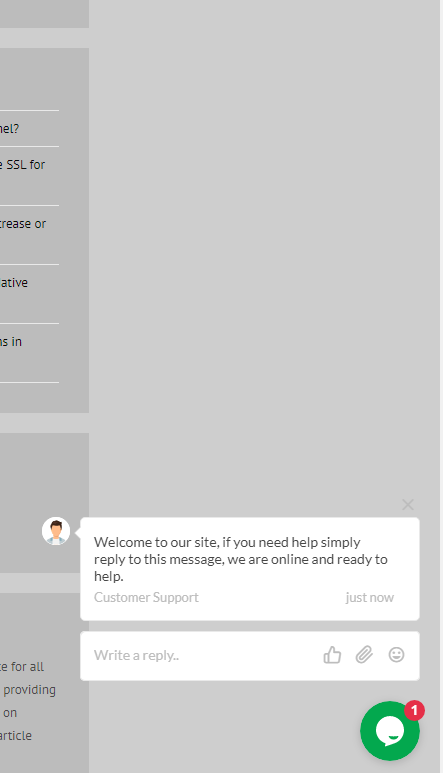
How to add live chat on WordPress Website – Integrate Tawk.To Live Chat to WordPress
In this Article I am going to share my personal experience that how i added the Twak.to Live Chat in my WordPress Site. After reading you come to know how to add live chat on WordPress Website.
This tutorial is basically my personal experience that how I integrate live chat on my WordPress Website. So without wasting time lets start tutorial.
CyberPanel has a great feature to add Google Drive backups. They added this feature in their 2.0.2 version.
This G-Drive backup option makes the backup process easy and more reliable. The method to set up Google drive Backup is also so easy. there is nothing typical or complex.
You can follow this guide to add Google drive backup through CyberPanel.
Table Of Contents:
Login to your CyberPanel Account
Set up Google Drive Backup
Set Up New Account
Add Sites For Backup
Login To CyberPanel:
To initiate this process you must have to log in to the CyberPanel. So use your CyberPanel credentials to log in.
Set Up Google Drive Backup:
Now go to Back Up->Setup Google Drive to set up google drive backup for your site.
Set Up new Account
Here you can see the SETUP NEW ACCOUNT click that button to add a google drive account for backup.
You can see a Pop up asking for the name of the account you want to set up for your g-drive backup.
Enter your name here and then click the Save button. This will migrate you to a new screen for Google account setup.
Select any account if you are logged in or add a new one here
Now click the Allow button to processed.
Once it’s done now you will get back to the backup page. and you can select that account you just added.
Add Sites For Backup:
Now you can add backups for your sites from this screen. Select account from here.
Now provide the details and Press the Add button then you can see the Site added below.
Access Cyberpanel Via Hostname with SSL- Issue SSL for Hostname
DO you want to access CyberPanel via a hostname with valid SSL ?
By default, you can access your cyber panel using the IP of your server and Port 8090. But For a valid SSL certificate, you must need a valid domain to access cyber panel with a valid SSL.
In this article, we will discuss how you can select a hostname and then issue SSL for that. So follow all steps along to access Cyberpanel Via Hostname with SSL.
Table of Content:
Select a Valid Domain
Create a Website on CyberPanel
Issue SSL for HostName
Access Cyberpanel
Select a Valid Domain
To access CyberPanel through a hostname and valid SSL first you need a domain through which you want to access CyberPanel. Like you want to use https://domian.com:8090 to access your CyberPanel you need to add domain.com to your CyberPanel.
Before creating a domain make sure that your DNS A records are point this server where you want to add a domain.
Create a Website on CyberPanel
To do so login to your CyberPanel using your Credentials then go to Websites->Create Website :
Now provide all the required details and press Create Website button.
Now your required website is created. SSL may be working for this domain But we need to issue for the Hostname and select this domain as the hostname.
Issue SSL for HostName:
Go to the SLL->Hostname SSL
Now select that domain you want to use for the Hostname. Then Press the Issue SSL.
This domain has now SSL for hostname you can use this to access cyberpanel
Access Cyberpanel:
Now it’s time to check that is this domain is working to access the CyberPanel. Go to your brewers and visit the Link https://your-domain.com:8090 it should work for your Hostname now you can access CyberPanel using this link.
How to create a staging or clone of the WordPress site from CyberPanel?
Sometime you may need to create a clone or staging site of your WordPress site to make changes and test them. CyberPanel allows to create staging or clone site easily.
In this article, I will tell you how you can create a staging or clone of your WordPress site from CyberPanel.
You can create a staging site from CyberPanel and after doing that you can merge it back to the Original or master site.
Always keep backup before doing anything. So if you lost anything you can restore. The process of creating a staging site is very easy to follow along to do so.
Create a Clone or create a Staging for your site:
Step 1: Log in to CyberPanel and Go to Manage Website
Create a clone or staging site in cyberpanel is very easy. I will write the steps below to do so.
The first thing to do is login to your cyberpaner using your credentials on port 8090.
Then go to the Websites->List Websites->Manage
Step 2: Create a clone or Staging site
In the manage Dashboard, you can see the CLONE/STAGING button press that to process.
Add the Domain name which you want to use as staging or clone.
It will take some time and once staging is done it will show you this screen.
Now you must have to set A records for the staging domain you create Like staging.yourdomain.com. Visit your DNS manager and add A record for this staging site. No need to add any other records. A record is enough for staging.
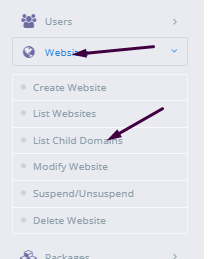
In cyberpanel got to Websites->List Child Domains you can check the staging site.
Push back, Copy or sync site to Master:
Once you did all changes to staging and now you want to sync the staging back with the master site CyberPanel allows to do this very easy to do so follow steps:
Go to the Websites-> List Child Domains:
Now on this page, you can see your staging site press the Manage button in front of your site.
Now you are in the management dashboard of the staging site. You can see COPY/SYNC TO MASTER from here you can push back your staging to the original.
Here you can chose the options:
Copy complete Data
Sync Database
Copy Changed Files
Chose any option from them according to your requirement. Once the process of sync or coping is done now go back to your original site and check the changes if you have any cache plugin clear cache and then check the changes.
How to Create a Website and install WordPress on CyberPanel one-click installation?
In this article, I am going to tell you how to install WordPress on CyberPanel. This article is about the one-click installation of WordPress on CyberPanel.
I will briefly describe how to create a website on CyberPanel. And then we will go toward the installation of WordPress on CyberPanel. The main theme is how you can create a website and install WordPress on CyberPanel.
if you are new on CyberPanel and want to know the basic Information and usage of CyberPanel then do not leave the article i will explain some basic at the end of article.
How to create a new Website on CyberPanel?
Creating a website on CyberPanel is very simple and easy. Here the all steps to create a Website on CyberPanel are listed.
Go to the Websites-> Create Website Option in CyberPanel Menu:
Can navigate to this ULR to Create new web site:
https://your_IP:8090/websites/createWebsite
Provide the following details here
Select Package (Default )
Select Owner (Admin or any other)
Domain name (example.com without www)
Email (Your email address (youremail@xyz.com))
Select PHP (Latest is recommended )
SSL (Always check)
DKIM (Always check)
Open Basedir Protection (Check )
Create Mail Domain (Check if you want to you on same server)
After providing all information press Create Website Button. It will take sometime to complete and will show the confirmation massage once its Done.
How to install WordPress on your domain from CyberPanel?
When creation of your website on cyberpanel is done. Time to install WordPress on that site using CyberPanel. Just Follow these steps and do it quickly.
Go to the Websites-> list websites
Can follow this URL to list all websites
https://your_IP:8090/websites/listWebsites
2. Click the Manage button to navigate to the manage website dashboard
Navigate to this URL to list all websites
https://your_IP:8090/websites/listWebsites
3. On the management dashboard to the last section there you found WordPress click on that.
You can also get access the dashboard through this Url
https://your_IP:8090/websites/yoursite.com
4. Once you click this button now you can see a screen asking for the WordPress details.
How to migrate WordPress Site using Migrate Guru Step by Step guide
Do you want to transfer your site from Local to live server? Do you want to create a clone of your site? Do you want to migrate your site from one server to another server? the question is How to transfer your website to another host?
So you are in the right place. In this article, I am going to tell you how to migrate the WordPress site using migrate Guru.
This guide helps you to migrate WordPress site using migrate guru from local to live, from one live server to another live server, from one domain to any other domain and all.
But first of all, I am going to add some information about the Migrate Guru plugin. So before going deep you have some knowledge about the migrate guru plugin.
Top features of Migrate Guru:
1 click migration
Migrate large site
No addons
No space required for migration
Compatible with almost every host
Fully Automatic
Timely alters
1 click migration:
Migrate Guru made the WordPress migration on click migration. You just need to enter the details of remote server (host) and click to processed.
Migrate large site:
Migrate Guru allows you to migrate large sites even the large as 200 GB. There is no limit for transfer. Large site migrations usually fail because of live-site server import limits.
No addons:
You don’t need any add-ons to move multi-sites. You know that sometimes we need add-ons to migrate multi sites from one place to another.
No space required for migration:
As the migration process of the wordpress site is done on there server so no extra space need for the migration process.
After the migration is complete, the copy is erased.
Compatible with almost every host:
Migrate guru plugin is compatible with a large amount of web hosts. you can see them when you are going to perform migration. Like FTP, BLUEHOST, GoDaddy, A2 hosting, etc.
Fully Automatic:
The process of migration is fully automatic and you didn’t need to perform any task manfully. Migrate Guru will take care of each and every thing.
Timely alters:
The main thing that i like about them is timely alerts. They alert instantly when the process began and inform immediately when the process complete.
Step-by-Step Guide to Migrate Your WordPress Site to a New Host
Follow these steps:
Install Migrate Guru
Setup site where need to move
Move Site using Migrate Guru
Install Migrate Guru:
To install migrate guru Go to the Plugins-> add new
Type migrate guru into the search bar and install this one.
Activate migrate guru by pressing the activate button.
Your migrate guru is installed and activated you can see the Migrate Guru in the menu.
Video link
Setup WordPress site where need to move:
Migrate Guru migrate WordPress site from one server to another. For this process, we need to create the WordPress site on the other server to make the migration possible.
Simply Go to the control panel or the environment that you are using to create a new website there and then install the WordPress on that website.
You need to create a just simple WordPress site.
For FTP transfer:
For the transfer through FTP create an FTP account also on your host provider. different host provider has different methods to create FTP account.
Move Site using Migrate Guru
Noe the phase to transfer the site from one place to another started. Follow these steps to migrate the site.
Step1: Start Migrate Guru:
Click the migrate guru from the menu and provide details write your email, check the agreement and press the migrate button.
Setp2: Select your Server:
Now select your host from here to transfer site. I selected FTP to show you how to transfer through FTP. You can go with others.
Step3: Provide detials to tranfere:
Provide all the required details for the transfer. The following details and press migrate
your domain
your host IP
FTP user name
FTP account password
Path as(public_html)
After this, you can click the migrate and go to the migrate WordPress site using migrate guru. You can see the screen that show the process of migration.
At the beginning and end of the migration. Migrate Guru will send you email there are very good in timely updating.
Migrate Guru is a free Plugin powered by BlogVault. Migrate Guru plugin helps you to migrate your site from one place to any other with out risk of losing any thing.
You can migrate even a large site in a short time using this plugin. Migrate guru makes the migration 1 click process. You have nothing to do manually migrate guru will do everything automatically.
In this article, I am going to tell you how you can install a WordPress plugin on your WordPress site. In this article, I will explain briefly how can you install any WordPress plugin on your site.
I know if you are familiar with WordPress then its not an issue for you to install any plugin. But I must say if you are an expert then this article is not for you. How to install a WordPress Plugin is for the beginner. Those who have very little knowledge of WordPress.
In this article, I am going to tell you different methods to Install any Plugin on WordPress. I will tell you a different method if one does not work for you you can go with the other one. But mostly all methods work without any issue. Lets go.
Methods To install a WordPress Plugin:
Install plugin from WordPress admin Dashboard plugin section
Install Plugin via Upload plugin method
Install plugin from WordPress admin Dashboard plugin section:
This one is the easiest and most used way to install any plugin on WordPress. Commonly most of the free plugins available here and you can easily install plugins from here. This method is a 1 click installation method. You just need to click the install button and the installation is done. Now I am going to define the installation process step by step.
Set 1: Search in Plugins Section:
The first thing to do for installation is Go to the Plugins-> Add New from the admin dashboard.
Now on the left side, you can see a search box. You have to search the name of the plugin in that search box which you want to install. Just go to that search box and write the name of plugin.
You can see I want to install an element or plugin and I wrote Elementor in the search box and the results are there.
Step 2: Install Plugin
Now its time to install your required Plugin. To do so just click on the Install Button present next to the name of the plugin that you searched.
Step 3: Activate Plugin
Once the installation is done now click the Activate button to activate the plugin.
Now your plugin is installed and Activated. Good to go.
Install Plugin via Upload plugin method:
You are now familiar with plugin installation now I am going to tell you another method to install the plugin. This method is slightly different from the first one. Let’s move toward the steps so you can understand this method.
Step 1: Download Plugin
First of all, you have to download the required plugin from a valid source. mostly free plugins are available on WordPress official sites and plugins also have there own sites to download. I am going to download elementor plugin. I just opened Google and write elementor plugin.
I prefer to download from the official site you can download from any source. From the official site click on the Get Started button
Now you can see the screen to add an email and download the zip file for the plugin. Click the download button.
Setp2: Upload and install Plugin:
Its time to log in to your WordPress admin dashboard and go to the Plugins->Add New.
Here you can see the Upload option. Click upload
Select the Plugin file from choose file option that you downloaded in the last step. Please note that your file must be in zip format.
Once file is selected now you can see install button is active click Install.
After a short time, you will see a screen that shows that your required WordPress plugin is installed. Now press Activate to activate Plugin
There are also some other methods to install plugins on WordPress but for this article, we discuss these two only.
Do you know what is WordPress? If you don’t know relax I will tell you that what is WordPress is. WordPress is an open-source and a free content Management system (CMS). WordPress is written in PHP and MySQL or MariaDB is used as a database. A very large amount of websites are using WordPress as their content management system. Almost 38% of the websites are built on WordPress and a very huge number of os bloggers and companies are also using this CMS. WordPress is used for small blog websites to large eCommerce websites that mean every kind of website. WordPress has a large number of Themes and Plugins for its user. These plugins and Themes come in free and paid versions. WordPress itself is free but its themes and plugins paid. There are free WordPress plugins and themes also but they also have paid versions.