Warning: Redis::get(): php_network_getaddresses: getaddrinfo for localhost failed: Name or service not known in /home/solveddoc.com/public_html/wp-content/plugins/litespeed-cache/src/object-cache.cls.php on line 674 server techniques Archives - Page 2 of 3 - Solveddoc
How to resolve 404 error from website internal pages on LiteSpeed/Cyberpanel?
Some time you face 404 error on all internal pages of your website. This often happened when you move your website from one server to any other or change any internal configurations. Here in this article we will tell you How to resolve 404 error from website internal pages on LiteSpeed Cyberpanel.
Without going deep let me tell you the reason for this. This happened due to the permissions or the rewrite rules. As after changes Open litespeed need a restart.
To resolve 404 error from website internal pages on LiteSpeed/Cyberpanel we just have to do 2 steps.
Steps to resolve 404 error from website:
1. Fix permissions.
Login to your cyberpanel on port 8090.
https://<YOURIP>:8090
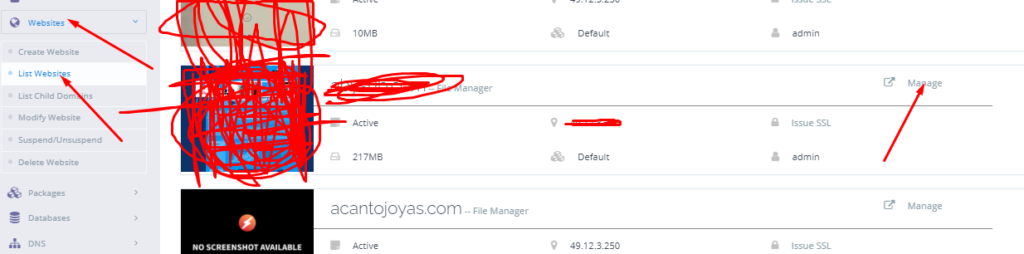
Got to the website->list websites then click on Manage button present in front of your domain which have issue.
Manage Website
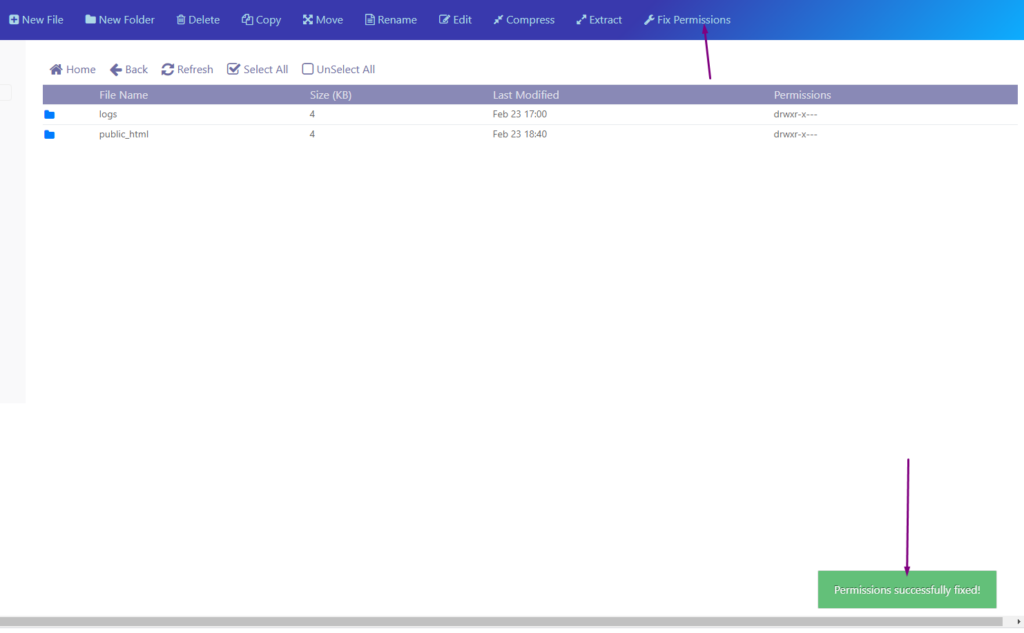
Scroll down and find file manager click on it and here you will find fix permissions button click that a green pop up appears.
fix permissions
2. Restart LiteSpeed Webserver
After doing all restart the Open liteSpeed webserver. You can do it two way one through command.
Systemctl restart lsws
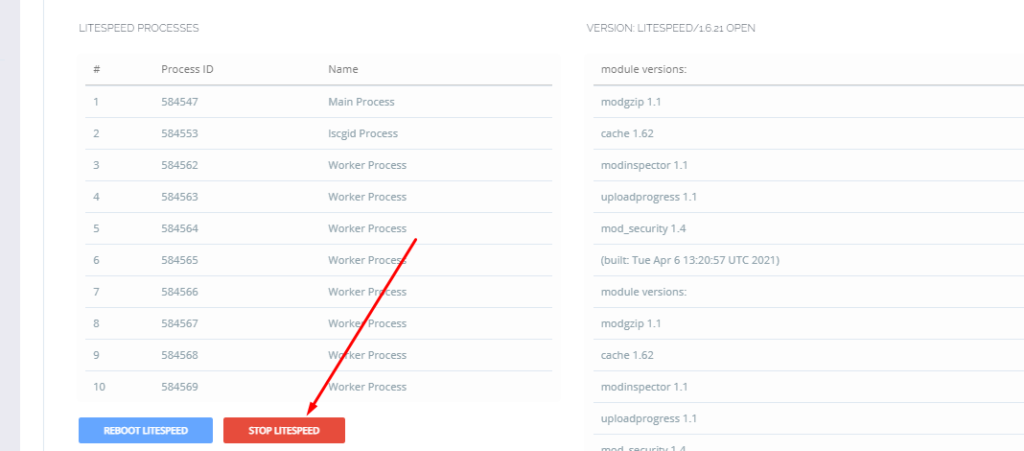
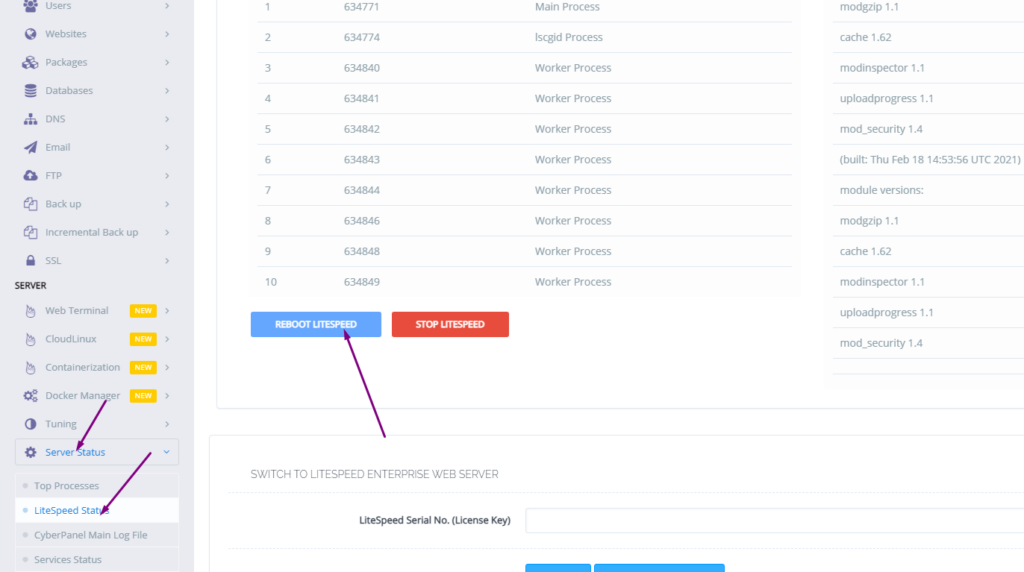
.Or go to the Server status-> LiteSpeed status and press restart.
How to change time zone on Linux server using command line?
In this article, we will know How to change time zone on a Linux server using command line. This is a very easy and a few steps process so follow along to change your time zone according to your need.
The Time zone is the standard time for any specific region. The server time zone is a basic and one of the important things. Server time zone set while installing and setup server. Sometimes we need to change our server time zone according to our requirements. There are many ways but here we will go through command line one. This is one of the easy ways while using Linux.
How to check Current TimeZone of your server?
Before changing your server time zone first of all you must know what is the current time zone of your server to do so you just need to run a very simple command. This command is available in all Linux flavors.
open terminal and run:
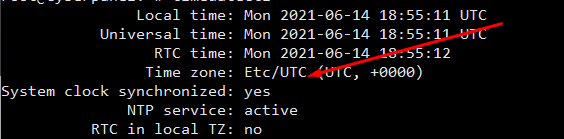
$ timedatectl
How to check Current TimeZone of your server?
You can see your current time zone of your server.
2. Set / Change Time zone on Linux Server Using Command line:
Before changing your time zone first of all you must have to know about the time zone you want to set. Like if you want to set somewhere in Asia. you must have to know about your region and cit. Now, how you can do it.
For this there is a command to list all time zones:
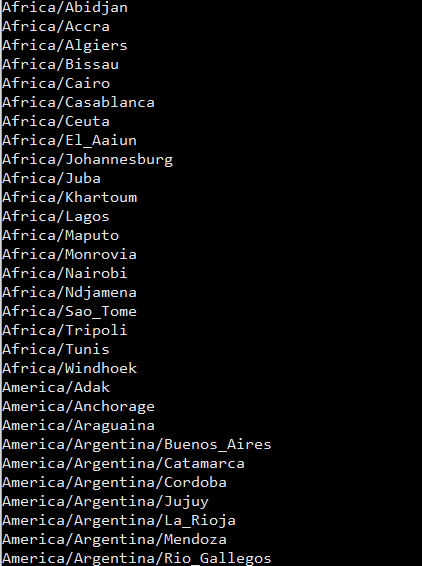
$ timedatectl list-timezones
List all time zones
Select your required time zone from the list and add it to this cmd.
timedatectl set-timezone “you time zone”
Make sure that you are login from root account if not use sudo with this.
$ sudo timedatectl set-timezone <your specific time zone>
set time zone
After running this run the timedatctl again and verify if time zone updated or not.
$ timedatectl
Now you can see time zone that you set using above methode.
NOTE: Time zone is one of the core important things many features and services depend upon it so before doing anything make sure that you understood all. moreover, you just need a reboot to apply a new time zone on all servers.
Sometimes we need to log in to the rainloop dashboard to do some configurations. Here in this article, we will tell you how to log in to rainloop admin dashboard?
Rainloop is an efficient memory webmail solution. it is a fast, simple, and modern web-based client email client. Rainloop is the email solution that comes with CyberPanel. It has an amazing user interface. Not only the interface also works great as any other email service.
RainLoop Admin Dashboard access address:
To access rainloop dashboard you just need to go to.
How to add ZeroSSL on your site? Free SSL for your website
You always need a secure URL for your website. Secure means your website will be accessible with SSL(Secure Sockets Layer). It’s very important to access your site on HTTPS instant of HTTP. Today I will tell you how you can add ZeroSSL to your website. ZeroSSL is totally free for your website.
ZeroSSL allows the free start of three domains. You can add free-of-cost SSL to your first three sites after those you have to buy if you want to issue SSL for more sites.
Create ZeroSSL account:
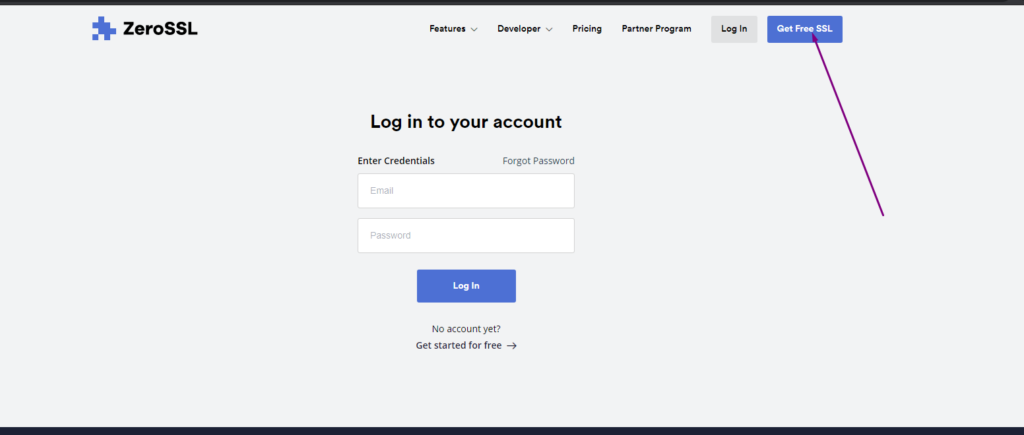
In first step you have to create an account on ZeroSSL website. For this go Here.
Here on this page you can see the Get Free SSL button click on that and visit to registration button.
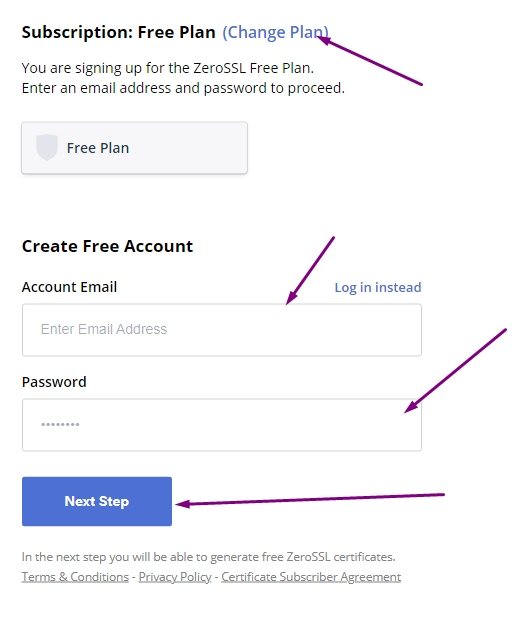
On this page you have to provide some information to signup.
Subscription Plan
Email Account
Password
After providing these all press to the Next Step button.
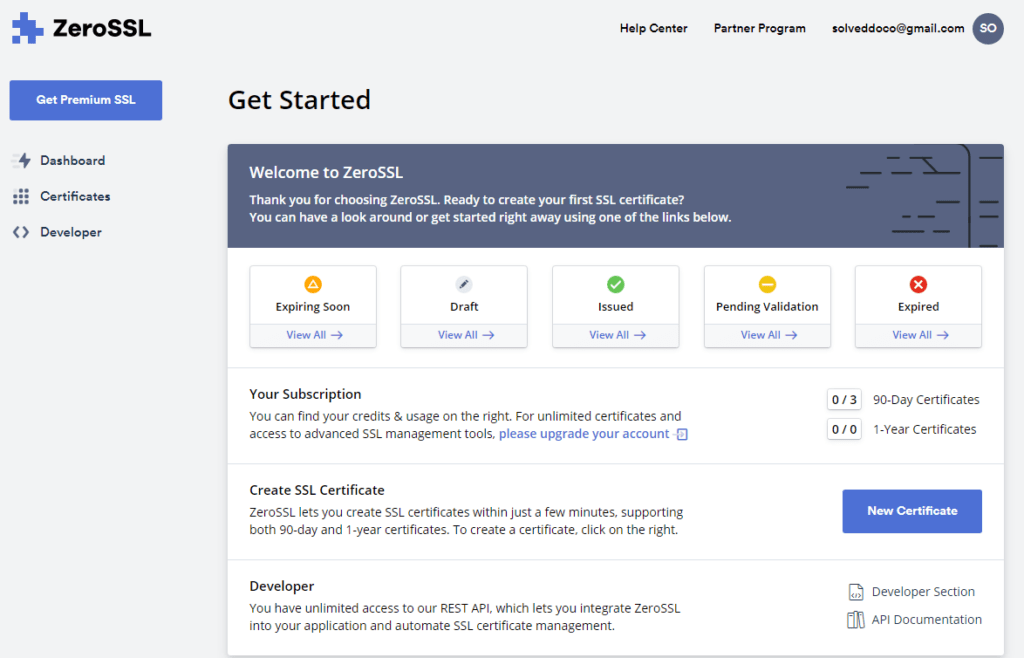
Once you press this button you can see the ZeroSSL dashboard.
Create New SSL Certificate:
Here on Dashboard you can see New Certificate button press this button present in the above image.
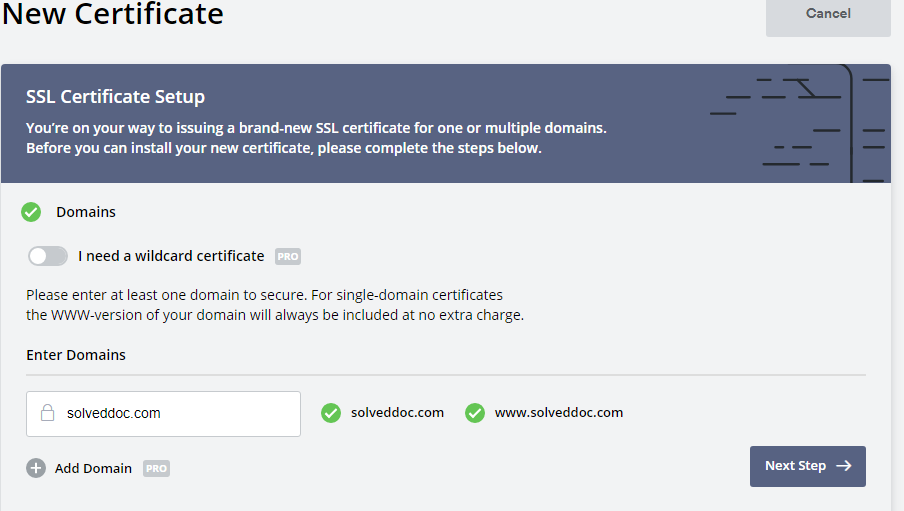
On the next page you have to provide following information:
Enter Domain (Enter your domain name for which you want to issue SSL)
You will see this Green ticks for a valid domain name.
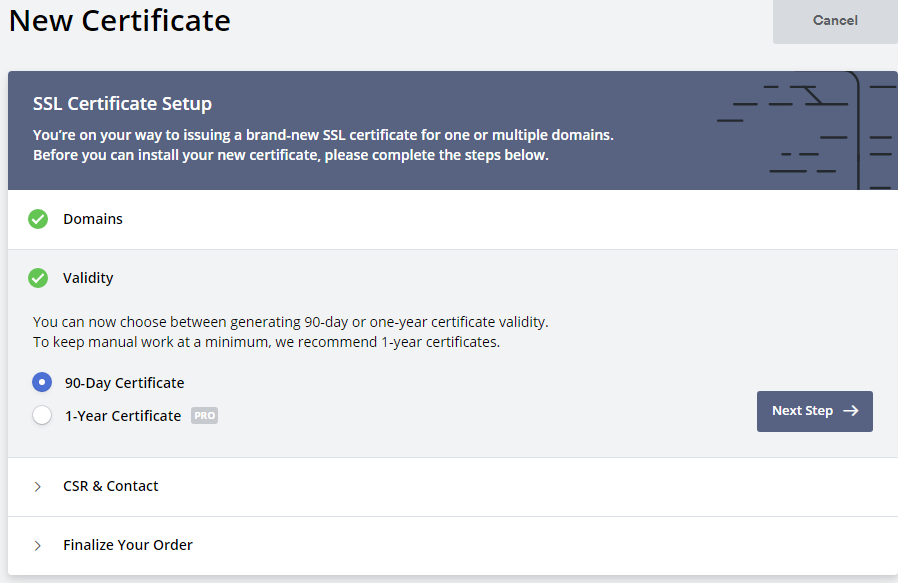
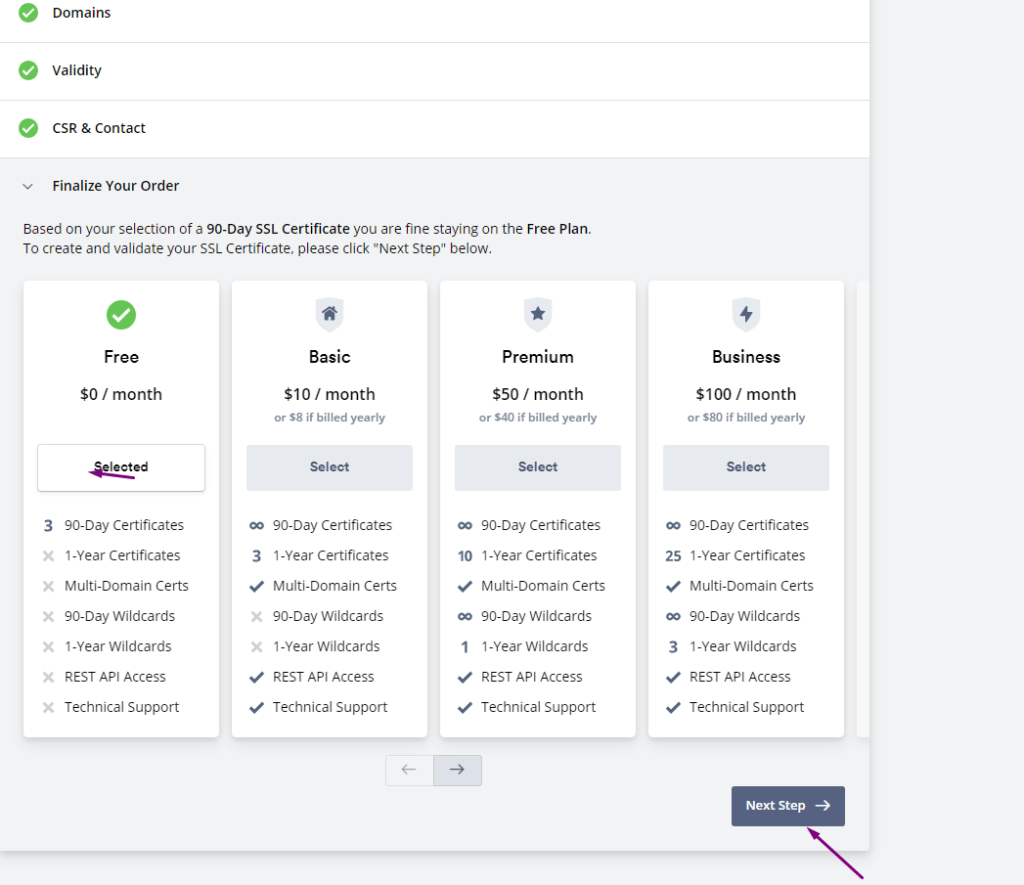
2. Validity (For how many time this ssl is valid )
Usually for 90 days its free and if you want for 1 year you have to buy.
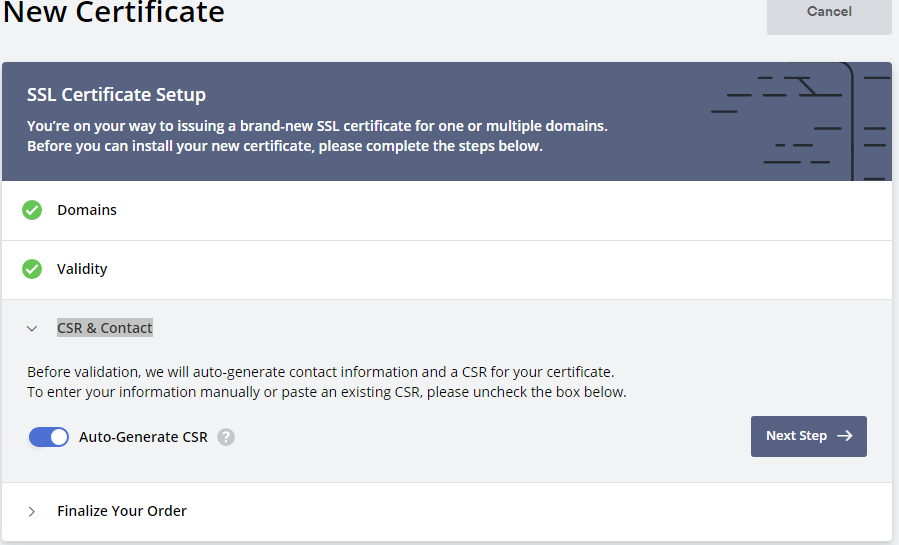
3. CSR & Contact
Finalize Your Order (you have to select )
You have limit to issue three free ssl to your domain. Once the process of plan selection done now you have to verify your domain.
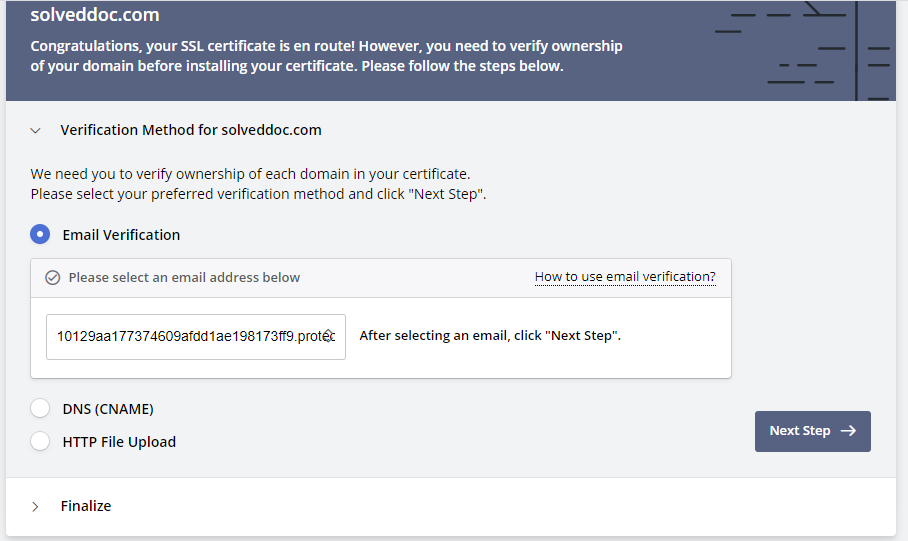
Verification Method:
ZeroSSL allow three types of verification:
Email Verification
DNS (CNAME) HTTP
File Upload
You can chose any one you are comfortable with. If you have this email then use it, or update DNS records according to the second or upload the file to dns.
Verification Method:
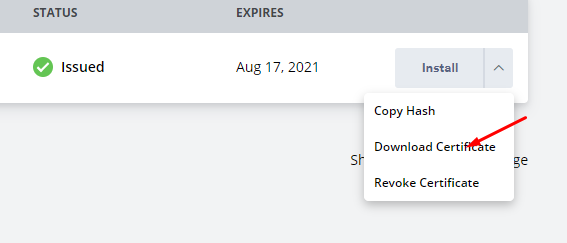
After this you will get a option to download SSL. you can download crteficate.
download SSL
Add ZeroSSL to your Website?
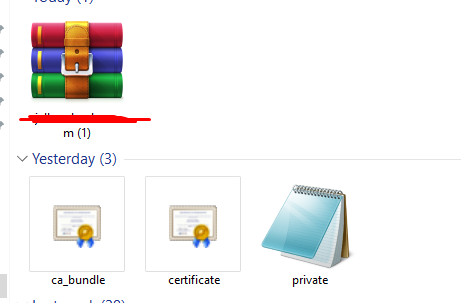
When you got your SSL file there must be three files after extracting. ca_budle, certificate, private key
Add these files values according to the require mint on your site.
A lot of users install ImunifyAV but after some issue, if they want to uninstall they do not know how to do this. Here in this article, we will tell you How To Uninstall Or Stop ImunifyAV?
ImunifyAV – an intelligent antivirus and security monitoring tool for websites with one-click automatic malware cleanup, domain reputation monitoring, and blacklist status check. Read more about ImunifyAV
A lot of users install ImunifyAV but after some issue, if they want to uninstall they do not know how to do this. Here in this article, we will tell you How To Uninstall Or Stop ImunifyAV?
In this artical we provide the way where you can able to uninstall or Stop ImunifyAV.
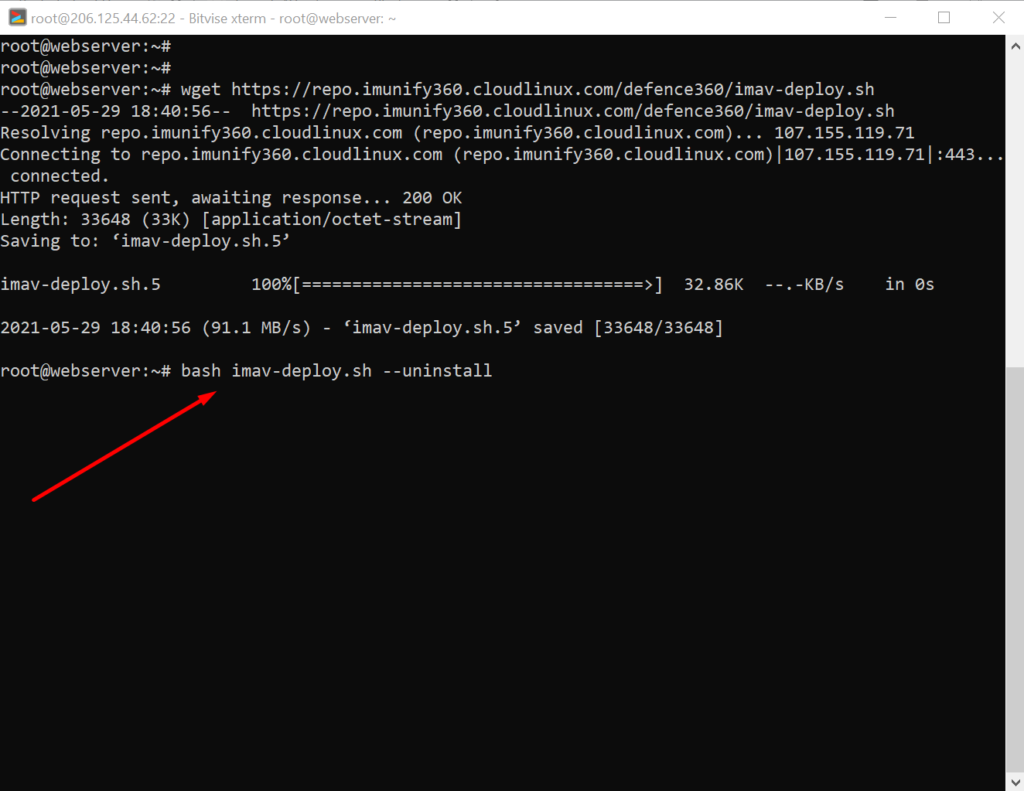
Uninstall ImunifyAV:
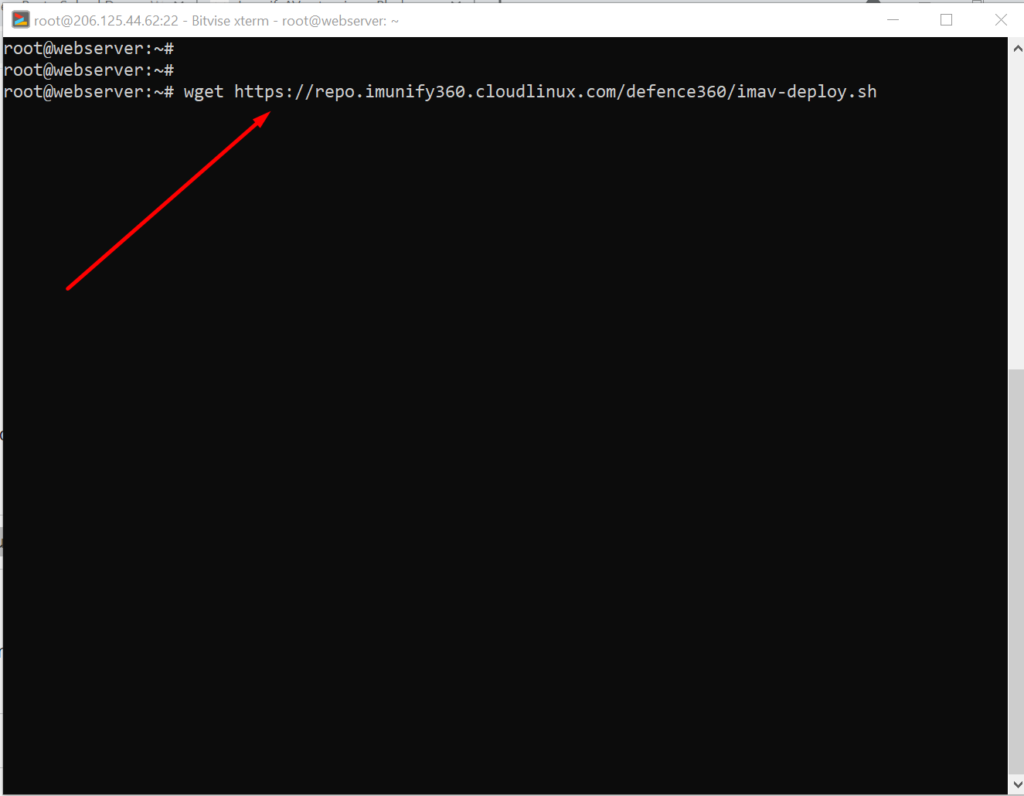
To uninstall ImunifyAV, you need to first download the imav-deploy.sh script with the following command:
How to solve the can’t upload the file on file manager issue in CyberPanel?
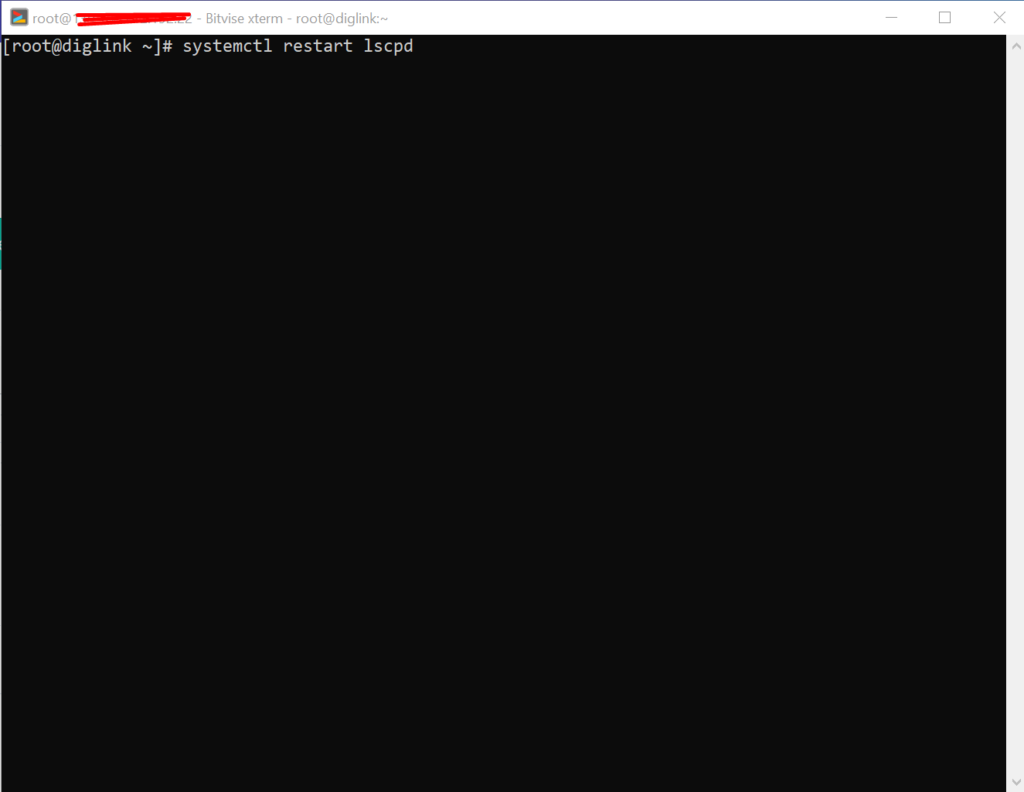
if you are uploading a file on file manager in CyberPanel. and getting some error there. Follow this short solution for can’t upload the file on CyberPanel file manager.
Solution
There is very easy and short solution for this issue. Access your root through Bitvise or putty open your terminal(CLI) and run this Command
Systemctl restart lscpd
This simple command will restart all of your CyberPanel services and now if you can try you can easily upload any file but there may be upload limit issue if so you can follow this tutorial to solve that Link below.
How to fix Fix WordPress 404 permalink OpenLiteSpeed- 404 error on OpenLiteSpeed
If you host your WordPress websites with OpenLiteSpeed you may get a 404 error on the permalink of your website. here in this article, I will explain how you can fix ix WordPress 404 permalink OpenLiteSpeed.
OpenLiteSpeed is the free version of LiteSpeed Enterprise and this free version is not as stable as the paid version. Not OpenLiteSpeed WordPress permalink often gives 404 error. When you move site from one server to another or made any change this error comes up. Here i will discuss few methods to solve this issue.
Methods to fix WordPress 404 permalink OpenLiteSpeed:
Method 1 Fix Permissions:
If you are using CyberPanel and you did any change of website after that 404 error come to the site you can fix it by doing few thing.
Fix permissions from the file manager
Restart OLS
Fix Permissions from the file manager:
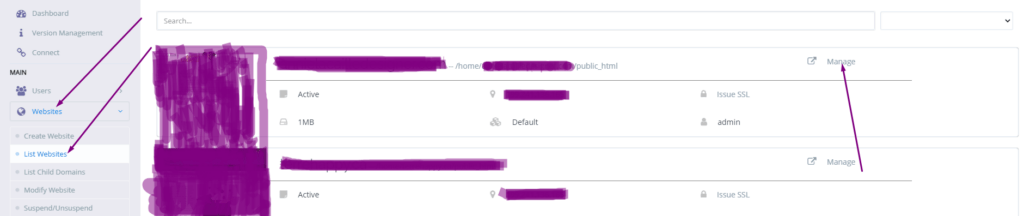
To fix permission you have to log in to your cyber panel then go to the Websites-> List website select the domain for which you have to fix the issue then press the Manage button present in front of the website.
Manage Website
On the Website Dashboard you can see File Manager press to access the file manager.
File Manager
In file manager click Fix Permission button and you can see the success massage in green color.
Fix Permission
After doing all now its time to restart OLS.
Restart OpenLiteSpeed:
To restart OLS from CyberPanel you have to go on Server Status ->LiteSpeed Status and then you see two-button shutdown and reboot. Press the Reboot button and you can see a success message.
Restart OpenLiteSpeed:
Method 2 htaccess:
An other reason is the missing rules in htaccess for WordPress. To check htaccess rules. Go to the Public_html folder of the website. If you have CyberPanel go to the Website->List Websites then press Manage button.
Then go to the file manager from the Website Dashboard.
File Manager
In file manager open and open .htaccess file and see if there is rules or if the file is empty.
If you want to create a Database in CyberPanel. And do not know how to do this you are on right place read this article to know how you can create a new DataBase on CyberPanel for your Website.
Table of Contents:
Login to CyberPanel
Create New Database
Access Database
Login to CyberPanel:
First of all visi the CyberPanel login URL to login to your CyberPanel it must be with port 8090, Look like:
https://<somainname/IP>:8090
Provide username and password and login to your CyberPanel dashboard.
CyberPanel Login
Create New Database:
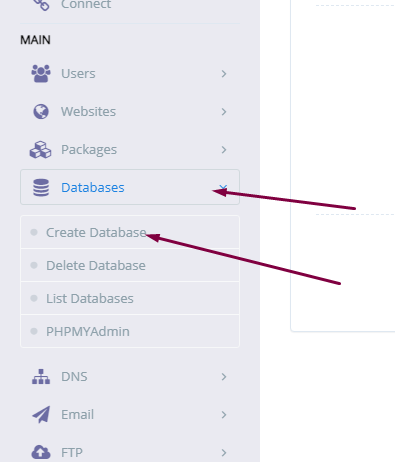
Once you logged in go to the Database->Create Database: in the left menu.
Create New Database
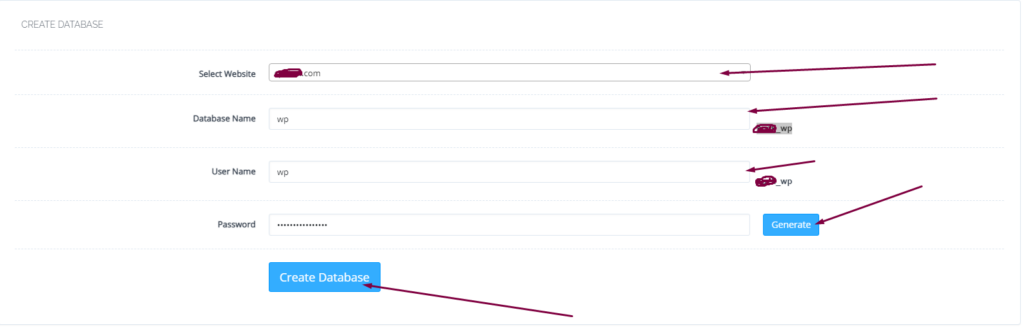
On this create database page you have to select the domain for which you want to create a new database.
select domain
Now screen ask you to provide the details for database.
Username
Database name
Password
Provide the Details for Database
When you press Create Database button this will create a new one for you on your server.
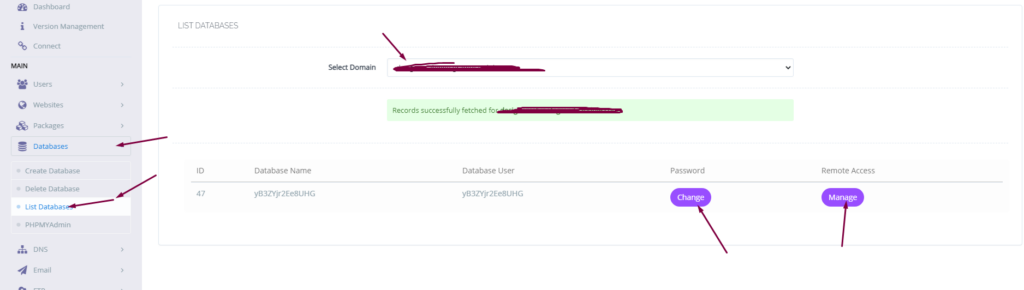
you can also list the database for any of your site on sever from Database-> List Database then select the domain and you can see the list.
list database
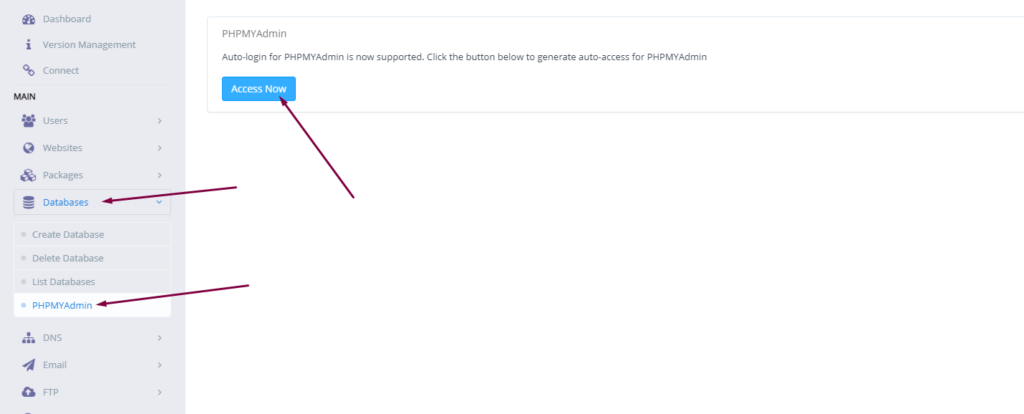
Access Database:
To access your database you created you have to go to Database-> PHPMYADMIN. Then press Access Now button.
You can see the PHPMyAdmin screen now. Where you can see all database for all domains. You can check the database your created and do any operation you want to do on this database.
Do you know now from CyberPanel version 2.0.3 you can install Redis on your server using one click? Here we will tell you one-click Redis install through CyberPanel.
Now CyberPanel made the installation and use of Redis cache on your server very easy.
Redis is an open-source cache used to cache databases, and is used as a message broker. Nowadays it is very important to use cache and boost your website. CyberPanel helps you to do this.
One-Click Redis install Through CyberPanel:
Follow these steps to setup Redis on your server.
Login to CyberPanel
One-Click Redis Install
Install Redis PHP extension
Setup Redis on WordPress using LS Cache
Login to CyberPanel:
Login to your CyberPanel using the credentials. Follow the link with port 8090.
https://<Your_IP>:8090
CyberPanel
One-Click Redis Install:
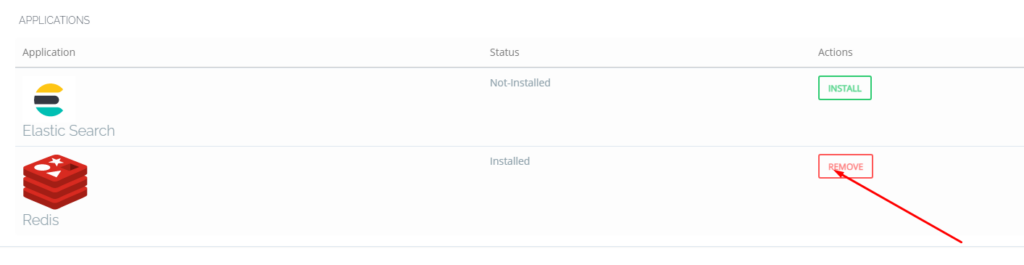
To install Redis on your server you have to go to the Manage Services->Application -> Redis then you can see the install button there. Click that and your Redis installed.
Now your Redis is installed and you have to install PHP extension to run properly.
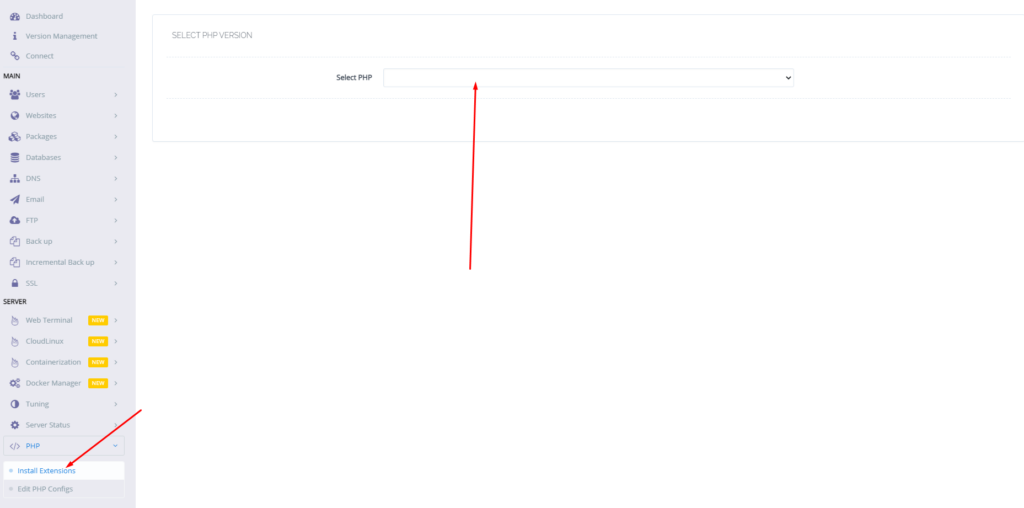
Install Redis PHP extension:
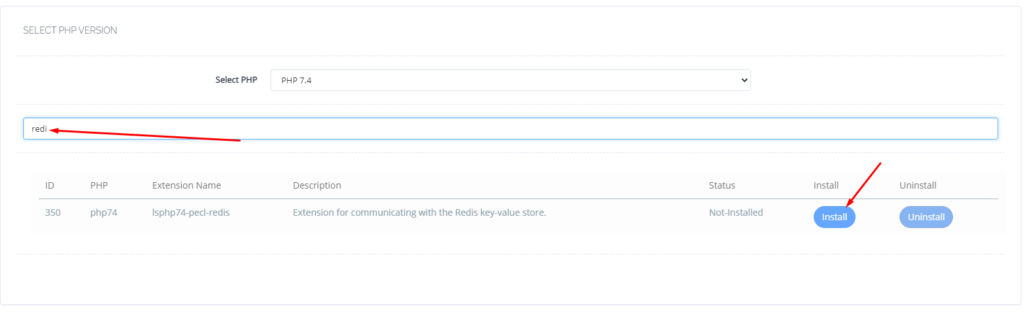
Now go to the PHP-> Install Extension Then you have to select PHP version for which you want to install Redis Extension. You can also follow this link.
Now search redis on the search bar and you can see redis PHP extension press the Install button and everything is good to go.
Redis
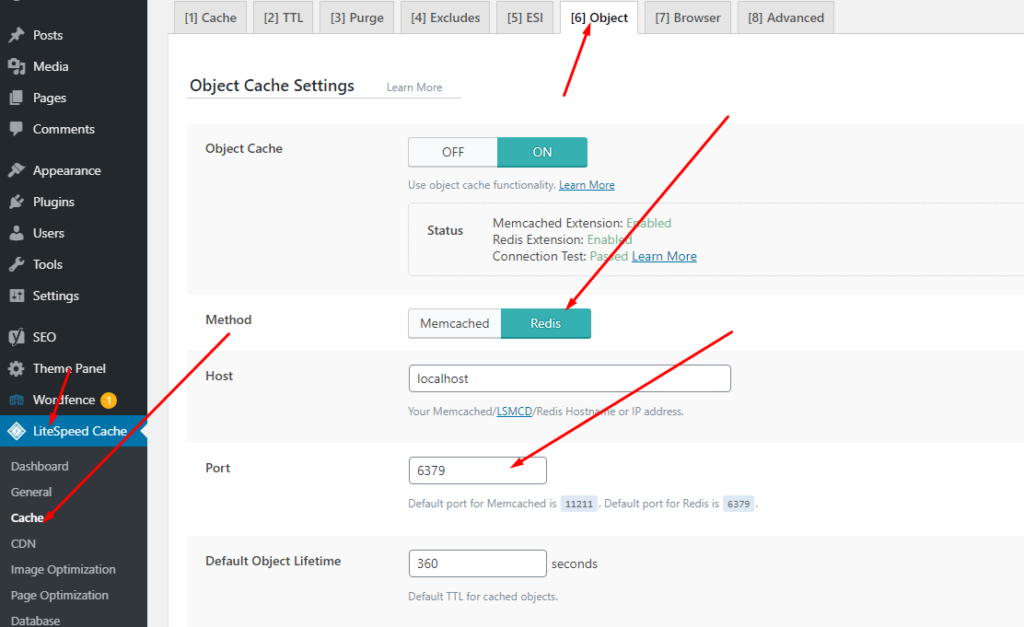
Setup Redis on WordPress using LS Cache:
Now it’s time to setup Redis on your WordPress site. We will tell you here how you can setup Redis on your WordPress site without any extra plugin. Ls cache plugin will all do for you. Let’s begin how to do.
Do you know how to change CyberPanel Admin Password? Read this short article to check and know how to change or reset the admin password on CyberPanel.
Methods to Change or reset CyberPanel Password:
Reset Cyberpanel Password using Command line.
Change Password From CyberPanel
Reset CyberPanel Password using Command line
Mostly you use this method when you don’t have your CyberPnael Credentials are forgotten your CyberPanel password. And you have root SSH access to your system.
To change the Cyberpanel password from the command line you just need to run a simple command.
adminPass Your_New_Password
This command helps you to reset your password easily without having any CyberPanel access.
Reset CyberPanel Password using Command line
Change Password From CyberPanel:
If you have your CyberPanel admin account access and you want to change it you just need to follow these easy steps.
Login to your cyberpanel account using your credentials on port 8090.
https://<your_ip>:8090
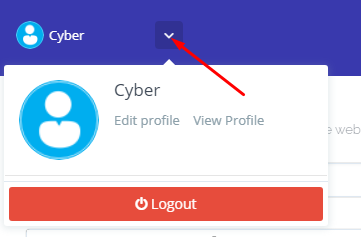
Once you login into your account clicks on the arrow on the top of your cyber panel account.
CyberPanel Profile
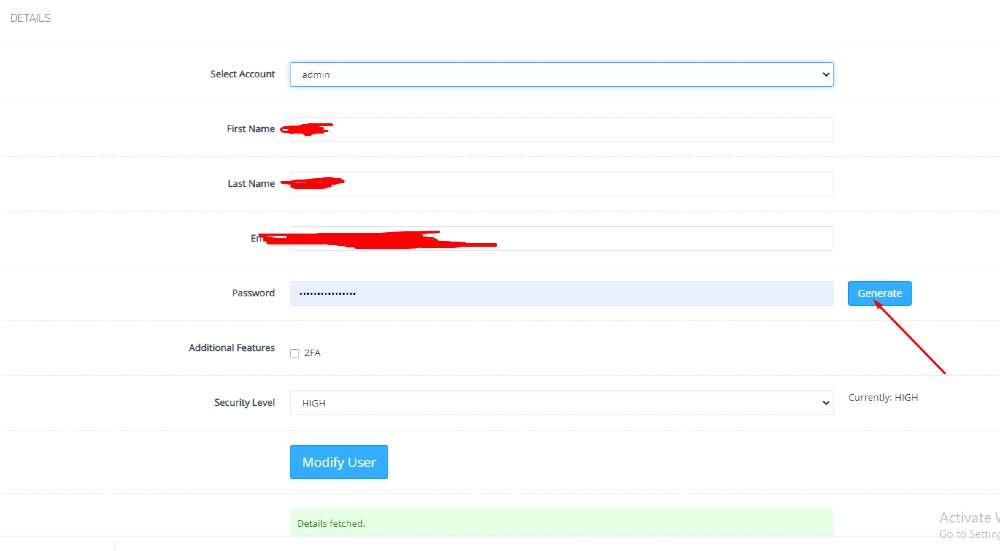
Then click the Edit Profile button. You can see a screen that ask you to select the account for which you want to change the password of CyberPanel.
Edit Profile
On this page, you can see you can change the password for your account and you can easily generate a password by clicking the generate password button.
Generating a password is a good move because CyberPanel auto-generate password will always generate a strong password.