Warning: Redis::get(): php_network_getaddresses: getaddrinfo for localhost failed: Name or service not known in /home/solveddoc.com/public_html/wp-content/plugins/litespeed-cache/src/object-cache.cls.php on line 674 November 2021 - Solveddoc
How to change Linux Server PHP version?
Some time the CLI or your server PHP version needs to change. Here in this article, we will discuss how to change Linux Server PHP version.
Welcome back! Many of you are wondering how to change the PHP CLI version. In this short article, we will be looking at this.
First, let’s check the current version of PHP. Type in the command:
php --version
As you can see, I am currently running PHP v7.4.25.
Change Linux Server PHP version
Now let’s change our PHP version but first of we need to know what other versions we can use. To know that type in the terminal:
ls /usr/local/lsws/
We have four versions available i.e PHP 7.2, 7.3 7.4, and 8.0. I will be changing it to 8.0.
Now to do that, you need to copy the binary of the version you want to use to the user’s binary. Now type in the following command:
cp /usr/local/lsws/lsphp80/bin/php /usr/bin/
Change the lsphp80 to any version you want and hit enter. After that, check the PHP version again and you’ll see the version is changed.
How to Uninstall or Remove Broken Package in Linux?
Many times it happens that when you try to uninstall a package you encounter an error and the package cannot be uninstalled. This happens when the package is broken. To overcome this issue, we remove the post files of the package to make things work. in this article we are going to learn how to Remove Broken Package in Linux.
Recently, I was trying to remove the ImunifyAV package but encountered this error. E: Sub-process /usr/bin/dpkg returned an error code (1)
Removing the Post Files
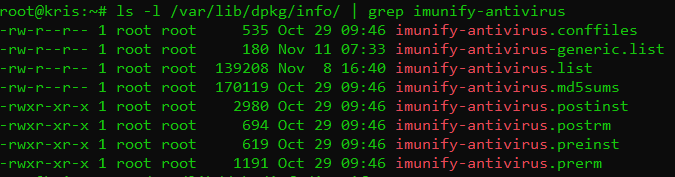
To fix this issue and remove the package successfully, we need to remove the post files manually for this package. But first, we need to see the files for this package. The installation files are usually located at /var/lib/dpkg/info file. Type in the following command and replace the package_name with the name of the package that you want to remove.
In my case, I replaced the package_name with imunify-antivirus. This thing helps me to list all packages of imunify-antivirus. Now we need to remove these files manually. For that, type the command:
sudo mv /var/lib/dpkg/info/package_name.* /tmp
This will move all the post files to the tmp directory in case we need them back for any reason. Once the command executed to remove files. After doing that reinstall the package again without getting any errors.
Don’t forget to run the sudo apt update command after removing the files.
after doing all these just run commands to Remove Broken Package in Linux.
Command to Remove Broken Package in Linux:
$ apt unintsall <package-name>
After doing all these steps you can run the uninstall command like this given above and get the required results.
Dovecot is an open-source IMAP and POP3 email server for Linux/UNIX-like frameworks written with security primarily in mind. It is a Mail Delivery Agent. Dovecot is easy to set up and requires almost no memory. It allows users to access their mailboxes using the IMAP interface. If configured correctly, it only interacts with authenticated users.
The main config file of Dovecot is located at /etc/dovecot/dovecot.conf. We will be looking at three main options:
listen: This options allows you to set the IP address where you want to listen. You can use an asterik (*) which the wildcard meaning all IPv4 address and for IPv6 addresses you can use (::). To use both it should be like:
listen = *, ::
protocols: This option allows you to specify which protocols you would like to support such as POP3, IMAP. LMTP is also listed here as well which stands for Local Mail Transfer Protocol:
protocols = imap, pop3, lmtp
mail_location: This option sets from where the mail is picked up. By default, this setiing is empty, which means that Dovecot attempts to locate your mail automatically. The format of the mailbox location specification option is as follows:
What is Postfix and How to Install and Configure it?
In this article, we are going to be looking at Postfix. It is a Mail Transfer Agent (MTA) which is used to send and receive emails. It is currently used by 33% of internet mail servers. Let’s move on to installing the Postfix.
Installing Postfix
To install postfix you need to type in the following command:
You also need to install mailutils utility for Postfix to work correctly.
Configuring the Postfix
We need to configure the inet_interfaces in the Postfix main config file. The network interface addresses that this mail system receives mail on. Specify “all” to receive mail on all network interfaces (default), and “loopback-only” to receive mail on loopback network interfaces only
nano /etc/postfix/main.cf
When the file is opened, scroll down the page until you see the line:
inet_interfaces = all
Now it’s up to you on which interface you want to receive emails. You can either go with the default one this all which listens on all interfaces or you can replace it with loopback-only to listen only on localhost.
Another directive that we need to look at is mydestination, the list of domains that are delivered via the local_transport mail delivery transport. By default, this is the Postfix delivery agent which looks up all recipients in /etc/passwd and /etc/aliases.
Mine is configured to:
mydestination = localhost, localhost.localdomain
After making changes, you need to restart the Postfix.
sudo systemctl restart postfix
Testing the SMTP Server
Now it’s time to test the Postfix whether it can send an email or not using the mail the command which comes with the package mailutils that we installed earlier.
echo "This is the body of the email" | mail -s "This is the subject line" your_email_address
In place of your_email_address, enter the valid email address to which you want to send the email. Now check the account on which you have sent the mail.