To install MailScanner on CyberPanel is very easy and a few click process. MailScanner is one of the core requirements for the email system now. And CyberPanel has a MailScanner which you can install from the CyberPanel dashboard.
In CyberPanel MailScanner is done by the community and this feature have a goof version but i am not sure that if it is 100% stable. So maybe MailScanner causes any issue in your mail server.
To install MailScanner on CyberPanel follow these steps.
Login to CyberPanel :
Login to your Cyberpanel account using your CyberPanel credentials. You have to visit the link:
https://<your-ip>:8090
Provide username and password and log in.
Install MailScanner on CyberPanel:
To install MailScanner on the server just follow these steps.
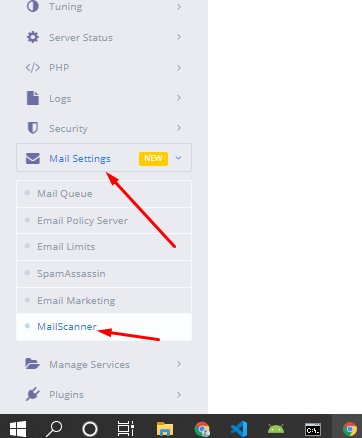
After login to CyberPanel dashboard just go to the Mail Settings-> MailScanner
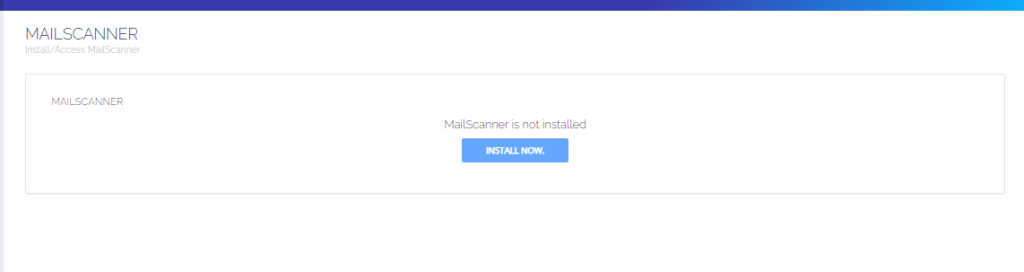
2. On the next screen you can see you have an Install button just press that and your MailScanner will be installed.
The installation process will take some time to complete and once the installation is done you can access the mail scanner on the server.
After clicking this button your Mailscanner is installed. And now you can access your MailScanner by clicking Access Now button.
How to Install and Setup Wordfence Security Plugin in WordPress
Do you want to secure your website from hackers? You want a secure website? Do you want to install and setup Wordfence Security Plugin to make your website more secure?
If you need anything above here in this article you will get all this information.
Wordfence Security is the most popular WordPress Scanner and Firewall. Wordfence uses to scan, remove malware, firewall again attacks, IP securing, 2FA login, etc.
You have to follow these steps to install and setup Wordfence in WordPress:
Install and Activate Wordfence
Setup Firewall in Wordfence
Scan your site from Wordfence
Login Security Setup
Other Security tools
Install Wordfence Plugin:
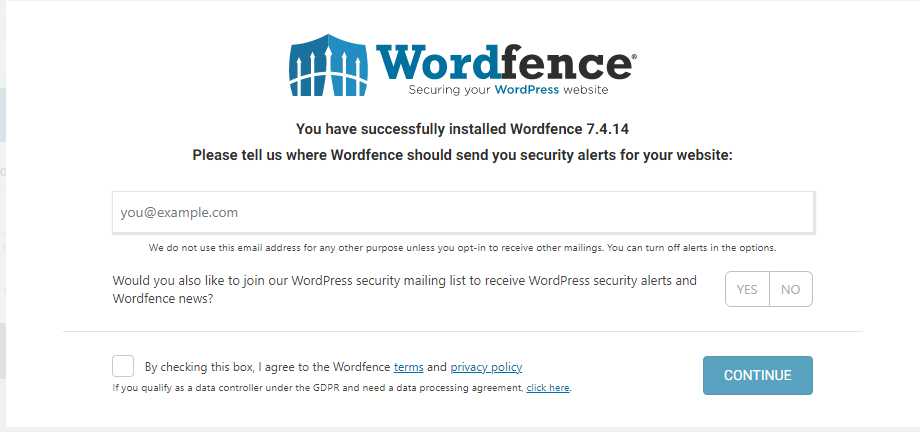
installation of Wordfence is just like any other WordPress Plugin. You can easily install Wordfence Plugin from the Plugin directory or you can download it from the Wordfence site and upload it.
After installation activate this Wordfence security plugin to configure it.
Install Wordfence Plugin
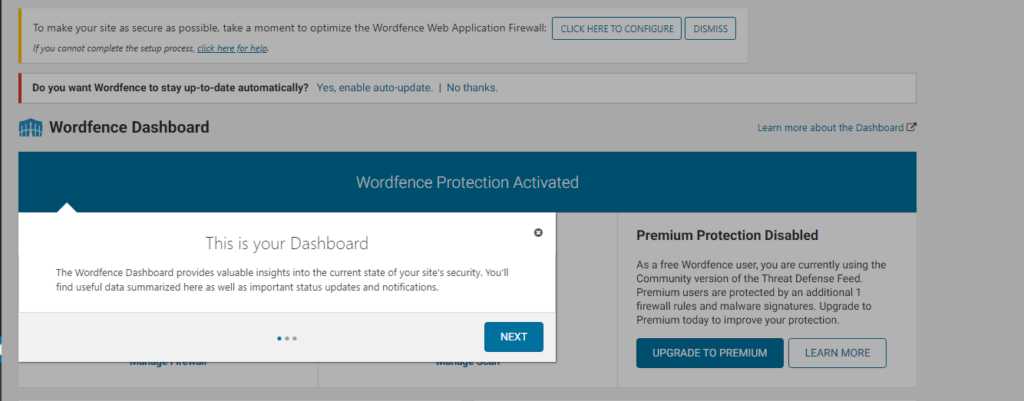
Once you completed the installation and check this privacy policy and terms link you can see the Dashboard of the Wordfence plugin by click on it from Wordfence -> Dashboard.
Wordfence Dashboard
They guide you through these steps and you can follow these but follow another part of this article in order to understand better.
Setup Firewall in Wordfence:
Wordfence Firewall saves your website from malleolus access of the website. The firewall has general real-time security and secures your website from brute force attacks on your website.
The free version of the Firewall of the workforce does most of the things for you but in the premium version, you will get all the advanced features also.
Premium versions include Real-time IP blocklist, Real-time firewall rules, and malware defense.
The firewall has two-level f protection one is basic and the other one is advanced level protection. The basic level of protection covers the threads and attacks on the website but may miss some plugin and themes attacks. Advanced level covers all these.
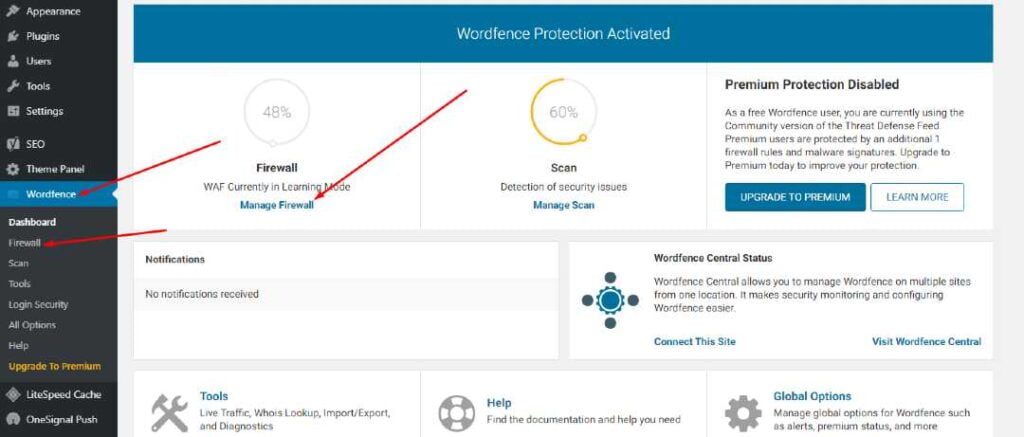
On the Dashboard page of your Wordfence plugin, you can see the firewall percentage.
Wordfence plugin
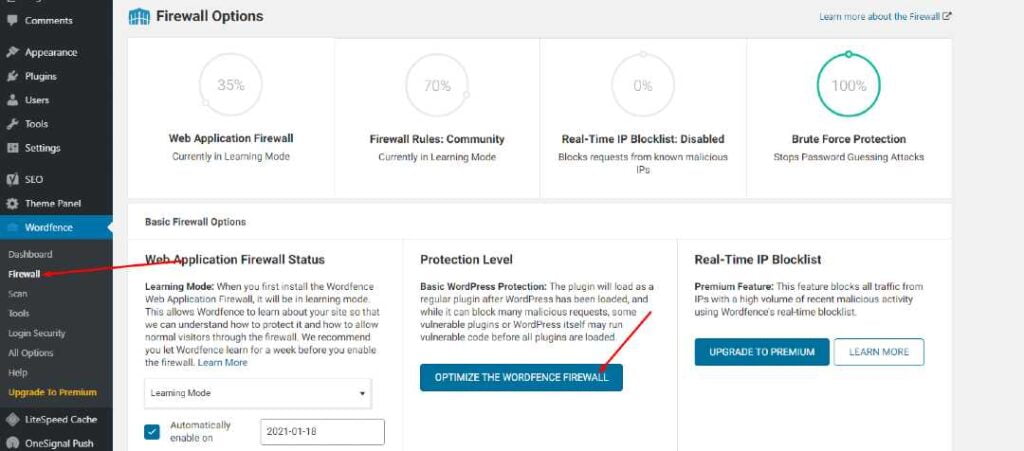
To configure your Wordfence firewall go to Wordfence->Firewall option.
Configure your Wordfence firewall
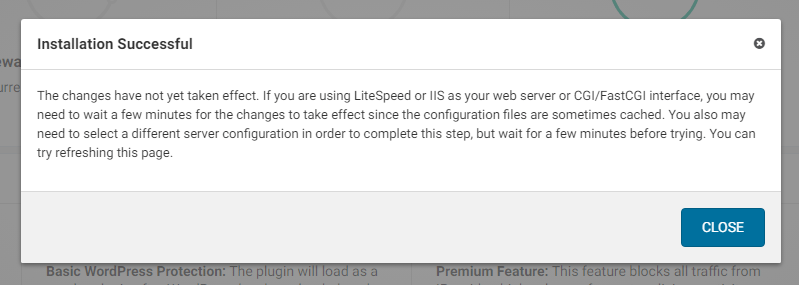
Once you click the Optimize The Wordfence Firewall you will see a notice click Continue and you can see your firewall is successfully installed.
Done
You can also see extended mode is enabled. if you check your firewall performance is also increased.
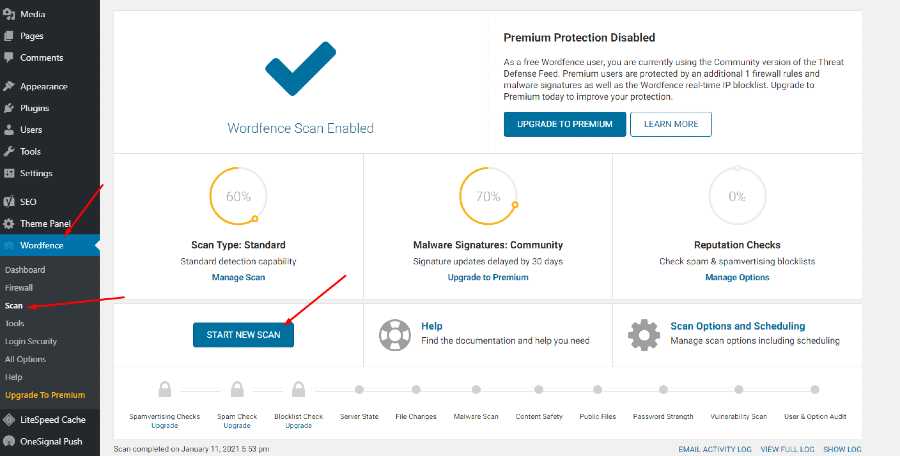
Scan your site from Wordfence:
You can scan your website using the Wordfence security plugin. To scan your website go to the Wordfence->Scan->Start Scan.
Scan your site from Wordfence
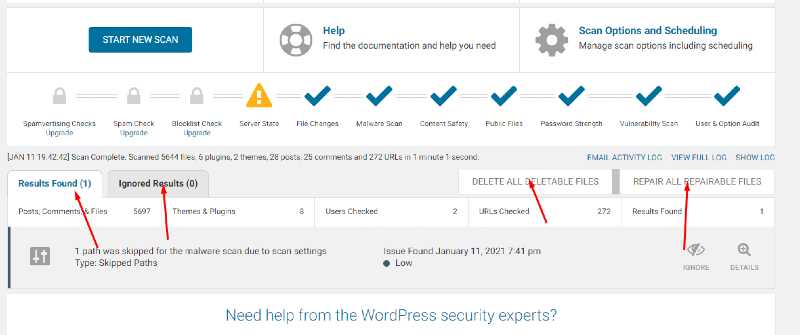
After clicking start scan you can see that your site starts scanning and now wordfence goes into the file of your WordPress site.
Basically, wordfence goes into the files of your websites and scans all the files present on your website directory. Note all changes that happen in that file and write those on your screen.
Wordfence tells you that which issue and changes of files are critical, which are ignorable, which files need to delete and which can be ignored.
The scanning process does not go into just one step it complete in a number of steps.
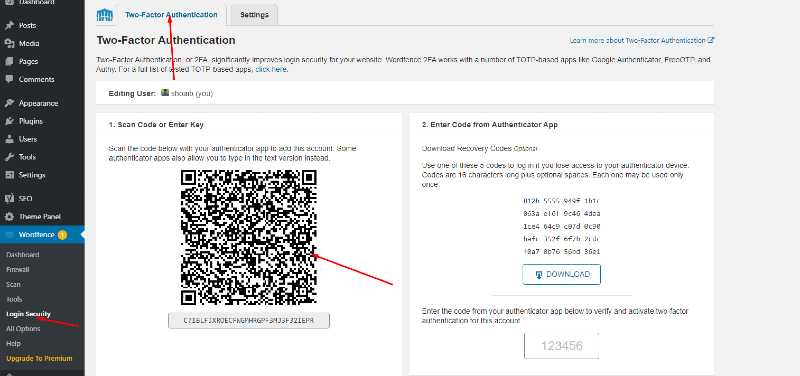
The coolest feature of worfence is that it has a Login security feaster also use this plugin you can set 2FA. Now your question is how to set up a 2FA login using wordfence security plugin?
To set 2FA login go to the Wordfence->Login->2FA scan code.
Login Security Setup
You can also go to settings and check for the other settings too like whom you want to 2FA for.
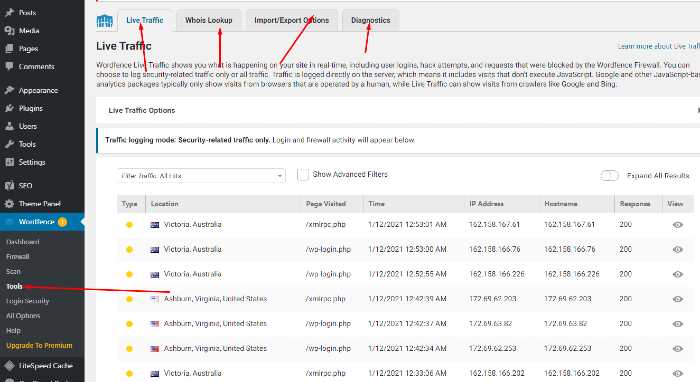
Other Security tools:
There are also other security tools like Live traffic, Whois Lookup, Import/Export Options, and Diagnostics.
These option also help user in security as well as performance.
Other Security tools
Security of your website is very important you have to secure your website no matter you use this plugin or use any other matter but the point is your site must be secure.
From this guide, How to Install and Setup Wordfence Security Plugin in WordPress you got a good idea to configure your Wordfence plugin with your website.
The process to add Child domain or subdomain in CyberPanel is very easy and short. Here i will tell you how to add subdomain in CyberPanel under any main domain or website.
How to Create Child Domain under main website?
To create child domain for a main or master domain you just need to go to.
Websites->List Websites->Manage
Manage of that website for which you want to create the subdomain.
Websites->List Websites->Manage
And click the Manage button you can also follow this URL:
https://<YOUR IP>:8090/websites/example.com
When you click the manage button you can see the website manager screen. This screen has a a lot of option. Like LOGS, DOMIANS, FILES, CONFIGRATIONS, ETC.
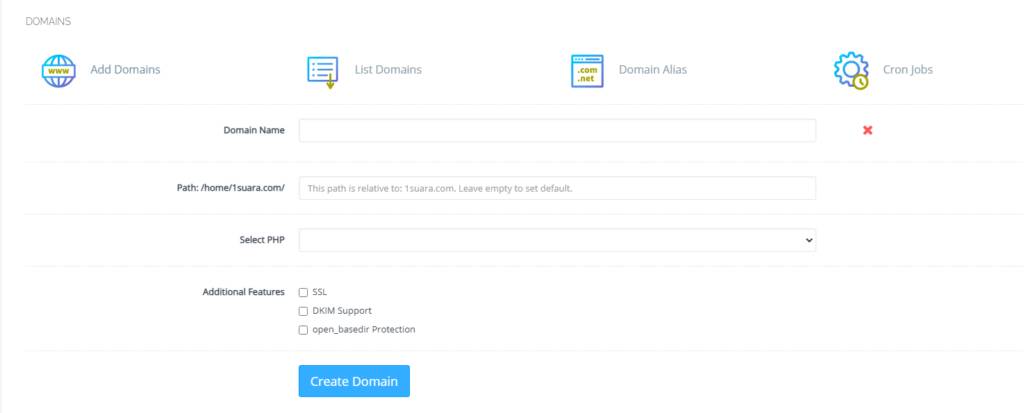
Got to the Domains part and click the Add Domains button.
Add Domains
When you click on this option you are asked to provide the details for the subdomain you want to add.
Details for the subdomain you want to add
After providing the details like:
Domain name
Path (Leave it empty)
Select PHP version
In additional features (Select SSL, DKIM, Open_basedir Protection)
Click the Create Domain button and you will receive a success massage from the panel.
Create Domain
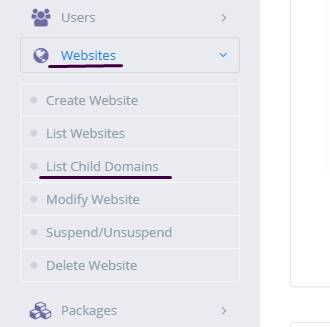
Once child domain is created from here. Now you can list child domain from two ways.
Go to website-> List child Domain
website-> List child Domain
2. From the Websites-> List Websites -> Manage-> List Domains
CyberPanel has a great feature to add Google Drive backups. They added this feature in their 2.0.2 version.
This G-Drive backup option makes the backup process easy and more reliable. The method to set up Google drive Backup is also so easy. there is nothing typical or complex.
You can follow this guide to add Google drive backup through CyberPanel.
Table Of Contents:
Login to your CyberPanel Account
Set up Google Drive Backup
Set Up New Account
Add Sites For Backup
Login To CyberPanel:
To initiate this process you must have to log in to the CyberPanel. So use your CyberPanel credentials to log in.
Set Up Google Drive Backup:
Now go to Back Up->Setup Google Drive to set up google drive backup for your site.
Set Up new Account
Here you can see the SETUP NEW ACCOUNT click that button to add a google drive account for backup.
You can see a Pop up asking for the name of the account you want to set up for your g-drive backup.
Enter your name here and then click the Save button. This will migrate you to a new screen for Google account setup.
Select any account if you are logged in or add a new one here
Now click the Allow button to processed.
Once it’s done now you will get back to the backup page. and you can select that account you just added.
Add Sites For Backup:
Now you can add backups for your sites from this screen. Select account from here.
Now provide the details and Press the Add button then you can see the Site added below.
How to Setup Two Factor Authentication in CyberPanel?
Here i will tell you how you can setup Two Factor Authentication in cyberpanel?
In the latest version of cyberpanel they introduced the 2FA for login to cyberpanel. In the resent released version 2.0.3 this two factor authentication setup is introduced.
Now cyberpanel provide an extra layer of security for cyberpanel user. In this article I will tell you step by step how to setup 2FA in CyberPanel.
Table of contents:
Setup 2FA in CyberPanel
Test two factor Authentication by login
Setup 2FA in CyberPanel:
To setup 2FA in cyberpanel login to CyberPanel on port 8090 using your credentials.
Then navigate to Users-> Modify User:
Press modify user and use can see screen that ask you to select a user for modification. Select any user from this page.
Click themodify user and use can see screen that ask you to select a user for modification.
You can see the authenticator
Now go to download any two-factor authentication application and scan this code. For me, I used Google Authenticator. You can download it from here.
Now scan this code in your application and you will see a code on your screen.
After this press to Modify and save the settings.
Test two factor Authentication by login:
To test the two factor authentication what you need to do is log out from your account you enabled two factor authentication.
Now you can see the login page provide the login details and press Sign in button:
Now it will ask you Enter code from Google Authenticator. provide the code that you saved in google authenticator app and press Sign In.
If you want you upgrade your Cyberpanel to latest version then you are at right place.
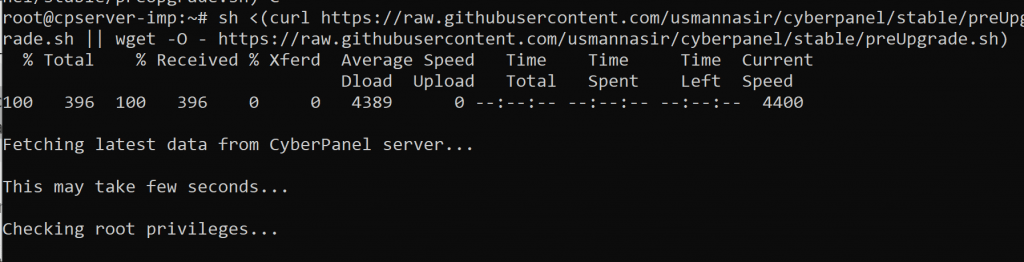
Here we tell you how to upgrade CyberPanel to the latest version. this is pretty easy to upgrade CyberPanel. You can get the latest Upgraded CyberPanel through just one command.
Upgrade CyberPanel To latest version:
Here the command to upgrade the cyber panel to the latest version.
sh <(curl https://raw.githubusercontent.com/usmannasir/cyberpanel/stable/preUpgrade.sh || wget -O - https://raw.githubusercontent.com/usmannasir/cyberpanel/stable/preUpgrade.sh)
But if you do not want the latest released version. You want to install any other specific version then use another command which allows you to update the cyber panel to a specific version.
<branch name> is the name of the branch you want to install like 2.0.1
From the first command, you can also upgrade the Cyberpanel to a specific version for this you have to take care of a thing, and what id that?
sh <(curl https://raw.githubusercontent.com/usmannasir/cyberpanel/stable/preUpgrade.sh || wget -O - https://raw.githubusercontent.com/usmannasir/cyberpanel/stable/preUpgrade.sh)
When you run this command and at a point, they ask for a version you can give the version like 2.0.2 or any you want. And if you want to upgrade to the version that is not released yet get and find the version from the CyberPanel team and provide the version when this command asks for the version.
Cyberpenel developers are very fast and good at updating. And introducing new features for CyberPanel users. I think they are always in a hurry to launch a new version. And trust me, they always introduce the best in the new version of CyberPanel. That’s why I like them. But I don’t think auto-upgrade is possible for CyberPanel. You will need to update when they release the new version. Here I will give you a very easy way to upgrade the cyber panel. Believe me, it has only one command.