Warning: Redis::get(): php_network_getaddresses: getaddrinfo for localhost failed: Name or service not known in /home/solveddoc.com/public_html/wp-content/plugins/litespeed-cache/src/object-cache.cls.php on line 674 Uncategorized Archives - Solveddoc
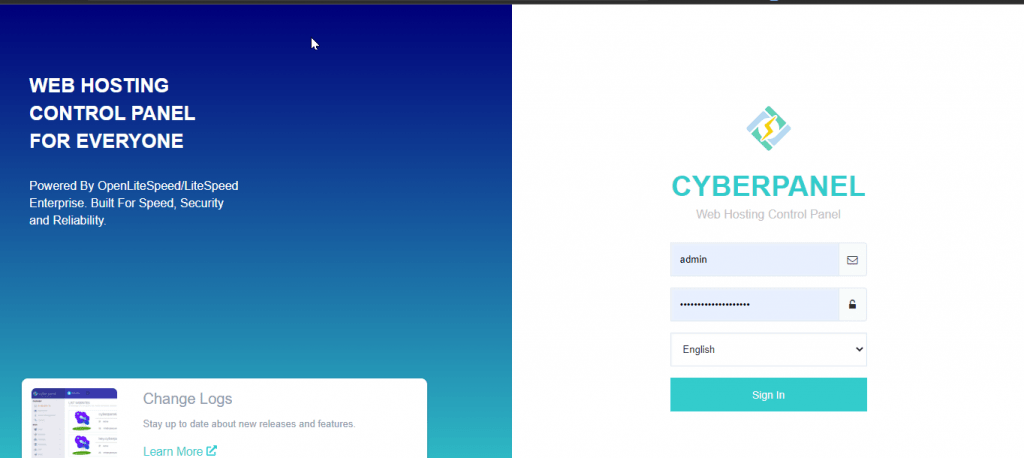
Google Drive Connection Error in CyberPanel — Fixed
If you’re using the latest version of CyberPanel and encounter the following error while connecting your Google Drive account:
This issue occurs because the previously authorized access tokens are outdated or have mismatched scopes after a recent update.
How to Fix the Issue
Go to your Google Account → Security → Third-party apps with account access.
Find and remove CyberPanel’s access to your Google Drive.
Return to CyberPanel and try connecting Google Drive again.
CyberPanel will now request the correct access scopes, and the connection should succeed.
how to change the time in my cpanel?
Sometimes you need to change your server time we already have an article on changing server time here. But in this, we will check how to change the time in my cpanel. Keeping the correct server time is essential for accurate logs, scheduling tasks, and ensuring smooth website functionality. If you’re using cPanel and need to change the server time, follow this guide to adjust your settings properly.
How do I change the time in my cpanel/server?
By default, cPanel does not allow users to change the server time directly. The time settings are managed at the server level, which means only users with root access (such as VPS or dedicated server administrators) can modify them. If you are on shared hosting, you will need to contact your hosting provider for changes.
There are two ways to change the time in the server which have cpanel or any other panel.
how to change the time in my cpanel using cpanel or whm?
how to change the time in the server using the command line.
1. Change time using cpanel:
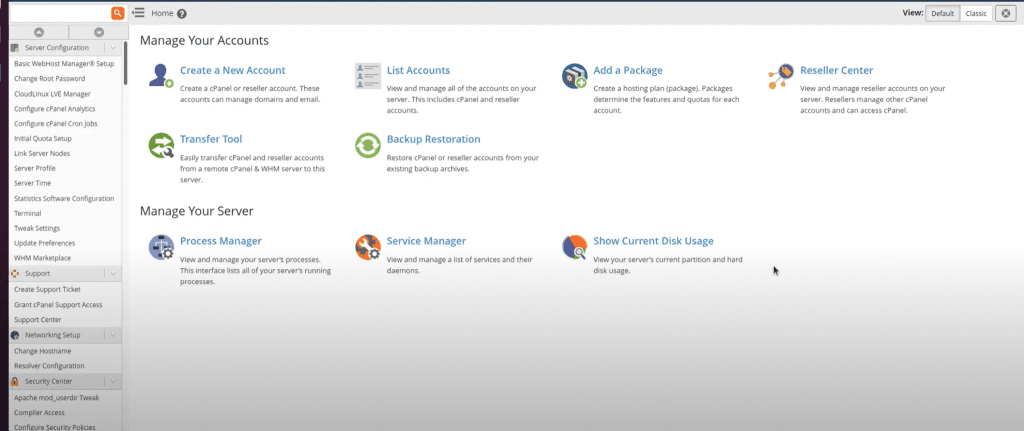
To set or change time in cpanel login to your cpanel account.
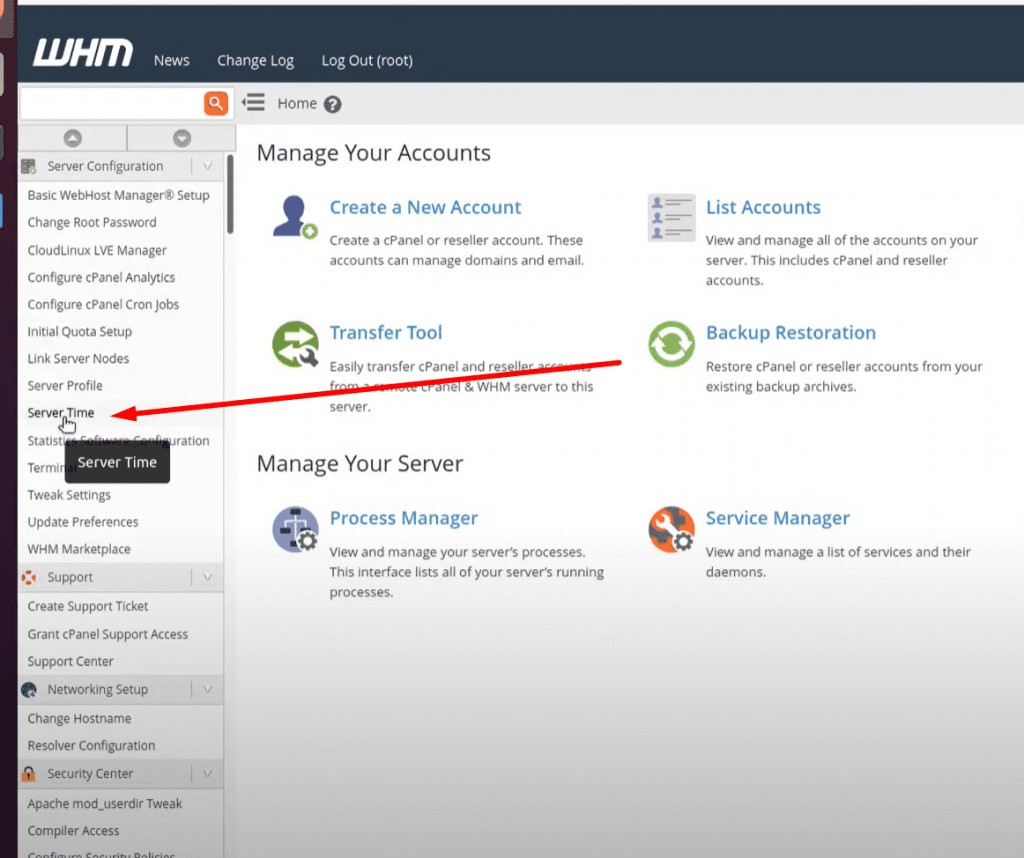
Now from left menu go to the server time option
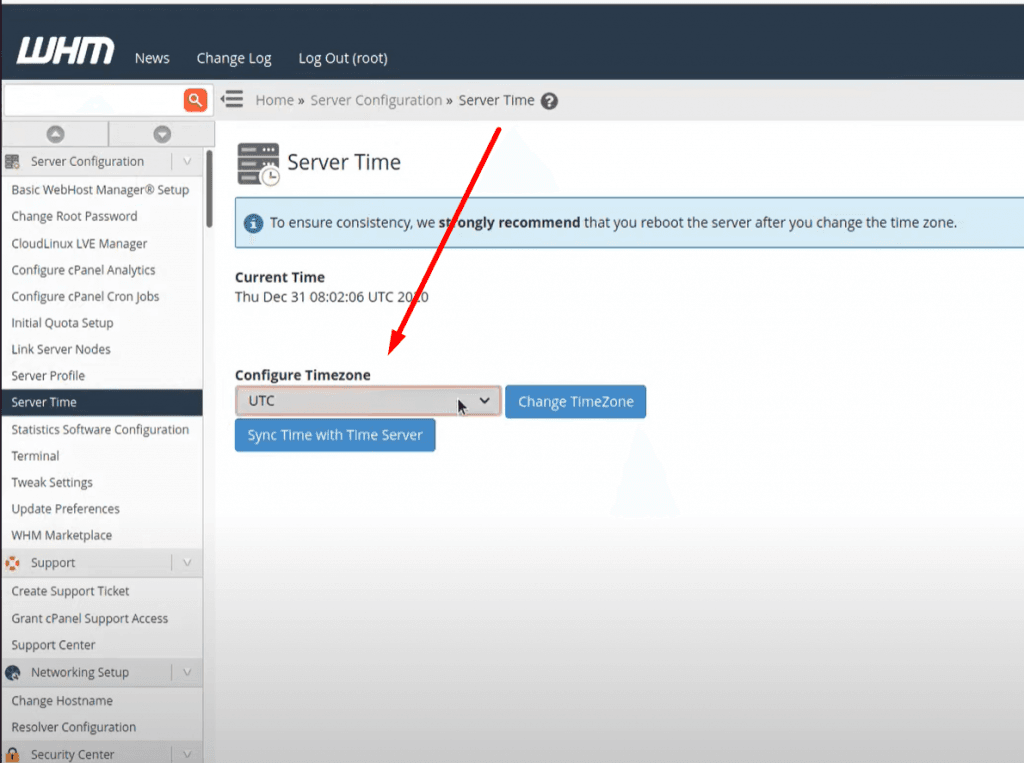
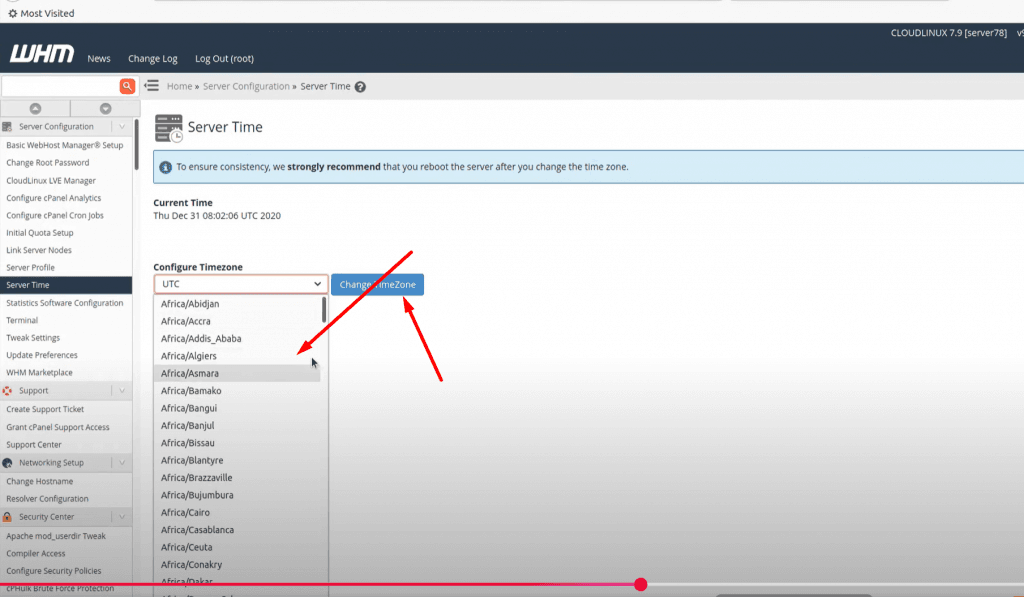
Here you can see all available time zones
Select whatever time zone you want to add in your server and click on change server time button
NOTE: Time zone is one of the core important things many features and services depend upon it so before doing anything make sure that you understood all. moreover, you just need a reboot to apply a new time zone on all servers.
2. Set / Change Time zone on Linux Server Using Command line:
Before changing your time zone first of all you must have to know about the time zone you want to set. Like if you want to set somewhere in Asia. You must know about your region and city. Now, how you can do it?
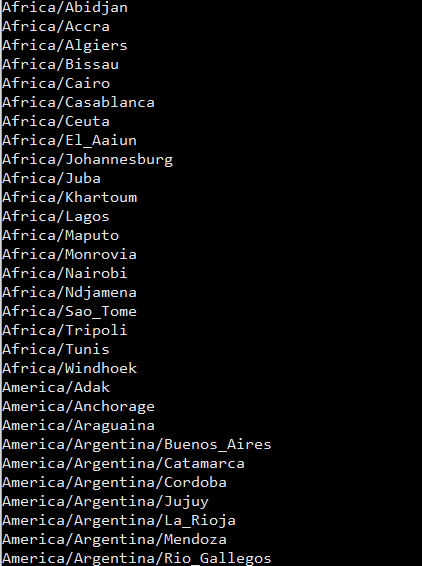
For this there is a command to list all time zones:
$ timedatectl list-timezones
List all time zones
Select your required time zone from the list and add it to this cmd.
timedatectl set-timezone “you time zone”
Make sure that you are login from root account if not use sudo with this.
$ sudo timedatectl set-timezone <your specific time zone>
set time zone
After running this run the timedatctl again and verify if time zone updated or not.
$ timedatectl
Now you can see time zone that you set using the above method.
What If You Are on Shared Hosting?
If you are using shared hosting and do not have access to WHM or SSH, you will need to contact your hosting provider to request a time zone change. Some providers allow you to modify the PHP time zone using a .htaccess file or php.ini settings.
Modify PHP Time Zone in .htaccess
Add the following line to your .htaccess file:
php_value date.timezone "America/New_York"
Modify PHP Time Zone in php.ini
If you have access to php.ini, add or edit this line:
So now Final Thoughts on how to change the time in my cpanel? Changing the time in cPanel is a quick and easy process that can save you from confusion and ensure your website operations run smoothly. By following the steps outlined above, you can set the time zone to match your local time and keep your server logs, emails, and scheduled tasks accurate.
Whether you’re a seasoned webmaster or a beginner, managing your cPanel settings effectively is key to maintaining a well-functioning website. So, take a moment to check your time zone settings today and make any necessary adjustments!
The Linux touch command is a handy tool for creating new files and changing file timestamps. It’s useful for both experienced system administrators and beginners. This article will show you how to use the touch command to make your work easier and more efficient.
Key Takeaways
Understand the purpose and functionality of the Linux touch command
Learn how to create new files using the touch command
Discover how to modify file access and modification timestamps
Explore advanced touch command options for enhanced productivity
Discover touch command alternatives and troubleshooting tips
Understanding the Linux Touch Command
The touch command is a key tool in Linux’s command line. It helps manage files by creating new ones or changing their timestamps. This makes it a vital part of your work.
What is the Touch Command?
The touch command is a built-in Linux tool. It’s mainly used to make new, empty files or change the access and modification times of files. It’s a simple yet powerful way to handle your files from the command line.
When to Use the Touch Command?
To create new, empty files quickly and easily
To update the access and modification times of existing files
To ensure the existence of a file required by a script or application
To trigger file-based actions, such as cron jobs or automated processes
To maintain the timestamps of files for better organization and tracking
Knowing how to use the touch command can make your file management tasks easier. It helps you work more efficiently in the command line interface.
Creating New Files with Touch
The linux touch command is great for making new files. Just type touch followed by a file name to create an empty file. This is handy for setting up a file for later use on the command line.
Using the touch command to make new files is easy. Here’s how:
Open your terminal or command prompt.
Type the command, replacing filename.txt with your file name: touch filename.txt
Hit Enter, and your new empty file will be ready in your current directory.
To make more than one file, list the names after touch, separated by spaces:
touch file1.txt file2.txt file3.txt
This will make three empty files: file1.txt, file2.txt, and file3.txt.
The touch command is a simple yet effective tool for file creation on Linux command line. Learning to use it can make your work faster and more efficient.
Changing File Timestamps with Touch
The linux touch command does more than just create new files. It also lets you change the timestamps of files that already exist. This is really useful when you need to keep files up to date or follow certain file management rules.
Modifying Access Time
The access time, or access time, shows when a file was last opened. You can change this with the touch command. This is handy for tracking how often files are used or meeting file retention rules.
Modifying Modification Time
The modification time, or modification time, tells you when a file was last changed. With the touch command, you can change this timestamp. This is useful for keeping files updated across different systems or checking if your files are current.
Using the linux touch command to adjust file timestamps is a key skill in managing files on Linux. It lets you have detailed control over your files.
Combining Touch with Other Linux Commands
The linux touch command is very useful on its own. But it gets even better when you use it with other Linux commands. For example, combining it with cron jobs makes file management easier and more efficient.
Using Touch with Cron Jobs
Cron jobs help you automate tasks like updating file timestamps or creating new files. Adding the touch command to these jobs makes managing your files more automated.
Periodically update file timestamps: Use the touch command within a cron job to update the access and modification times of specific files or directories, ensuring your file system remains organized and up-to-date.
Automatically create new files: Leverage the touch command in a cron job to generate new files on a scheduled basis, such as daily or weekly reports, log files, or other relevant documents.
Combine with other commands: Integrate the touch command with other Linux commands, such as find or grep, to create more complex automation workflows that address your unique file management needs.
Using the touch command with cron jobs makes your linux touch command workflows better. It cuts down on manual work and keeps your files in order.
linux touch command
The Linux touch command is a powerful tool for creating new files and changing file timestamps. It’s useful for both experienced Linux users and beginners. Knowing how to use the touch command can make your work easier and more efficient.
The touch command is simple but effective. It can create new files or update the timestamps of existing ones. This is great for managing files, making sure your project files have the right timestamps.
Creating New Files with Touch
One main use of the touch command is to create new files. Just type touch filename.txt to make a new file. This is handy for projects that need many files or when setting up a new project’s file structure.
Modifying File Timestamps
The touch command also changes file timestamps. This is useful in many situations, like:
Making sure a file’s timestamp shows the latest changes
Syncing timestamps of files in a project
Resetting timestamps for backups or archives
With the right options, you can adjust file timestamps easily with the touch command.
Integrating Touch with Other Linux Commands
You can also use the touch command with other Linux commands, like Cron jobs. This is great for automating file management tasks. It helps keep file timestamps consistent or creates new files on schedule.
Learning the touch command is a big plus for your Linux skills. It helps you manage files better and control your project files more effectively. Whether for personal or professional projects, the touch command is a valuable tool in your command-line toolkit.
Advanced Touch Command Options
The linux touch command has many advanced options. These options make it more useful. Two key features are setting a reference file and using verbose output.
Setting Reference File
The touch command lets you set a file’s timestamps from another file. This is great for syncing file timestamps or restoring original timestamps. To do this, use the -r option and the reference file’s name.
Verbose Output
The touch command also has a verbose output option. It’s useful for troubleshooting or tracking file changes. With -v or --verbose, you get detailed info on what the command does.
Using these advanced options of the linux touch command makes file management easier. You also learn more about how the command works.
Best Practices for Using Touch
The linux touch command is a key tool for managing files. It’s important to use it wisely to keep your files in order. By following best practices, you can make your work more efficient and keep your files safe.
One key thing to remember is how the touch command changes file timestamps. When you use touch, it updates the file’s last access and modification times. This can affect scripts and automated tasks that rely on these timestamps.
Use the touch command carefully to avoid messing up file timestamps.
Learn about the different touch command options. This lets you adjust access and modification times as needed.
Integrate the touch command into your file management routines. It can help make your work more efficient.
Also, think about how the touch command fits into your overall file handling. It’s great when used with other Linux commands. For example, you can use it in cron jobs to automate file updates.
“The touch command is a simple yet versatile tool in the Linux arsenal, but its power lies in understanding how to use it effectively and in alignment with your broader file management strategies.”
By following best practices, you can use the linux touch command to improve your workflow. It helps keep your files in order and boosts your efficiency in managing your Linux files.
Touch Command Examples
The Linux touch command is more than just for making new files. It has many useful features. Let’s look at some examples to see how powerful it is.
Creating Multiple Files
One great thing about the touch command is making many files at once. This is super useful for setting up folders or making lots of similar files. To make multiple files, just list their names separated by spaces:
touch file1.txt file2.txt file3.txt
touch report_{1..5}.txt
The first example makes three text files. The second example makes five files named “report_1.txt” to “report_5.txt” using a pattern.
Updating Timestamps
The touch command can also change the timestamps of files. This is handy when you need a file’s last change time to be now. Or when you want all files to have the same timestamp.
touch file1.txt
touch -d “2023-04-01” file2.txt
touch -m -d “2023-04-15” file3.txt
The first example updates `file1.txt` to the current time. The second example sets `file2.txt` to April 1, 2023. The third example changes only the modification time of `file3.txt` to April 15, 2023.
By checking out these examples, you can see how useful the touch command is. It makes managing files on Linux systems easier.
Touch Command Alternatives
The linux touch command is great for managing files, but it’s not the only choice. This section looks at other tools and commands for tasks like making new files or changing timestamps. Learning about these options can make your Linux experience better and help you pick the right tool for your needs.
The mkdir command is a good alternative. It lets you make new directories and files at the same time. For example, mkdir -p dir1/file1.txt makes a “dir1” directory and a “file1.txt” file inside it.
The echo command is also useful. It lets you make new files with certain text. For instance, echo "Hello, World!" > file.txt makes a “file.txt” file with “Hello, World!” inside it.
touch: The traditional Linux command for creating and updating file timestamps.
mkdir: Creates new directories and files simultaneously.
echo: Allows creating new files with specific content.
cat: Can be used to create new files and append content to existing ones.
nano and vim: Text editors that can be used to create and modify files.
There are many file management tools in Linux. You might find that some alternatives work better for you than the linux touch command. Try out different tools to see which ones fit your needs best.
Command
Description
touch
Creates new files or updates file timestamps
mkdir
Creates new directories and files simultaneously
echo
Allows creating new files with specific content
cat
Can be used to create new files and append content to existing ones
nano
Text editor that can be used to create and modify files
vim
Text editor that can be used to create and modify files
Troubleshooting Touch Command Issues
The linux touch command is usually easy to use. But sometimes, you might run into problems or error messages. Let’s look at some common issues and how to fix them.
Permission Denied Errors
Many users face the “Permission denied” error with the touch command. This happens when you try to create or change a file in a directory you can’t write to. To fix this, make sure you have the right permissions. Use the ls -l command to check permissions and the sudo command to get temporary access.
Nonexistent Directory Errors
Another issue is the “No such file or directory” error. This happens when you try to create a file in a non-existent directory. Before using touch, check if the directory exists and navigate to it with cd.
Interpreting Error Messages
Understanding error messages is key. Read them carefully, as they often point to the problem. For example, an “Invalid argument” error might mean you’ve entered a wrong file name or path.
Knowing common linux touch command problems and error messages helps you solve issues quickly. This makes managing files easier.
“Debugging is twice as hard as writing the code in the first place. Therefore, if you write the code as cleverly as possible, you are, by definition, not smart enough to debug it.” – Brian Kernighan
Remember, the touch command is a powerful tool. With a bit of troubleshooting, you can manage files smoothly and reliably.
Conclusion
The Linux touch command is a key tool for managing files and making workflows better. It helps users create new files and change timestamps. This makes daily tasks easier and boosts productivity.
Whether you’re experienced with Linux or just starting, learning the touch command is beneficial. It helps with tasks like automating jobs with Cron and controlling timestamps precisely. This tool opens up many ways to improve your workflow.
As you learn more about the touch command, remember it’s a powerful tool for keeping files organized. Using it can make your work more efficient and help you stand out professionally.
FAQ
What is the Linux touch command?
The Linux touch command is a tool for creating new files or updating file timestamps. It helps manage your files efficiently.
When should I use the touch command?
Use the touch command for creating empty files, changing file timestamps, or with cron jobs. It’s handy for automating tasks.
How do I create new files using the touch command?
To make a new file, type touch new_file.txt. This will create an empty file named “new_file.txt”.
Can I modify file timestamps with the touch command?
Yes, you can update file access and modification times. This is useful for keeping files in sync or meeting specific requirements.
How can I combine the touch command with other Linux commands?
The touch command works well with other Linux tools, like cron jobs. This makes your workflow smoother and ensures consistent file management.
What are some advanced options available for the touch command?
Advanced options include setting timestamps from a reference file and verbose output for troubleshooting.
What are some best practices for using the touch command?
To use the touch command well, understand its effects on timestamps. Use it wisely and as part of your file management.
Can you provide some practical examples of using the touch command?
Sure! You can create multiple files at once or update existing file timestamps. These examples show the touch command’s versatility.
Are there any alternatives to the touch command?
Yes, there are other Linux commands for similar tasks. Knowing these alternatives can help you find the best tool for your needs.
How can I troubleshoot issues with the touch command?
If you run into problems, this section helps with troubleshooting. It covers common issues and how to fix them, ensuring smooth file management.
Download the Pakistan Gold Rate Android Application
Independent News Coverage Pakistan (INCPak) has launched its Android App for Gold Rate in Pakistan, which provides daily updates from the bullion market.
The app provides Gold Prices in Pakistan, which are taken directly from the bullion market frequently throughout the day.
The initial version of the app is already available on the Google Play Store; however, we are working on more features, which will be released soon.
INCPak’s Pakistan Gold Rate Android App has several upcoming features, including Local Gold Prices, International Gold Rates, ARY Gold Rates, and Peshawar Gold Rates, which are mentioned separately in the app due to differences in Tola weight.
Features:
Latest Gold Rates
Frequently Updated Throughout the Day
International Gold Rate
Dollar Exchange Rate
ARY Gold Rate
Peshawar Gold Rate
Make sure to follow INCPak on their social media handles for regular updates
INCPak’s KSA Gold Rate App is Now Available on the Google Play Store
Independent News Coverage Pakistan (INCPak) has released its KSA Gold Rate Android App on the Google Play Store with daily updates from the local bullion market.
The app provides latest Gold Prices in the Kingdom of Saudi Arabia (KSA) and it is updated frequently throughout the day.
Furthermore, the app provides Gold Rates in Saudi Arabia via a detailed table showing 24-Carat, 22-Carat, and 21-Carat, which is broken down into Tola (11.664 Grams), 10 Gram, and 1 Gram weights.
Moreover, there is a built-in Gold Rate Calculator for manual calculations.
Make sure to follow INCPak on their social media handles for regular updates
The UAE Gold Rate App by INCPak Provides Daily Updates
If you’re looking for Gold Rates in the United Arab Emirates (UAE), you should download the UAE Gold Rate App by Independent News Coverage Pakistan (INCPak) on the Google Play Store.
The application provides daily updates on Gold Prices in the United Arab Emirates (UAE) from the local bullion market.
The app is updated frequently throughout the day and provides several features, including a breakdown of Gold Rates in UAE into 24-Karat, 22-Karat, and 21-Karat.
Furthermore, the Gold Prices are mentioned in 1 Tola (11.664 Grams), 10 Gram, and 1 Gram along with a Gold Rate Calculator for easy manual calculations for custom weights.
Make sure to follow INCPak on their social media handles for regular updates
Change PHP Upload Limit for Website in CyberPanel
Change PHP upload limit is not big deal in CyberPanel you just need to follow this short article and all will go good. In cyberpanel upload_max_filesize is just a matter of few clicks. So now to increase upload limit just follow few steps:
Step-1 Login CyberPanel:
Login to your CyberPanel on port 8090 and any other if you have changed. URL will be like:
https://<your-ip>:8090
Step-2 Go to Edit PHP Configs
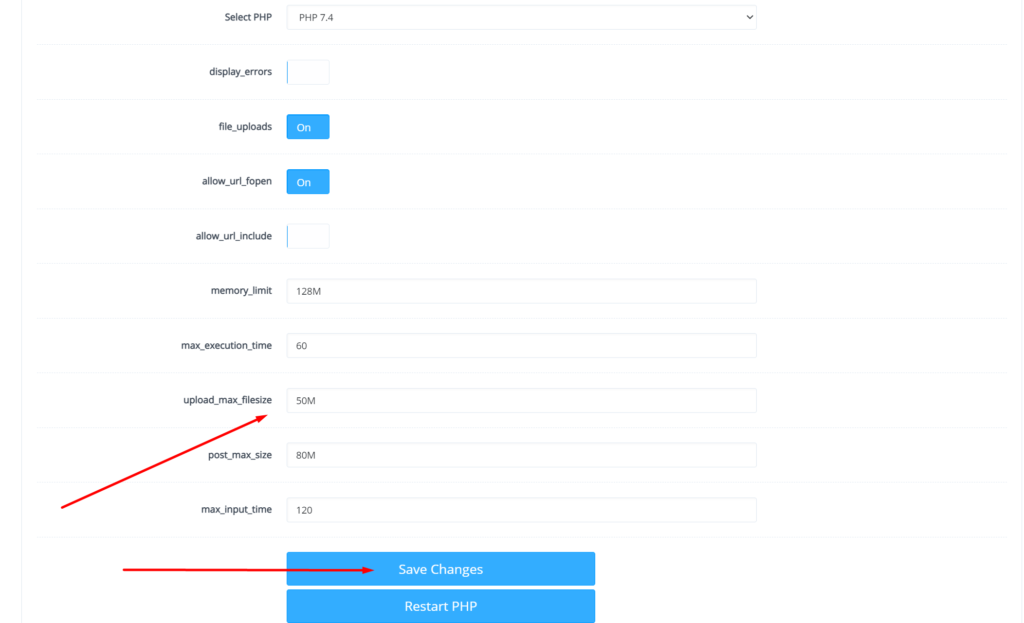
Go to PHP → Eidt PHP Configs → Basic, and select the version of PHP on which you want to change values of the required data.
Step-3 Change PHP upload limit CyberPanel
Set the limit in upload_max_filesize according to your choice and then click on Save Changes
After doing that also press the Restart PHP button this thing will apply all changes on server level and you can now good to go with it.
We have an other article on this as well check here. For old version CyberPanel official guide is here.
How to create SFTP login for websites hosted in cyberpanel.
Creating SFTP login for websites
Step 1: SSH Access
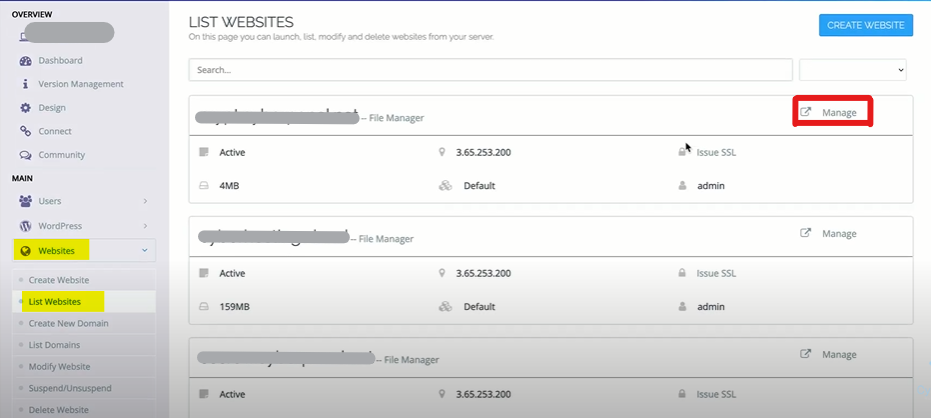
Open cyberpanel and go to “List websites”.
Select the website for which you want SFTP login. Then click on Manage.
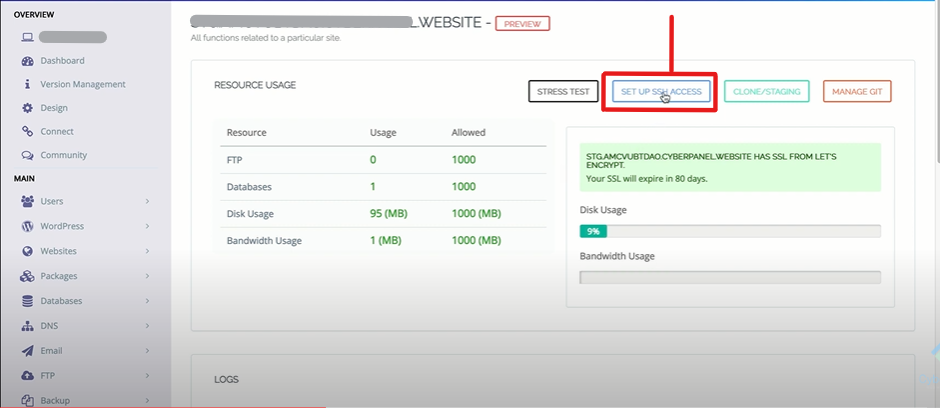
On the next page go to “SETUP SSH ACCESS”
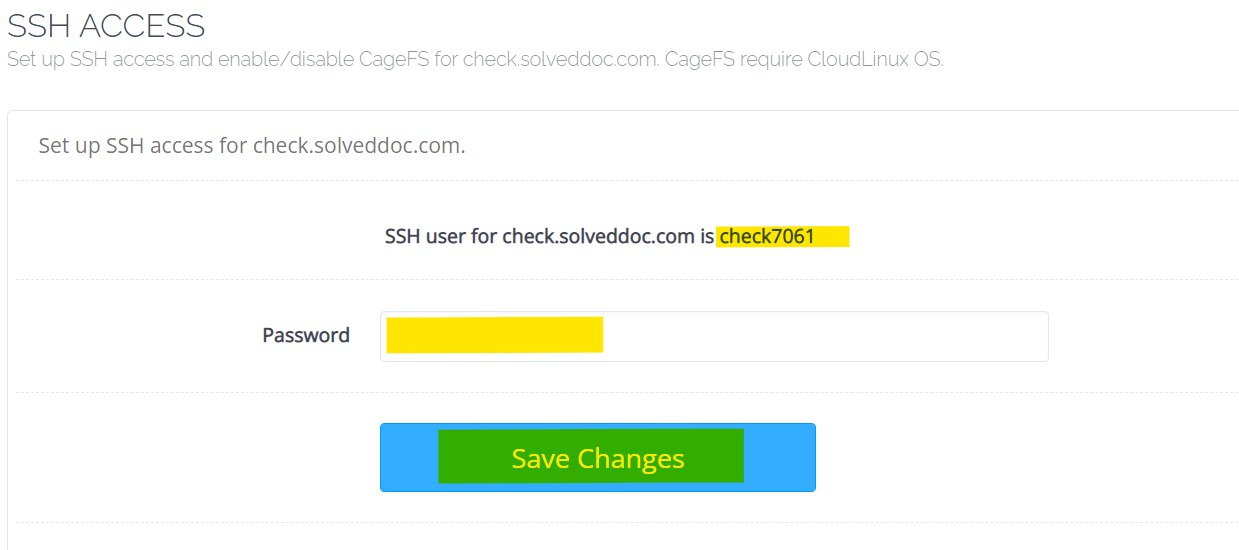
SSH USERNAME for your website will be automatically generated like the highlighted in the screenshot. Setup the Password you want and save.
Now you are able to access your SFTP. Just using Server IP, SSH user and Password.
Step 2: SFTP Access with FileZilla
Host: <your server ip>
Username: <ssh user of domain>
Password: <ssh pass of domain>
Port: <your server port>
Best Show-Hide/Collapse-Expand WordPress Plugins
Show-hide or collapse-expand functionality allows users to hide or show content on a web page by clicking on a designated button or link. This can be useful for displaying large amounts of information in a compact way, or for organizing content into sections that can be revealed as needed. So here in this article, we will learn about show-hide / collapse-expand WordPress.
In WordPress, this functionality can be implemented using plugins, which are add-ons that extend the capabilities of the WordPress platform. There are many different show-hide/collapse-expand plugins available, and the best one for you will depend on your specific needs and preferences. Some popular options include WP Collapse-O-Matic, Simple Show Hide, and Collapse-Pro. To find the right plugin for your site, you may want to do some research and read reviews to compare the features and functionality of different options.
WP-ShowHide
WP-ShowHide is a WordPress plugin that allows you to easily add a show/hide toggle to your WordPress site. This can be useful for hiding or revealing content on your sites, such as spoilers, spoilers, or additional information. To use the plugin, you can follow these steps:
Install and activate the WP-ShowHide plugin on your WordPress site.
Configure the plugin settings by going to Settings > WP-ShowHide in the WordPress admin dashboard. This may include options such as the toggle text, toggle style, and other customization options.
To add a show/hide toggle to your content, you can use the [showhide] shortcode provided by the plugin. The shortcode takes two arguments: the text to show (enclosed in ) and the text to hide (enclosed in ). For example:
[showhide]
[show]Click here to reveal the hidden content.[/show]
[hide]This is the hidden content.[/hide]
[/showhide]
This will display a toggle link with the text “Click here to reveal the hidden content”. When the link is clicked, the hidden content will be revealed.
Note that this is just an example of how to use the WP-ShowHide plugin. You may need to consult the plugin’s documentation or support resources for more detailed instructions and information.
Ultimate Blocks
Ultimate Blocks is a collection of custom blocks for the WordPress block editor (Gutenberg), designed to add additional functionality and design options to your WordPress site. The blocks included in Ultimate Blocks provide a range of features, including tables, testimonials, and call-to-action buttons. The blocks are designed to be easy to use and customize and can be added to any page or post on your site by simply inserting them into the block editor. Ultimate Blocks is a popular plugin among WordPress users and has received positive reviews for its feature-rich blocks and user-friendly interface.
As I mentioned earlier, there are many different show-hide/collapse-expand plugins available for WordPress. Some popular options include WP Collapse-O-Matic, Simple Show Hide, and Collapse-Pro. These plugins allow you to add show-hide/collapse-expand functionality to your WordPress site, allowing you to hide or show content on your pages and posts as needed.
To find the right plugin for your needs, you may want to do some research and read reviews to compare the features and functionality of different options. You can also try out different plugins on your site to see which ones work best for you. Keep in mind that not all plugins are compatible with all versions of WordPress, so be sure to check the plugin’s compatibility before installing it on your site.
Easy Accordion WordPress plugin:
An accordion is a user interface element that allows users to expand and collapse sections of content. The Easy Accordion plugin is a WordPress plugin that allows you to easily create accordion elements on your WordPress site. To use the plugin, you can follow these steps:
Go to the plugin settings page, which can be found under Settings > Easy Accordion in the WordPress admin dashboard.
Configure the plugin settings as desired. This may include options such as the accordion style, animation settings, and other customization options.
Create a new accordion by going to the Easy Accordion page in the WordPress admin dashboard, and clicking on the “Add New” button.
Enter a title for the accordion, and add the content for each accordion section using the editor provided.
Publish the accordion by clicking on the “Publish” button.
To display the accordion on your site, you can use the shortcode provided by the plugin, or you can use the Gutenberg block editor to add the accordion block to your page or post.
This is just an example of how to use the Easy Accordion plugin. You may need to consult the plugin’s documentation or support resources for more detailed instructions and information.
Dovecot is an open-source IMAP and POP3 email server for Linux/UNIX-like frameworks written with security primarily in mind. It is a Mail Delivery Agent. Dovecot is easy to set up and requires almost no memory. It allows users to access their mailboxes using the IMAP interface. If configured correctly, it only interacts with authenticated users.
The main config file of Dovecot is located at /etc/dovecot/dovecot.conf. We will be looking at three main options:
listen: This options allows you to set the IP address where you want to listen. You can use an asterik (*) which the wildcard meaning all IPv4 address and for IPv6 addresses you can use (::). To use both it should be like:
listen = *, ::
protocols: This option allows you to specify which protocols you would like to support such as POP3, IMAP. LMTP is also listed here as well which stands for Local Mail Transfer Protocol:
protocols = imap, pop3, lmtp
mail_location: This option sets from where the mail is picked up. By default, this setiing is empty, which means that Dovecot attempts to locate your mail automatically. The format of the mailbox location specification option is as follows:
How to access MySql root user using the command line?
Often in the case of big databases or lack of user interfaces you need to do MySQL functions using the command line on your server. In this article, we will discuss How to access MySql root users using the command line?
We try to minimize this article as we can.
Login to SSH using your credetial vis putty/bitvise etc.
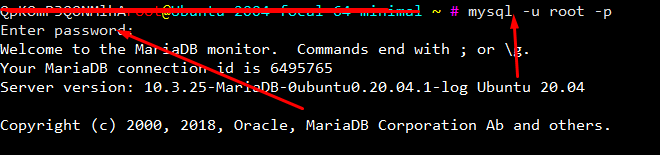
Now copy this comand and paste on your ssh terminal.
mysql -u root -p
After this terminal will ask for the root MySQL password provide a password to be processed.
In the case of cyberpanel Mysql root password location is. /etc/cyberpanel/mysqlPassword. use cmd to show.