Warning: Redis::get(): php_network_getaddresses: getaddrinfo for localhost failed: Name or service not known in /home/solveddoc.com/public_html/wp-content/plugins/litespeed-cache/src/object-cache.cls.php on line 674 Home - Page 3 of 15 - Solveddoc
How to enable CyberPanel API access?
CyberPanel offer API access for different porposes. You can enable CyberPanel API access and you can use to connect your server with cyberpanel platfrom. You can use to do use CyberPanel API. And more things.
If you are managing a server with CyberPanel, enabling API access can significantly enhance your ability to automate tasks and integrate third-party tools seamlessly. CyberPanel’s API feature allows developers and administrators to connect their server with various platforms, enabling them to perform critical operations remotely with ease. This guide will help you enable CyberPanel API access quickly and efficiently.
Login to your cyberpanel on port 8090 using your server access url like
https://<IP>:8090
2. Now once you are loged in you just need to go to the User->API Access from the left side menu of you cyberpanel.
3. Now on this screen you can see a user and access select the user and enable the access like shown below.
4. Once all done press the Save Changes button and all done.
Why Enable CyberPanel API Access?
By enabling API access, you can:
Automate routine server tasks and operations.
Integrate your server with third-party platforms and applications.
Manage and monitor your server remotely with ease.
CyberPanel’s API is a powerful tool that brings flexibility and efficiency to server management. Whether you’re a developer looking to build integrations or a server administrator aiming to optimize workflows, this feature can make a significant difference.
We have already made an article on How To Make A VPS Hosting Company. This is another article just like the old one. In this we will discuss How to start a VPS hosting company?
We will make this very simple and a words article so everything will be easy to understand.
How to Start a VPS Hosting Company A Step-by-Step Guide
Starting a VPS (Virtual Private Server) hosting company can be a lucrative venture if done right. However, it requires careful planning, an understanding of the technical aspects, and a clear business strategy. Below is a detailed guide to help you navigate through the process of setting up your VPS hosting company. Steps for How to Start a VPS Hosting Company.
1. Understand the VPS Market
Before diving into the business, research the VPS hosting market. Understand the target audience (developers, businesses, startups), the competitors, and the pricing strategies. Identify what features or services can make your offering stand out, such as better performance, enhanced security, or excellent customer support.
2. Choose the Right Business Model
There are several business models you can follow:
Reseller Hosting: Purchase VPS hosting from a larger provider and resell it under your brand.
Self-Managed Infrastructure: Invest in physical servers and build your infrastructure. This model offers more control and profit but comes with higher initial costs.
Hybrid: Use a mix of reselling and self-managed infrastructure. Decide based on your budget, technical expertise, and long-term vision.
3. Set Up Your Infrastructure
Infrastructure is the backbone of your VPS hosting company. You need to decide whether you will own physical servers or rent them from data centers.
Physical Servers: If you’re buying your own servers, you’ll need a data center to host them. Choose a location with excellent network connectivity and security.
Cloud Infrastructure Providers: If you’re renting infrastructure (e.g., from AWS, DigitalOcean, or Linode), select a provider known for reliability and speed. Ensure you have a reliable internet connection, redundant power supplies, and effective cooling systems. The goal is to keep your servers running with minimal downtime.
4. Choose the Right Software
You’ll need several layers of software to manage your VPS hosting company:
Virtualization Software: Popular options include KVM, VMware, Xen, or OpenVZ. Virtualization allows you to divide a physical server into multiple VPSs.
Control Panel: Choose a user-friendly control panel for your clients to manage their VPS. Popular choices are cPanel/WHM, Plesk, or Virtualizor.
Billing and Automation: Use billing platforms like WHMCS or Blesta to automate billing, invoicing, and customer account management.
Security Software: Implement firewalls (like CSF), DDoS protection, and monitoring tools to secure your servers.
5. Build a Professional Website
Your website is the face of your VPS hosting company. Ensure it is professionally designed, easy to navigate, and clearly communicates your services, pricing, and support options.
Key sections your website should include:
Services Overview: Highlight your VPS plans, features, and benefits.
Pricing: Be transparent with your pricing. Offer different tiers to cater to various needs (e.g., small businesses, enterprises).
Support: Offer 24/7 support via chat, email, and phone. Having a ticketing system for customer inquiries is also beneficial.
Customer Reviews/Testimonials: Social proof can build trust with potential customers.
6. Establish Pricing and Packages
Set your pricing structure based on market research and your costs. Consider offering multiple packages with varying resources (CPU, RAM, storage, bandwidth) to appeal to different customers.
You can also add optional add-ons like:
Additional storage or bandwidth
Managed VPS services (for an extra fee)
Enhanced security features (backups, SSL certificates, DDoS protection)
7. Develop a Marketing Strategy
Marketing is key to attracting customers. Use a mix of the following strategies:
SEO: Optimize your website for search engines to rank high in relevant searches.
Content Marketing: Write blogs, guides, and tutorials to help potential customers and establish yourself as an expert in the hosting industry.
Paid Advertising: Invest in Google Ads or social media ads to reach a larger audience quickly.
Referral Programs: Offer discounts or credits to existing customers who refer new clients.
Affiliate Marketing: Partner with affiliates who can promote your services for a commission.
8. Provide Stellar Customer Support
Hosting customers expect quick and reliable support. Ensure you have a dedicated support team available 24/7 to resolve technical issues and answer customer inquiries.
Offer multiple channels: Live chat, email, phone, and a knowledge base.
Aim for a fast response time to reduce customer frustration.
Train your support staff to handle both common and complex issues. Great customer support can set you apart from competitors and build long-term loyalty.
9. Legal and Financial Setup
Set up the necessary legal and financial infrastructure for your business:
Register your company: Choose a business structure (LLC, corporation, etc.) and register your business with the appropriate authorities.
Set up a business bank account: Keep your finances separate from personal funds.
Get insurance: Consider business liability insurance to protect your company from potential lawsuits.
Ensure Compliance: Make sure your business complies with all relevant laws, such as data protection regulations (e.g., GDPR).
10. Scale Your Business
As your customer base grows, you’ll need to scale your infrastructure to meet demand. This could involve adding more servers, upgrading network capacity, or expanding to multiple data center locations.
Regularly monitor your systems to ensure optimal performance and plan for capacity increases in advance.
Conclusion
This is a short but somehow basic guide for How to start a VPS hosting company? Starting a VPS hosting company is a significant investment in both time and money, but with the right approach, it can be a profitable venture. Focus on providing reliable service, excellent customer support, and competitive pricing, and you’ll build a loyal customer base over time.
Success will depend on continuous innovation, marketing, and adapting to the evolving needs of your clients.
The Linux touch command is a handy tool for creating new files and changing file timestamps. It’s useful for both experienced system administrators and beginners. This article will show you how to use the touch command to make your work easier and more efficient.
Understand the purpose and functionality of the Linux touch command
Learn how to create new files using the touch command
Discover how to modify file access and modification timestamps
Explore advanced touch command options for enhanced productivity
Discover touch command alternatives and troubleshooting tips
Understanding the Linux Touch Command
The touch command is a key tool in Linux’s command line. It helps manage files by creating new ones or changing their timestamps. This makes it a vital part of your work.
What is the Touch Command?
The touch command is a built-in Linux tool. It’s mainly used to make new, empty files or change the access and modification times of files. It’s a simple yet powerful way to handle your files from the command line.
When to Use the Touch Command?
To create new, empty files quickly and easily
To update the access and modification times of existing files
To ensure the existence of a file required by a script or application
To trigger file-based actions, such as cron jobs or automated processes
To maintain the timestamps of files for better organization and tracking
Knowing how to use the touch command can make your file management tasks easier. It helps you work more efficiently in the command line interface.
Creating New Files with Touch
The linux touch command is great for making new files. Just type touch followed by a file name to create an empty file. This is handy for setting up a file for later use on the command line.
Using the touch command to make new files is easy. Here’s how:
Open your terminal or command prompt.
Type the command, replacing filename.txt with your file name: touch filename.txt
Hit Enter, and your new empty file will be ready in your current directory.
To make more than one file, list the names after touch, separated by spaces:
touch file1.txt file2.txt file3.txt
This will make three empty files: file1.txt, file2.txt, and file3.txt.
The touch command is a simple yet effective tool for file creation on Linux command line. Learning to use it can make your work faster and more efficient.
Changing File Timestamps with Touch
The linux touch command does more than just create new files. It also lets you change the timestamps of files that already exist. This is really useful when you need to keep files up to date or follow certain file management rules.
Modifying Access Time
The access time, or access time, shows when a file was last opened. You can change this with the touch command. This is handy for tracking how often files are used or meeting file retention rules.
Modifying Modification Time
The modification time, or modification time, tells you when a file was last changed. With the touch command, you can change this timestamp. This is useful for keeping files updated across different systems or checking if your files are current.
Using the linux touch command to adjust file timestamps is a key skill in managing files on Linux. It lets you have detailed control over your files.
Combining Touch with Other Linux Commands
The linux touch command is very useful on its own. But it gets even better when you use it with other Linux commands. For example, combining it with cron jobs makes file management easier and more efficient.
Using Touch with Cron Jobs
Cron jobs help you automate tasks like updating file timestamps or creating new files. Adding the touch command to these jobs makes managing your files more automated.
Periodically update file timestamps: Use the touch command within a cron job to update the access and modification times of specific files or directories, ensuring your file system remains organized and up-to-date.
Automatically create new files: Leverage the touch command in a cron job to generate new files on a scheduled basis, such as daily or weekly reports, log files, or other relevant documents.
Combine with other commands: Integrate the touch command with other Linux commands, such as find or grep, to create more complex automation workflows that address your unique file management needs.
Using the touch command with cron jobs makes your linux touch command workflows better. It cuts down on manual work and keeps your files in order.
linux touch command
The Linux touch command is a powerful tool for creating new files and changing file timestamps. It’s useful for both experienced Linux users and beginners. Knowing how to use the touch command can make your work easier and more efficient.
The touch command is simple but effective. It can create new files or update the timestamps of existing ones. This is great for managing files, making sure your project files have the right timestamps.
Creating New Files with Touch
One main use of the touch command is to create new files. Just type touch filename.txt to make a new file. This is handy for projects that need many files or when setting up a new project’s file structure.
Modifying File Timestamps
The touch command also changes file timestamps. This is useful in many situations, like:
Making sure a file’s timestamp shows the latest changes
Syncing timestamps of files in a project
Resetting timestamps for backups or archives
With the right options, you can adjust file timestamps easily with the touch command.
Integrating Touch with Other Linux Commands
You can also use the touch command with other Linux commands, like Cron jobs. This is great for automating file management tasks. It helps keep file timestamps consistent or creates new files on schedule.
Learning the touch command is a big plus for your Linux skills. It helps you manage files better and control your project files more effectively. Whether for personal or professional projects, the touch command is a valuable tool in your command-line toolkit.
Advanced Touch Command Options
The linux touch command has many advanced options. These options make it more useful. Two key features are setting a reference file and using verbose output.
Setting Reference File
The touch command lets you set a file’s timestamps from another file. This is great for syncing file timestamps or restoring original timestamps. To do this, use the -r option and the reference file’s name.
Verbose Output
The touch command also has a verbose output option. It’s useful for troubleshooting or tracking file changes. With -v or --verbose, you get detailed info on what the command does.
Using these advanced options of the linux touch command makes file management easier. You also learn more about how the command works.
Best Practices for Using Touch
The linux touch command is a key tool for managing files. It’s important to use it wisely to keep your files in order. By following best practices, you can make your work more efficient and keep your files safe.
One key thing to remember is how the touch command changes file timestamps. When you use touch, it updates the file’s last access and modification times. This can affect scripts and automated tasks that rely on these timestamps.
Use the touch command carefully to avoid messing up file timestamps.
Learn about the different touch command options. This lets you adjust access and modification times as needed.
Integrate the touch command into your file management routines. It can help make your work more efficient.
Also, think about how the touch command fits into your overall file handling. It’s great when used with other Linux commands. For example, you can use it in cron jobs to automate file updates.
“The touch command is a simple yet versatile tool in the Linux arsenal, but its power lies in understanding how to use it effectively and in alignment with your broader file management strategies.”
By following best practices, you can use the linux touch command to improve your workflow. It helps keep your files in order and boosts your efficiency in managing your Linux files.
Touch Command Examples
The Linux touch command is more than just for making new files. It has many useful features. Let’s look at some examples to see how powerful it is.
Creating Multiple Files
One great thing about the touch command is making many files at once. This is super useful for setting up folders or making lots of similar files. To make multiple files, just list their names separated by spaces:
touch file1.txt file2.txt file3.txt
touch report_{1..5}.txt
The first example makes three text files. The second example makes five files named “report_1.txt” to “report_5.txt” using a pattern.
Updating Timestamps
The touch command can also change the timestamps of files. This is handy when you need a file’s last change time to be now. Or when you want all files to have the same timestamp.
touch file1.txt
touch -d “2023-04-01” file2.txt
touch -m -d “2023-04-15” file3.txt
The first example updates `file1.txt` to the current time. The second example sets `file2.txt` to April 1, 2023. The third example changes only the modification time of `file3.txt` to April 15, 2023.
By checking out these examples, you can see how useful the touch command is. It makes managing files on Linux systems easier.
Touch Command Alternatives
The linux touch command is great for managing files, but it’s not the only choice. This section looks at other tools and commands for tasks like making new files or changing timestamps. Learning about these options can make your Linux experience better and help you pick the right tool for your needs.
The mkdir command is a good alternative. It lets you make new directories and files at the same time. For example, mkdir -p dir1/file1.txt makes a “dir1” directory and a “file1.txt” file inside it.
The echo command is also useful. It lets you make new files with certain text. For instance, echo "Hello, World!" > file.txt makes a “file.txt” file with “Hello, World!” inside it.
touch: The traditional Linux command for creating and updating file timestamps.
mkdir: Creates new directories and files simultaneously.
echo: Allows creating new files with specific content.
cat: Can be used to create new files and append content to existing ones.
nano and vim: Text editors that can be used to create and modify files.
There are many file management tools in Linux. You might find that some alternatives work better for you than the linux touch command. Try out different tools to see which ones fit your needs best.
Command
Description
touch
Creates new files or updates file timestamps
mkdir
Creates new directories and files simultaneously
echo
Allows creating new files with specific content
cat
Can be used to create new files and append content to existing ones
nano
Text editor that can be used to create and modify files
vim
Text editor that can be used to create and modify files
Troubleshooting Touch Command Issues
The linux touch command is usually easy to use. But sometimes, you might run into problems or error messages. Let’s look at some common issues and how to fix them.
Permission Denied Errors
Many users face the “Permission denied” error with the touch command. This happens when you try to create or change a file in a directory you can’t write to. To fix this, make sure you have the right permissions. Use the ls -l command to check permissions and the sudo command to get temporary access.
Nonexistent Directory Errors
Another issue is the “No such file or directory” error. This happens when you try to create a file in a non-existent directory. Before using touch, check if the directory exists and navigate to it with cd.
Interpreting Error Messages
Understanding error messages is key. Read them carefully, as they often point to the problem. For example, an “Invalid argument” error might mean you’ve entered a wrong file name or path.
Knowing common linux touch command problems and error messages helps you solve issues quickly. This makes managing files easier.
“Debugging is twice as hard as writing the code in the first place. Therefore, if you write the code as cleverly as possible, you are, by definition, not smart enough to debug it.” – Brian Kernighan
Remember, the touch command is a powerful tool. With a bit of troubleshooting, you can manage files smoothly and reliably.
Conclusion
The Linux touch command is a key tool for managing files and making workflows better. It helps users create new files and change timestamps. This makes daily tasks easier and boosts productivity.
Whether you’re experienced with Linux or just starting, learning the touch command is beneficial. It helps with tasks like automating jobs with Cron and controlling timestamps precisely. This tool opens up many ways to improve your workflow.
As you learn more about the touch command, remember it’s a powerful tool for keeping files organized. Using it can make your work more efficient and help you stand out professionally.
FAQ
What is the Linux touch command?
The Linux touch command is a tool for creating new files or updating file timestamps. It helps manage your files efficiently.
When should I use the touch command?
Use the touch command for creating empty files, changing file timestamps, or with cron jobs. It’s handy for automating tasks.
How do I create new files using the touch command?
To make a new file, type touch new_file.txt. This will create an empty file named “new_file.txt”.
Can I modify file timestamps with the touch command?
Yes, you can update file access and modification times. This is useful for keeping files in sync or meeting specific requirements.
How can I combine the touch command with other Linux commands?
The touch command works well with other Linux tools, like cron jobs. This makes your workflow smoother and ensures consistent file management.
What are some advanced options available for the touch command?
Advanced options include setting timestamps from a reference file and verbose output for troubleshooting.
What are some best practices for using the touch command?
To use the touch command well, understand its effects on timestamps. Use it wisely and as part of your file management.
Can you provide some practical examples of using the touch command?
Sure! You can create multiple files at once or update existing file timestamps. These examples show the touch command’s versatility.
Are there any alternatives to the touch command?
Yes, there are other Linux commands for similar tasks. Knowing these alternatives can help you find the best tool for your needs.
How can I troubleshoot issues with the touch command?
If you run into problems, this section helps with troubleshooting. It covers common issues and how to fix them, ensuring smooth file management.
How to install Redis in CyberPanel | Redis CyberPanel
CyberPanel offer you one click installtion of the Redis. CyberPanel allows you a very quick and easy setup for the Redis. Redis CyberPanel is a very advanced and new feature.
Redis is an open-source cache used to cache databases and is used as a message broker. Nowadays it is very important to use cache and boost your website. CyberPanel helps you to do this.
CyberPanel is a web hosting control panel designed to manage websites and servers. It is built on top of OpenLiteSpeed or LiteSpeed Enterprise, which are high-performance web servers known for their speed and security. CyberPanel provides an easy-to-use graphical interface for handling website management tasks such as creating and managing domains, setting up SSL certificates, handling DNS, and managing databases.
Follow these steps to set up Redis on your server.
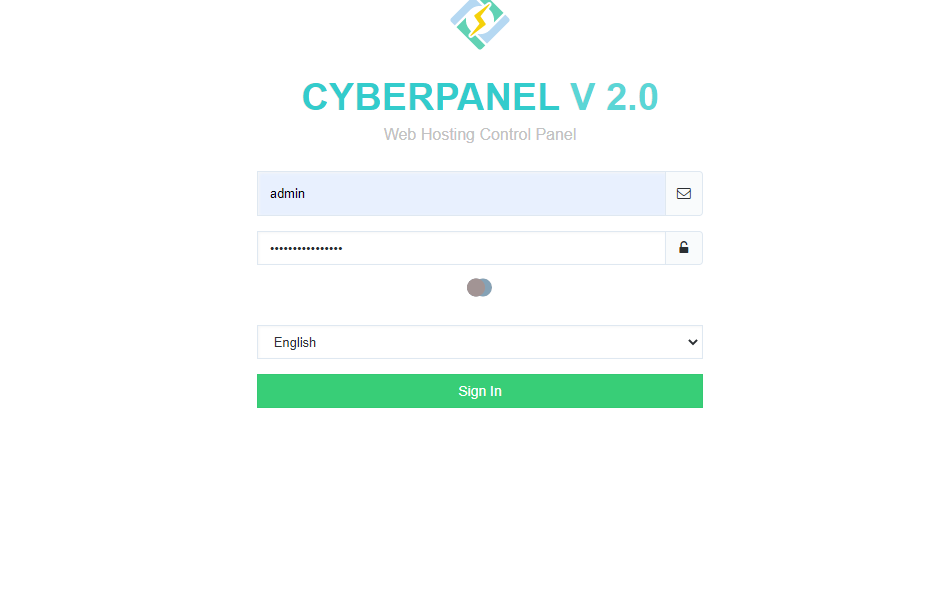
Login to CyberPanel: Access your CyberPanel control panel by visiting https://yourdomain.com:8090, then log in with your username and password.
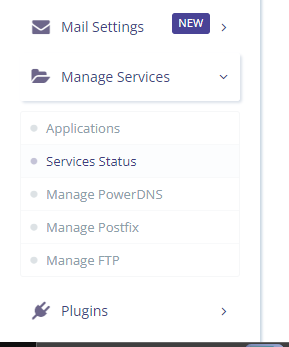
One-Click Redis Installation: Navigate to the Manage Services section in CyberPanel, select Applications, and click Install Redis for a quick, automatic setup of the Redis server on your machine.
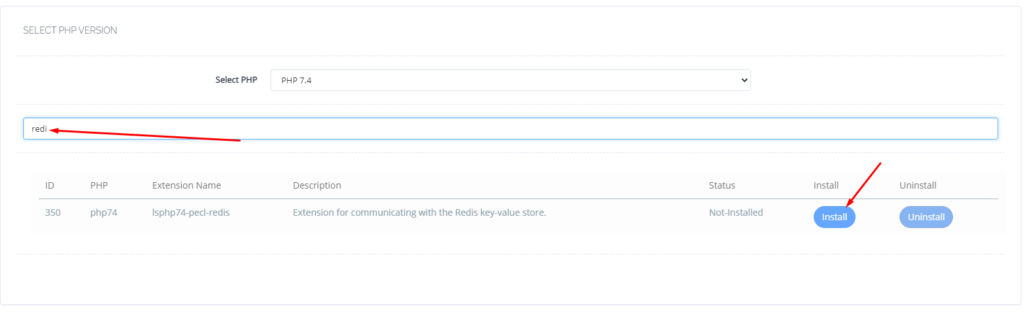
Install the Redis PHP Extension: Go to the PHP section in CyberPanel, click on Install Extensions, search for Redis, and click Install to add the Redis PHP extension for Redis-PHP communication.
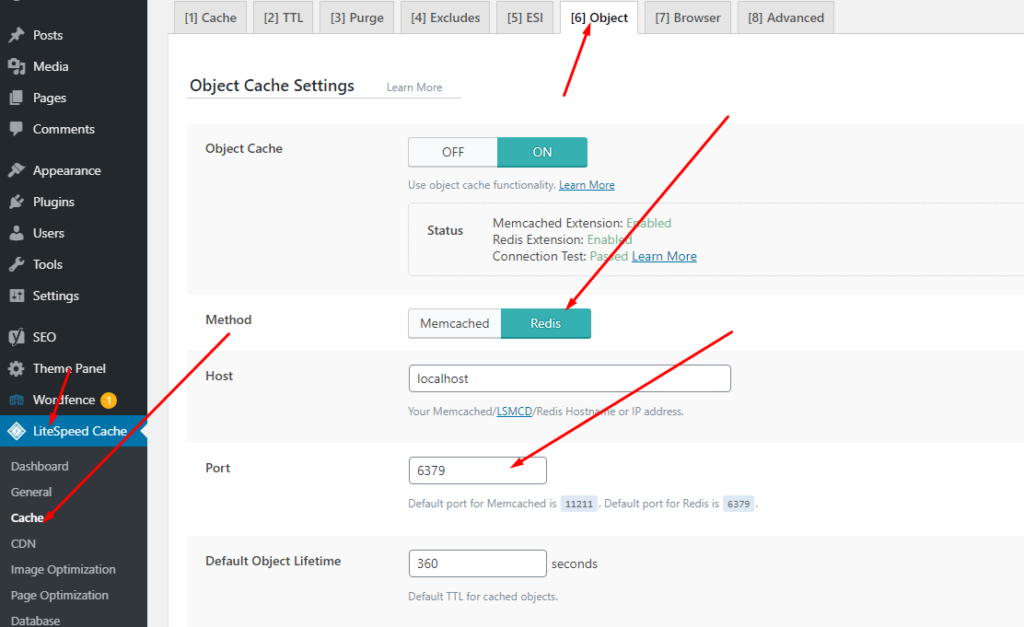
Setup Redis on WordPress using LiteSpeed Cache (LS Cache): Log in to WordPress, navigate to LiteSpeed Cache > Cache > Object, enable Object Cache, set Redis as the method, change the port to 6379, and save the settings; ensure that both the Redis PHP extension and connection test pass to confirm Redis is configured properly.
Login to CyberPanel:
Login to your CyberPanel using the credentials. Follow the link with port 8090.
https://<Your_IP>:8090
CyberPanel
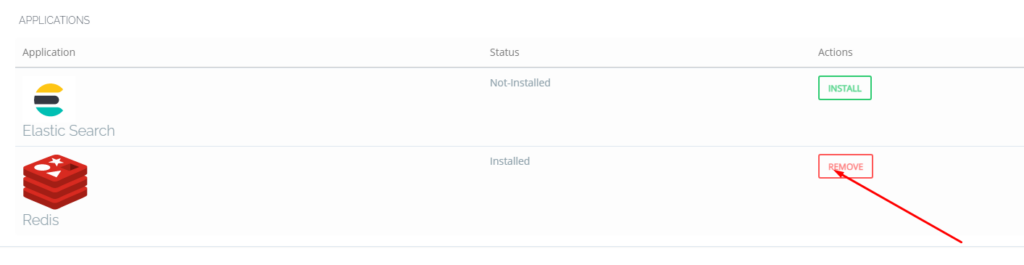
One-Click Redis Install:
To install Redis on your server you have to go to the Manage Services->Application -> Redis then you can see the install button there. Click that and your Redis will be installed.
Now your Redis is installed and you have to install the PHP extension to run properly.
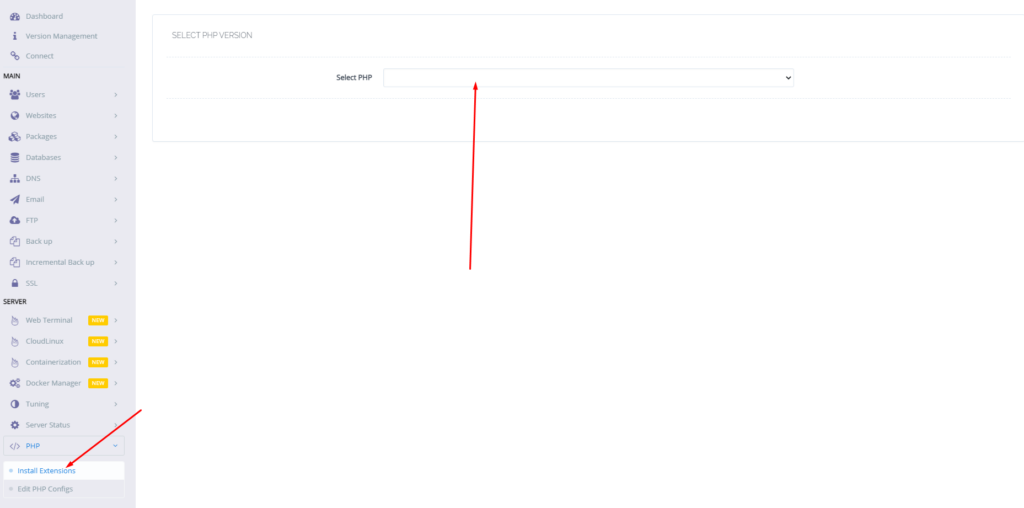
Install Redis PHP extension:
Now go to the PHP-> Install Extension Then you have to select the PHP version for which you want to install Redis Extension. You can also follow this link.
Now search Redis on the search bar and you can see the Redis PHP extension press the Install button and everything is good to go.
Redis
Setup Redis on WordPress using LS Cache:
Now it’s time to set up Redis on your WordPress site. We will tell you here how you can set up Redis on your WordPress site without any extra plugins. The Ls cache plugin will all do for you. Let’s begin with how to do it.
In the WordPress dashboard, locate the LiteSpeed Cache plugin on the left-hand menu and click on the Cache option.
From the Cache settings page, switch to the Object tab, where you’ll find the configurations for object caching.
Turn on the Object Cache by toggling the option. Once enabled, set the caching method to Redis.
Update the Redis port to 6379, which is the standard port for Redis, and then click Save to store your settings.
After saving, check the status indicators on the same page. You should see confirmation that the Redis extension is installed and that the connection test has passed. If both show success, your object caching is correctly configured and ready to go!
Why Redis CyberPanel is a Game-Changer for Speed and Performance
In today’s online world, speed is everything. Whether you’re running a website, an app, or an e-commerce store, slow performance can drive users away. That’s where Redis comes in—a powerful, lightning-fast data store that helps businesses handle large amounts of data without slowing down.
Blazing-Fast Performance
Imagine opening a website and waiting for it to load. Frustrating, right? Redis solves this by keeping frequently used data in memory, making it incredibly fast. Unlike traditional databases that have to fetch data from disk, Redis serves it instantly, keeping users engaged.
Handles High Traffic with Ease
As your website or app grows, so does the demand on your database. Many systems struggle under heavy loads, but Redis is built to scale. Whether you’re dealing with thousands or millions of users, Redis helps keep things running smoothly without crashes or slowdowns.
Faster Load Times with Caching
Some websites load instantly, while others take forever. One major reason is caching. Redis stores frequently accessed data, like user sessions and product listings, so your website doesn’t have to fetch the same information repeatedly. This results in faster page loads, improved SEO, and a better user experience.
More Than Just a Key-Value Store
Many think of Redis as a simple data store, but it supports advanced data structures like lists, sets, and sorted sets. This makes it ideal for use cases like leaderboards, messaging apps, and recommendation engines, providing a more dynamic experience for users.
Keeps Data Safe and Available
One concern with in-memory storage is data loss, but Redis offers solutions. It provides persistence by saving data to disk and replication by copying data to multiple servers. These features ensure data is safe and available even if something goes wrong.
Reduces Database Load
Databases like MySQL and PostgreSQL are powerful, but when overloaded, they slow down. Redis helps by handling frequent requests, reducing the load on the main database. This improves overall efficiency and system performance.
Perfect for User Sessions and Authentication
Many websites and applications rely on user sessions for login and personalization. Redis is widely used for session management, ensuring that user data is stored and retrieved quickly without unnecessary delays.
Cost-Effective and Open Source
Redis is open source, meaning businesses can use it without expensive licensing fees. Its efficiency reduces infrastructure costs while delivering high performance, making it a cost-effective solution for businesses of all sizes.
Final Thoughts on Redis CyberPanel
If you want your website or application to be fast, reliable, and scalable, Redis is an excellent choice. It improves user experience, enhances SEO, and ensures smooth operations even under heavy traffic. Whether you are running an online store, a social media platform, or a real-time analytics dashboard, Redis can help you stay ahead of the competition.
If you’re someone who craves the thrill of off-roading, the Polaris RS1 is a dream come true. This single-seat buggy is all about putting you in the center of the action. Unlike traditional side-by-side UTVs, the RS1 strips away the distractions, placing the focus solely on the driver and the raw, untamed landscape ahead.
The RS1 is built for performance, speed, and agility. Here’s a quick breakdown of its key features:
Feature
Description
Engine
999cc ProStar, 110 horsepower
Suspension
Dual A-arm, 21 inches of travel
Drive System
On-Demand AWD/2WD
Brakes
Hydraulic disc brakes
Tire Size
29-inch
Seating
Single-seat, center-positioned for better balance
This buggy packs a 999cc ProStar engine, cranking out 110 horsepower. With that kind of power, the RS1 is a beast on any trail, ready to tackle sand dunes, rocks, or mud with ease. It’s the perfect mix of speed and control, giving you the confidence to push your limits.
The Driving Experience
One of the most unique aspects of the RS1 is its driver-centric design. You’re sitting dead-center in the vehicle, which gives you better visibility and a deeper connection with the machine. It’s like being in the cockpit of a fighter jet—everything feels sharp, responsive, and built for action.
That central seating also improves weight distribution, so when you’re hitting tight turns or scaling tough inclines, the RS1 handles with impressive balance and stability.
Suspension That Soaks Up the Terrain
The Polaris RS1’s suspension system is designed to eat up rough trails. With 21 inches of usable travel in the dual A-arm suspension, it smooths out the bumps and dips, making for a more comfortable and controlled ride. Paired with the 29-inch tires, this buggy can glide over obstacles that would leave others struggling.
Whether you’re speeding across uneven terrain or crawling over jagged rocks, the Polaris RS1 Buggy makes the ride feel seamless.
Key Features for a Better Ride
Here’s a closer look at what makes the RS1 a joy to drive:
On-Demand AWD/2WD System: This gives you the flexibility to switch between two-wheel drive for everyday cruising and all-wheel drive when you need extra grip on tricky surfaces.
Advanced Braking System: With three hydraulic disc brakes, the RS1 offers powerful stopping ability, which is crucial when you’re tearing through rugged trails at high speeds.
Ergonomic Cockpit: Long rides can be taxing, but Polaris made sure the RS1’s cockpit is comfortable. A high-performance racing seat and four-point harness keep you securely in place, even during aggressive driving.
Tech-Savvy Dashboard: The digital gauge display gives you real-time data like speed, RPMs, and fuel levels, keeping you fully aware and in control.
Perfect for the Solo Adventurer
Unlike most UTVs designed for multiple passengers, the Polaris RS1 is a solo experience. This makes it perfect for anyone who wants to get away from the noise and truly focus on the ride. Whether you’re into competitive off-road racing, or you just love trail riding, the RS1’s design is tailored to meet the needs of drivers who prefer to go it alone.
Final Thoughts
The Polaris RZR RS1 is not your average buggy. Its high-powered engine, exceptional handling, and innovative design make it stand out in the world of off-road vehicles. If you’re looking for a one-of-a-kind driving experience that puts you in the heart of the action, the Polaris RS1 Buggy is definitely worth considering.
Whether you’re navigating tight, winding trails or blasting across open terrain, the RS1 delivers thrills and control in equal measure. looking for a desert buggy ride check them.
bellmedex Strengthening Medical Practices with Innovation
BellMedEx excels in delivering expert medical billing solutions, ensuring precision in coding, a seamless billing process, efficient A/R recovery, and swift electronic claim submissions. The focus is on maximizing reimbursements, reducing expenses, maintaining HIPAA compliance, and effortlessly navigating regulatory hurdles.
As for Technology Advice, the ability to offer services for free stems from potential compensation by vendors for web traffic or other sales opportunities. The mission is clear: to assist technology buyers in making informed purchasing decisions by providing information on all vendors, regardless of financial arrangements.
BellMedEx is a prominent medical billing and Revenue Cycle Management (RCM) firm based in Seattle, with over 20 years of experience providing top-quality services to medical practices nationwide. They specialize in medical billing and coding, helping physicians streamline their billing processes through outsourcing.
BellMedex is headquartered in the picturesque city of Seattle, Washington. As the nation’s highest-reviewed medical billing company, BellMedex boasts nearly a decade of expertise in delivering outstanding revenue cycle management services. The company takes pride in its dedicated team of over 1,000 professionals who have contributed to its stellar reputation for providing top-notch solutions to healthcare providers across the United States.
BellMedEx is more than a medical billing company. We are your collaborator in the art of health care. Our expert staff sculpts the fine details of your billing process, from coding and denial management to fast reimbursement and follow-up. We wield the tools and techniques to shape any billing challenge, regardless of the scale or specialty of your practice. With BellMedEx, you can drop the mic on billing woes and bask in the spotlight of patient care.
You can also read about one of the big medicle billing companies of MTBC- carecloud
How to restart litespeed in cyberpanel | restart litespeed cyberpanel?
CyberPanel is the only panel that comes with the OpenLiteSpeed and LiteSpeed Enterprise, both as well. CyberPanel is the first panel that started offering a LiteSpeed webserver. In the case of OLS, you need to restart the web server many times. So this is about restarting LiteSpeed cyberpanel.
Read a complete details guide for CyberPanel here.
Cyberpanel provides a quick restart button for LiteSpeed whether you have the OLS or LSWS.
Login to your CyberPanel dashboard on port 8090 using your password and username.
Now go to the Manage Services ->Services Status
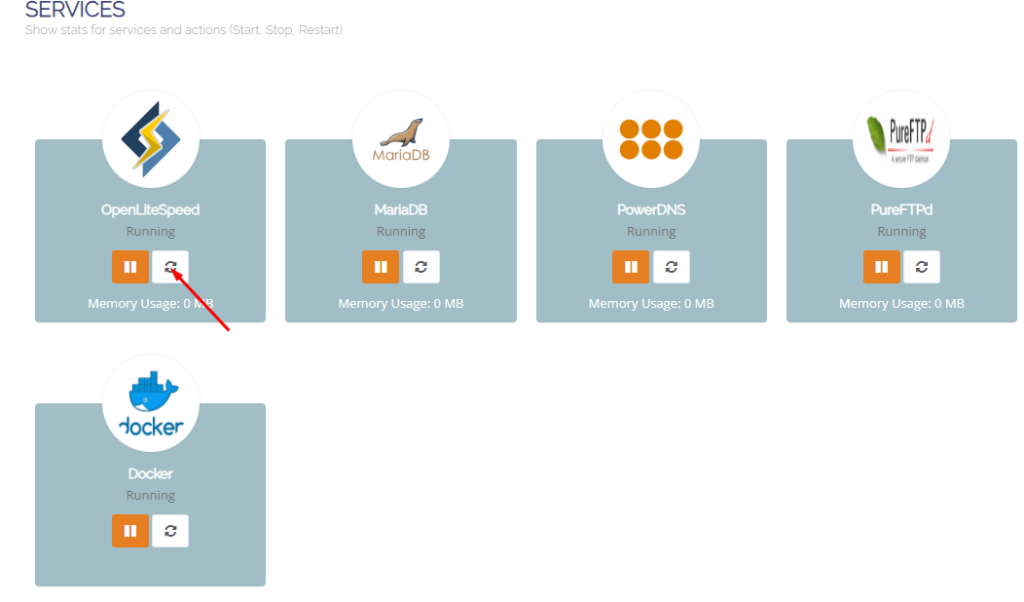
Here on the services page, you can see all of your active services you can now restart any service but in the first number, you can see LiteSpeed or open LiteSpeed and restart button in front of that just press that.
Methode 2: Restart LiteSpeed From Terminal:
LiteSpeed provides you with very short and easy commands to restart stop and restart. Litespeed has its own commands as well and you can do anything using systemctl or service command.
Start LiteSpeed: sudo service lsws start OR sudo systemctl start lsws
Stop LiteSpeed: sudo service lsws stop OR sudo systemctl stop lsws
Restart LiteSpeed: sudo service lsws restart OR sudo systemctl restart lsws
Graceful Restart: A graceful restart allows LiteSpeed to restart without dropping existing connections. sudo service lsws reload OR sudo systemctl reload lsws
Check LiteSpeed Status: sudo service lsws status OR sudo systemctl status lsws
Remember to adjust the paths accordingly based on your LiteSpeed installation directory. These commands assume a standard installation; however, it’s always a good idea to verify the specific paths on your system.
Suppose you want to learn how to remove CyberPanel from your server. Here I will guide you through the possibility of that. Sometimes due to some issues, users want to remove cyberpanel from the Linux server. So here I will write what you can do for this case.
CyberPanel is an open-source web hosting control panel designed to simplify and automate the process of managing web servers. It is built to work with the LAMP (Linux, Apache, MySQL, PHP) or LEMP (Linux, Nginx, MySQL, PHP) stack, providing users with a user-friendly interface to manage their websites and associated services.
Here are some key features and uses of CyberPanel:
Web Server Management: CyberPanel allows users to easily configure and manage web servers like Apache or Nginx. It streamlines the process of creating virtual hosts, setting up domains, and managing website files.
Database Management: It supports various database management systems, such as MySQL and MariaDB. Users can create, modify, and delete databases through the CyberPanel interface.
PHP Management: Users can manage PHP configurations and versions easily within CyberPanel. This is crucial for web developers who may need specific PHP settings for their applications.
Email Management: CyberPanel includes tools for managing email services, such as creating email accounts, setting up domains for email, and configuring mail server settings.
DNS Management: The control panel provides features to manage Domain Name System (DNS) settings, allowing users to configure DNS records for their domains.
SSL/TLS Certificates: CyberPanel simplifies the process of installing and managing SSL/TLS certificates, enhancing the security of websites.
Security Features: It includes security features such as firewalls, intrusion detection, and malware scanning to help protect websites and servers.
Resource Monitoring: CyberPanel provides insights into server resource usage, helping users monitor CPU, memory, and disk space utilization.
One-Click Applications: Some control panels offer the ability to install popular web applications like WordPress, Joomla, or Magento with just one click.
It’s important to note that the features and capabilities of CyberPanel may have evolved or changed since my last update, so I recommend checking the official CyberPanel website or documentation for the most up-to-date information.
A common reason to remove CyberPanel From the server:
Reinstallation of CyberPanel
Server errors
Change of OS
Change of Panel
Change of server Provider
if you have any other in mind do comment below.
There may be other reasons for this as well but in the end user wants a command or a way to get with it.
How to remove CyberPanel?
There is no specific command to run or any button in UI to do so but there are few ways to do.
Rebuilt your server from the server provider.
Reinstall OS from the server provider
Change server from server provider
These are the only ways to remove CyberPanel from your server.
Here are some Operating systems that cyberpanel supports for the installation link.
We also have a complete guide to Cyberpanel that can help you understand each and every feature of Cyberpanel. Also how to use that feature is also written there. So here is the guide.
How to create an SFTP account in CyberPanel for your website
CyberPanel allows you to play with root SSH, website-level SSH, website-level sftp, and the FTP accounts. In this article, we will learn How to create an SFTP account in CyberPanel for your website.
SFTP Account CyberPanel:
Login to your cyberpanel using your cyberpanel login details.
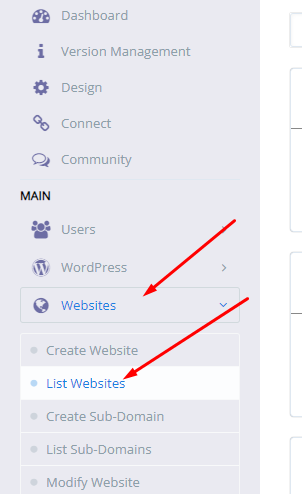
Go to the Websites-> List website from the left menu
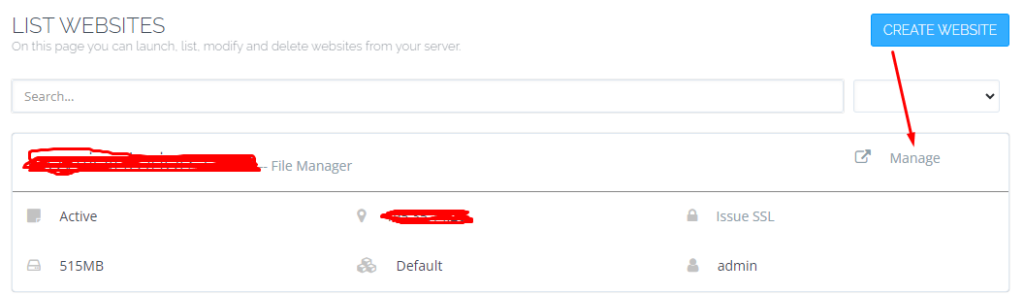
Now click the Manage button in from of your site.
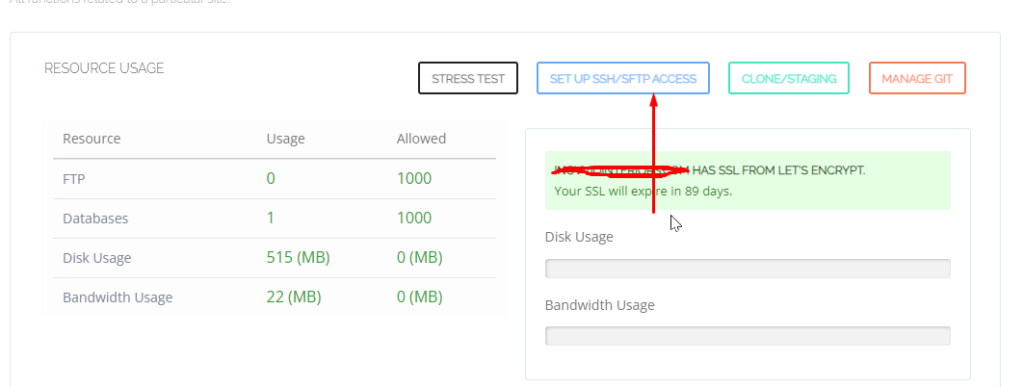
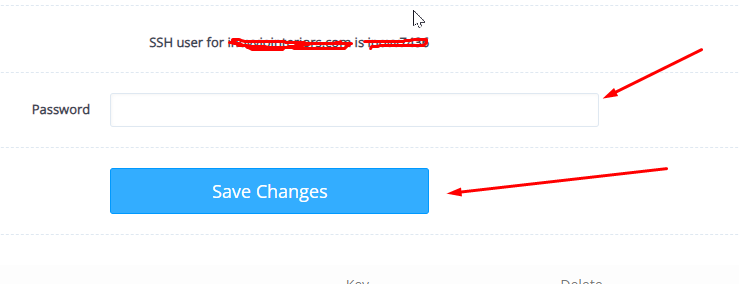
In the Manage Dashboard go to the sftp/shh for the website section
Click on the Setup SFTP/SSH for the website button that will take you to a new screen.
Now change the sftp user password for your site
access through any SSH or FPT client using port 22