Warning: Redis::get(): php_network_getaddresses: getaddrinfo for localhost failed: Name or service not known in /home/solveddoc.com/public_html/wp-content/plugins/litespeed-cache/src/object-cache.cls.php on line 674 CyberPanel Archives - Solveddoc
cyberpanel backup settings
In this article i am going to tell few CyberPanel Backup Settings that you have to take care while setting up any type of backup in cyberpanel.
As you know CyberPanel offers different types of backups like Normal local backups, inc local backups, gdrive backups, sftp backups and few others. So while setting all these types you have to check few settings of cyberpanel backup.
Essential CyberPanel Backup Settings You Shouldn’t Ignore
In this article, I’m going to share a few important CyberPanel backup settings that you need to take care of while setting up any type of backup in CyberPanel.
As you may know, CyberPanel offers different types of backups such as normal local backups, incremental (inc) local backups, Google Drive (GDrive) backups, SFTP backups, and a few others. When configuring these backups, it’s important to check and understand the key settings associated with each type.
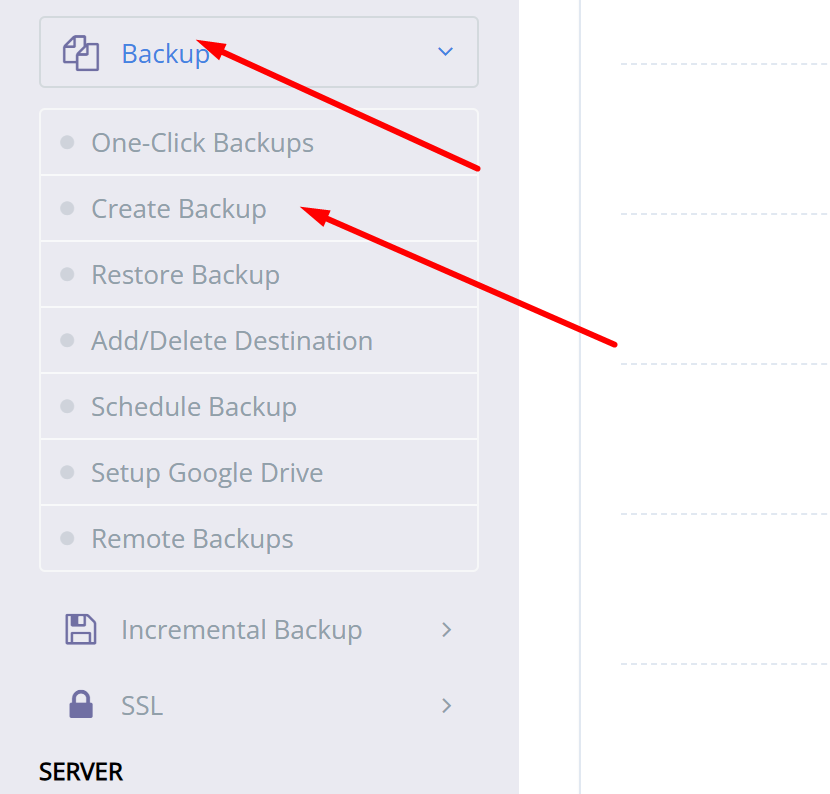
Local CyberPanel Backup settings:
The normal local backups of cyberpanel are the best stable and easy to use backups. You dont ahve to make any settings or special changes for these backups. You just need to do this one step thing.
Login to CyberPanel go to Backup-> Create Backup Select your website and click on create backup button your backup will be made.
This backup file will be stored in /home/domain/backup directory.
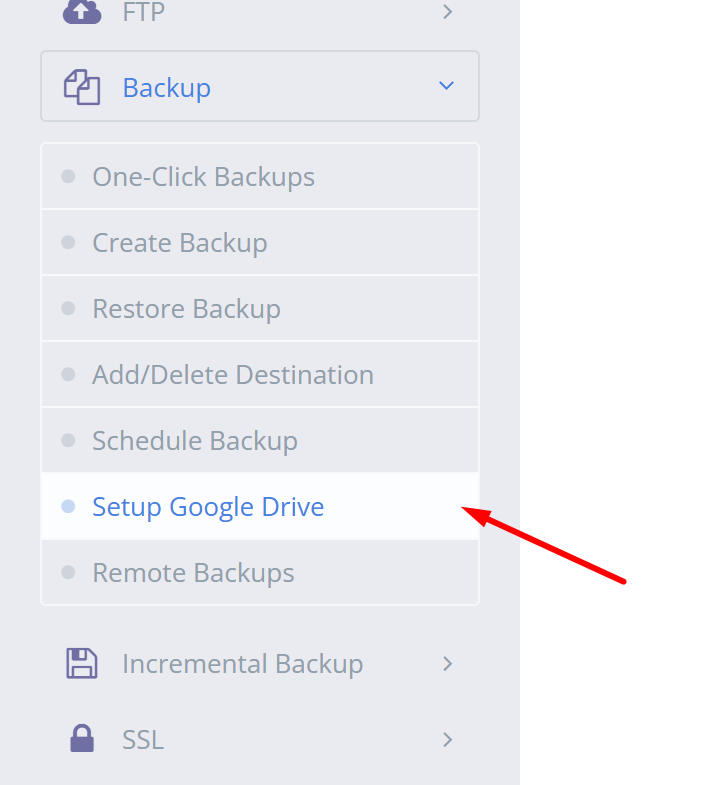
Gdrive CyberPanel Backup Settings:
For Google Drive backup with cyberpanel you must have a gdrive account if you dont have follow guide to create one. To setup Gdrive backup just follow these steps:
LOgin to cyberpanel using your login access.
2. Go to Backup-> Setup Gdrive backup
3. CLick on setup new account and add a google account in that.
4. once account added the gdrive account will be listed in your tab.
5. Now use this and add settings for the gdrive:
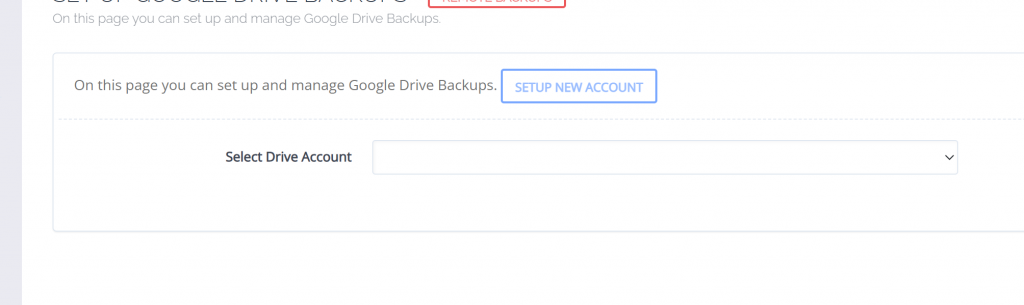
🔧 Google Drive Backup Configuration Overview
1. Drive Account Selection
Field:Select Drive Account
Current Value:Gdrive123
Action Button:Delete
This dropdown lets you choose a connected Google Drive account where backups will be stored. You can delete the selected account if needed.
2. Backup Frequency
Field:Select Backup Frequency
Current Value:Daily
Label on the Right:Currently: Daily
This dropdown allows the user to choose how often backups should occur. In this case, the frequency is set to Daily, meaning backups will be created every day.
3. Site Selection for Backup
Field:Add Sites for Backup
Current Value: A partially blurred domain name (e.g., example.com)
Action Button:Add Site (Highlighted with a red arrow)
This option lets the user specify which website or domain they want to include in the backup. Pressing “Add Site” adds the selected site to the backup list.
4. Backup File Retention
Note: Marked as a Paid Feature
This section likely allows configuration of how long backups are kept (e.g., 7 days, 30 days), but requires a paid upgrade.
🔍 Use Case
This panel is useful for website administrators who want to automate backups to Google Drive. It simplifies the process of:
Linking a Google Drive account
Setting a backup schedule
Choosing which sites to back up
Let me know if you’d like help automating or customizing this backup process further!
Conclusion
Setting up backups in CyberPanel is crucial for ensuring the safety and reliability of your website data. Whether you’re using the simple local backup option or integrating with Google Drive, understanding and configuring the right settings can save you from potential data loss. The local backup method is quick and easy, requiring minimal setup, while the Google Drive backup offers more flexibility and automation for remote storage — especially useful for offsite redundancy. Always make sure your chosen backup type is configured properly and tested regularly. If you need help automating or customizing your backup strategy, don’t hesitate to reach out.
cyberpanel install ubuntu 20.04
CyberPanel intsallation is very easy. You can install cyberpanel using one command. In this article we will discuss how to install CyberPanel install Ubuntu 20.04.
Officially CyberPanel supports a few different OS including Ubuntu 22.04, ubuntu 20.04, Alamalinux 8, Alamalinux 9, CloudLinux 7, and CloudLinux 8.
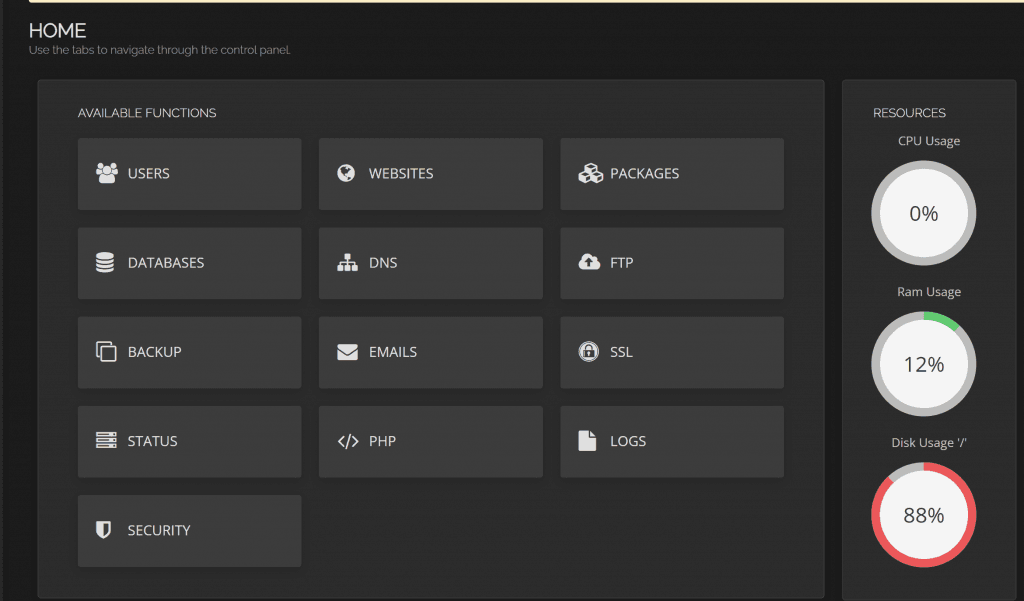
CyberPanel is a web hosting control panel designed to simplify server management. It supports one-click installations for popular applications like WordPress, Joomla, and Drupal, and offers features like email management, DNS control, and SSL certificate installation. Built on OpenLiteSpeed, CyberPanel is known for its high performance and low resource consumption, making it an excellent choice for both beginners and experienced users.
Why Choose CyberPanel?
Speed: OpenLiteSpeed, the underlying web server, is optimized for performance, ensuring fast loading times for your websites.
Ease of Use: CyberPanel’s intuitive interface makes server management accessible to users of all skill levels.
Cost-Effective: As an open-source solution, CyberPanel is free to use, making it a budget-friendly option for small businesses and individuals.
Security: CyberPanel includes built-in security features like ModSecurity and ImunifyAV, helping to protect your server from threats.
How CyberPanel install Ubuntu 20.04 Work?
Prerequisites for cyberpanel install ubuntu 20.04
Before diving into the installation process, ensure that you have the following:
A server running Ubuntu 20.04.
Root or sudo access to the server.
A stable internet connection.
A domain name pointed to your server’s IP address (optional but recommended).
Step 1: Update Your System
Start by updating your system to ensure all packages are up to date. Open your terminal and run the following commands:
sudo apt update
sudo apt upgrade -y
This will update your package list and upgrade any outdated packages.
Step 2: Run cyberpanel install ubuntu 20.04
To install the Cyberpanel on your server just get the ssh access of your server and access it via any ssh client like bitwise.
Once you are logged in just go to the terminal and run a single command:
sh <(curl https://cyberpanel.net/install.sh || wget -O - https://cyberpanel.net/install.sh)
Step 3: Follow the On-Screen Instructions
The installer will guide you through the process, asking for inputs such as:
Selecting the version of CyberPanel: Choose between the stable version or the latest pre-release version.
Setting up DNS: You can choose to install PowerDNS for DNS management.
Setting up Email: You can opt to install Postfix for email services.
Setting up a Password: You’ll be prompted to set a password for the CyberPanel admin panel.
Once you’ve made your selections, the installer will proceed with the installation. This may take a few minutes, depending on your server’s specifications and internet speed.
Step 4: Access CyberPanel
After the installation is complete, you can access CyberPanel by navigating to:
https://your-server-ip:8090
Replace your-server-ip with your server’s actual IP address. You’ll be greeted with the CyberPanel login page. Use the username admin and the password you set during the installation process to log in.
Step 5: Secure Your Installation
It’s crucial to secure your CyberPanel installation. Here are a few steps you can take:
Change the Default Password: After logging in, change the default admin password to something more secure.
Enable Firewall: Ensure that your server’s firewall is enabled and configured to allow only necessary ports.
Install SSL Certificates: CyberPanel makes it easy to install free SSL certificates using Let’s Encrypt, ensuring secure communication between your server and users.
Create Websites: Easily set up new websites with just a few clicks.
Manage Databases: Create and manage MySQL databases.
Set Up Email Accounts: Create email accounts for your domains.
Monitor Server Performance: Use the built-in monitoring tools to keep an eye on your server’s health.
Conclusion
Installing CyberPanel on Ubuntu 20.04 is a straightforward process that can significantly simplify server management. Whether you’re a seasoned developer or a beginner, CyberPanel offers a user-friendly interface and powerful features to help you manage your web hosting environment efficiently. By following this guide, you should now have a fully functional CyberPanel installation ready to handle your websites and applications.
Remember, the key to a successful server management experience is regular maintenance and staying updated with the latest security practices. Happy hosting!
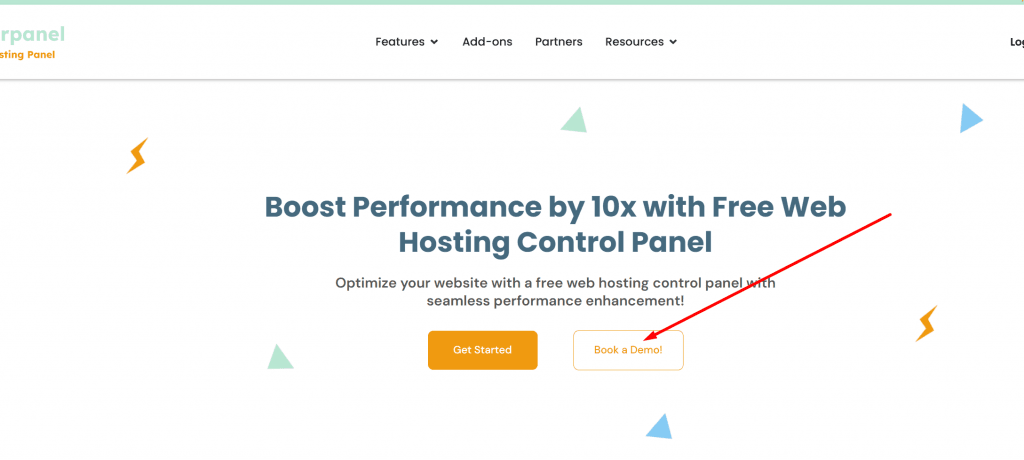
CyberPanel Demo: Try It for Free, But What’s the Catch?
If you are looking for a CyberPanel Demo this article is for you. CyberPanel does not offer a live demo thing. But CyberPanel offers a live demo. Demo CyberPanel was there in the past time but now CyberPanel does not have a live demo CyberPanel link but you can get a live CyberPanel Demo.
Now we will tell you how you can book a live CyberPanel call for Demo.
Process to Book CyberPanel Demo:
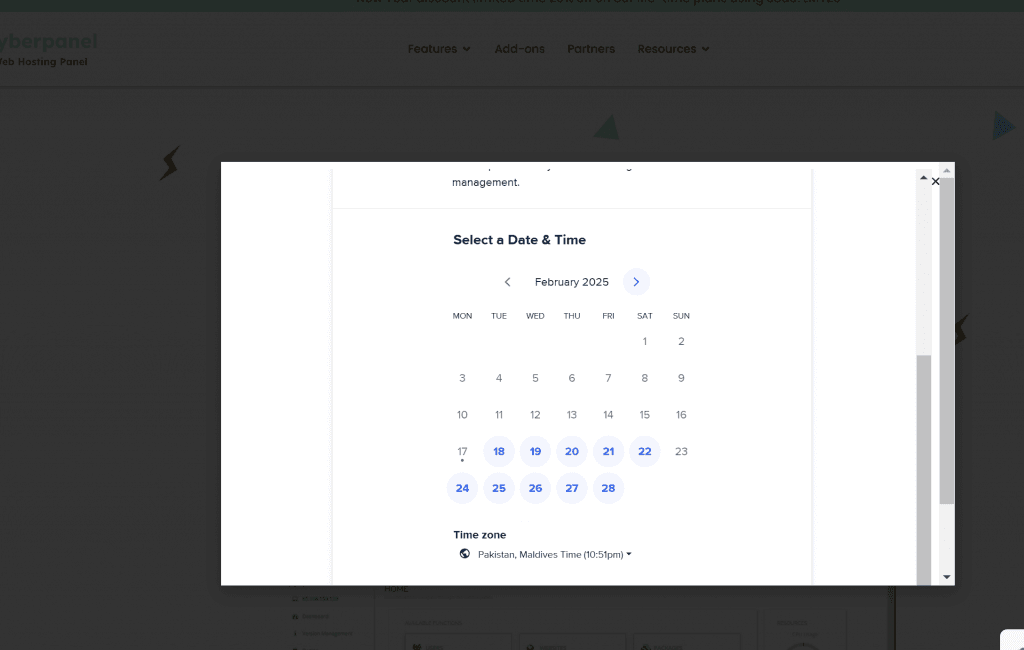
To book a CyberPanel live demo call. You just need to go to CyberPanel main site. On the CyberPanel home page, you can see a Book Demo button.
Once you click this button you will get all available time and dates to book a call with CyberPanel team.
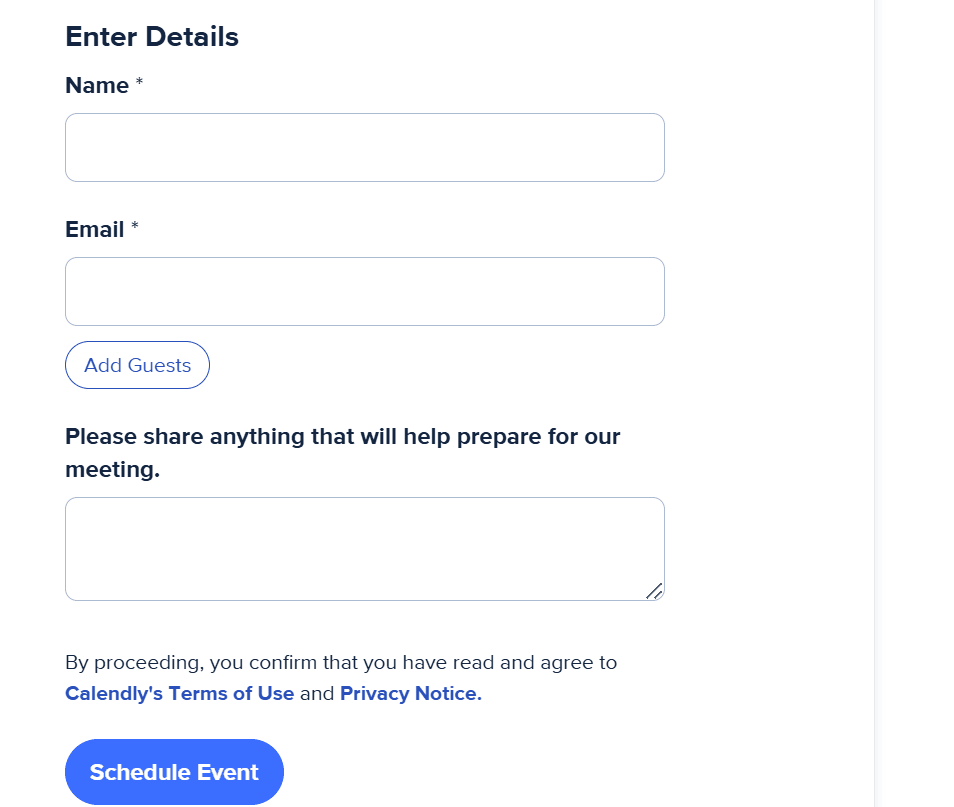
Select any data and time that suits you and once you select the time and date you have to provide your valid detials and active email that will receive your confirmation email and also the call detials.
Be on time for the booked call. and also if you need any cyberpanel-related help you can reach cyberpanel support team by email at help@cyberpanel.net
If you are using CyberPanel for your VPS Hosting and you are looking for managed cyberpanel hosting or CyberPanel VPS Hosting here we will tell you top three partners of CyberPanel who provides CyberPanel-based hosting.
CyberPanel is one of the leading web hosting control panels, widely adopted by both individual hosting users and hosting companies. Known for its simplicity, speed, and OpenLiteSpeed integration, CyberPanel has become a popular choice for managing web servers. In this article, we’ll explore some of the top VPS hosting providers that offer seamless integration with CyberPanel.
If you are using CyberPanel for your VPS hosting and are searching for managed CyberPanel hosting or CyberPanel VPS hosting, here we will highlight the top three partners of CyberPanel who offer hosting services based on the CyberPanel platform.
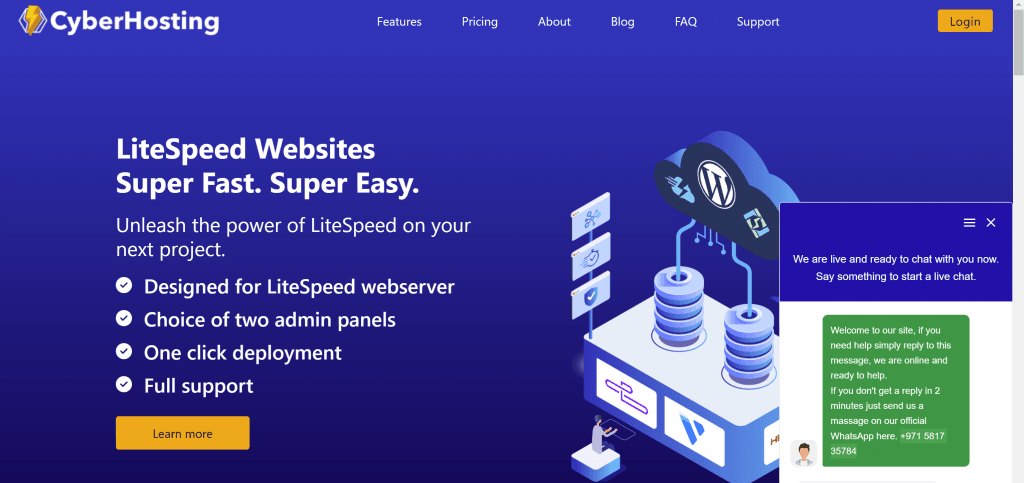
CyberHosting: A Reliable CyberPanel VPS Provider
One of the top VPS providers partnered with CyberPanel is CyberHosting. With years of experience in the hosting industry, CyberHosting has established itself as a reliable and stable solution for users seeking high-performance VPS hosting. Their servers are optimized for CyberPanel, ensuring a smooth and efficient hosting experience.
Whether you’re a beginner or an experienced user, CyberHosting offers flexible pricing plans to suit your needs. Their commitment to quality and customer satisfaction makes them a standout choice for CyberPanel VPS hosting.
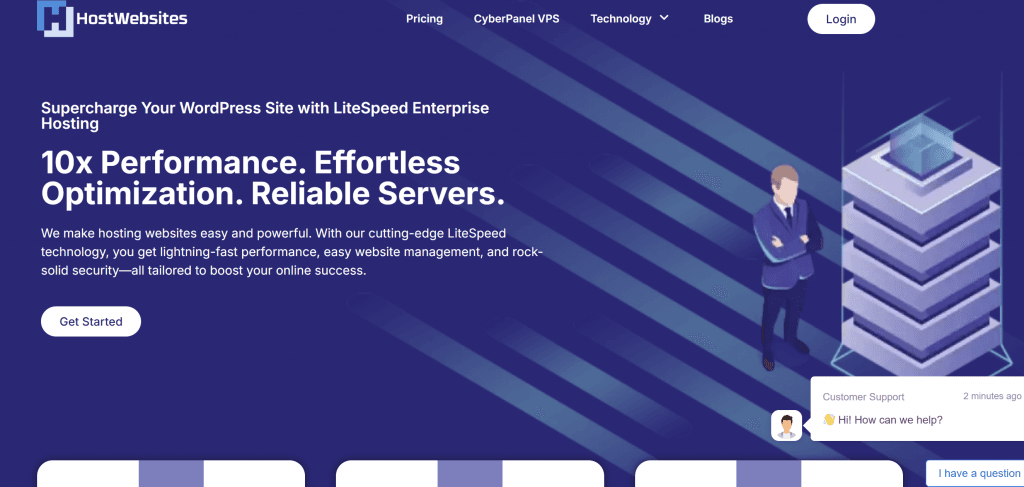
Hostwebsites: A New but Stable CyberPanel VPS Option
Another excellent option for CyberPanel VPS hosting is Hostwebsites. Although relatively new to the market, Hostwebsites has quickly gained a reputation for providing stable and reliable hosting solutions. Their VPS deployment process is smooth and user-friendly, making it an ideal choice for both beginners and advanced users.
Hostwebsites is a great choice for those looking for a fresh yet dependable hosting provider with a focus on performance and ease of use.CyberPanel VPS hosting.
Hostinger: Affordable and Feature-Packed CyberPanel VPS Hosting
Hostinger is another top-tier hosting provider that offers VPS hosting compatible with CyberPanel. Known for its affordability and feature-rich plans, Hostinger is a popular choice among individuals and businesses alike. Their VPS hosting solutions are scalable, making them suitable for small websites as well as growing online projects.
Key Features of Hostinger:
Affordable pricing with excellent value for money.
Scalable VPS plans to accommodate growing needs.
Easy-to-use control panel and one-click CyberPanel installation.
Hostinger’s combination of affordability, scalability, and user-friendly features makes it a strong contender for anyone looking for CyberPanel VPS hosting.
Conclusion
Choosing the right VPS hosting provider for CyberPanel depends on your specific needs, budget, and technical expertise. Whether you opt for the reliability of CyberHosting, the smooth deployment of Hostwebsites, or the affordability and scalability of Hostinger, each of these providers offers unique advantages to enhance your hosting experience.
If you’re ready to take your website to the next level, explore these providers and find the one that best suits your requirements!
How to enable csf cyberpanel ubuntu 22.04:
The process of installation of CSF is the same for all OS.
In newer versions of CyberPanel, CyberPanel offers CSF installtion and support without and issue. Now you can install csf in CyberPanel using one click installation to make your security more tight. let’s learn How to install cSF cyberPanel?
CSF (ConfigServer Security & Firewall) is a powerful and widely used security tool designed for Linux servers. It acts as both a firewall and a security suite, providing server administrators with advanced protection against malicious attacks, unauthorized access, and various threats.
What is CSF?
CSF is a stateful packet inspection (SPI) firewall, login/intrusion detection, and security application that enhances server protection. It is primarily used on servers running cPanel, DirectAdmin, Webmin, CyberPanel, and other Linux-based hosting environments. It helps prevent DDoS attacks, brute force attempts, and unauthorized logins while offering real-time monitoring of network traffic.
Key Features of CSF
Advanced Firewall Rules: CSF allows you to configure firewall rules easily, blocking or allowing specific IPs, ports, and protocols. It helps restrict unauthorized traffic and enhances overall server security.
Brute-Force Protection (LFD – Login Failure Daemon): CSF includes LFD, which actively monitors repeated failed login attempts to SSH, FTP, email, and other services. If an IP exceeds the failed login limit, it gets automatically blocked.
Port Scanning Protection: Hackers often scan ports to find vulnerabilities. CSF detects and blocks these scanning attempts in real time.
DDoS Mitigation: CSF helps mitigate small-scale DDoS attacks by limiting connection rates and blocking excessive requests from a single source.
Temporary & Permanent IP Blocking: You can manually block or whitelist IP addresses. It also supports temporary blocks, which automatically expire after a set period.
Country-Based Blocking: If you need to restrict access from specific countries, CSF allows GeoIP-based blocking to enhance security.
SMTP Protection: CSF can prevent unauthorized scripts or malware from sending emails, reducing the risk of your server being used for spam.
Real-Time Process Tracking: The firewall constantly monitors running processes, detecting suspicious activities and malware infections.
Integration with Control Panels: CSF works seamlessly with cPanel, CyberPanel, DirectAdmin, and Webmin, allowing easy management from their interfaces.
Lightweight & Optimized for Performance: Unlike some firewalls that consume high resources, CSF is designed to be efficient and lightweight, ensuring minimal impact on server performance.
Why Should You Use CSF?
Easy to configure even for those with limited Linux experience.
Regularly updated to keep up with emerging threats.
Active community support for troubleshooting and guidance.
How do you install and use CSF in CyberPanel?
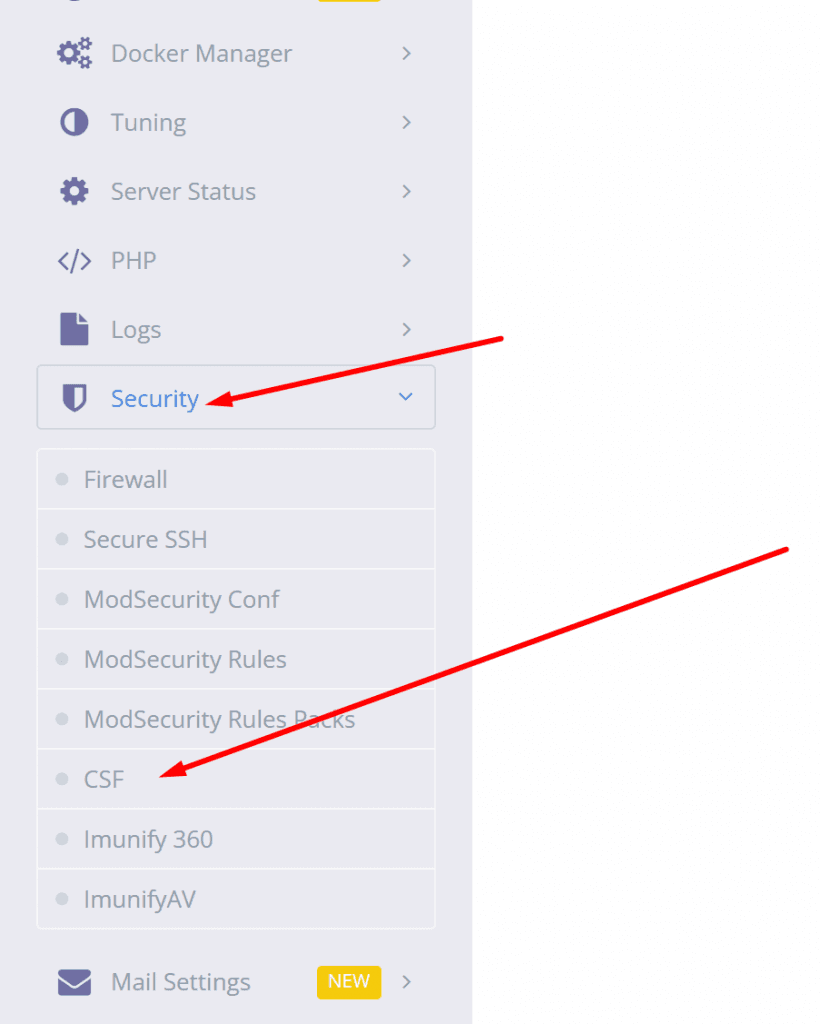
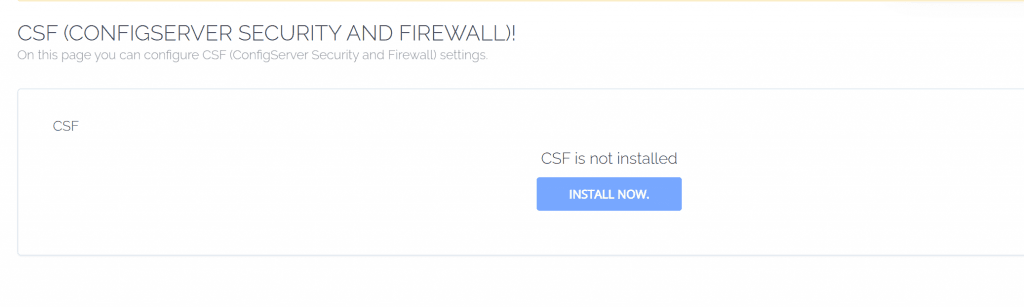
To install CSF CyberPanel just follow these steps:
Login to your cyberpanel at port 8090 using your access.
Now go to security-> csf
3. Now you can see install now button on this screen press that button
Installation started, and this will take 1 or 2 minutes to make it done. the process to install CSF cyberPanel is completed after this. after doing this the process of install CSF cyberPanel is completed now.
How to Install CSF on Your Server
If you’re using Ubuntu, AlmaLinux, Rocky Linux, or CloudLinux, you can install CSF with the following steps:
# Install required packages
yum install wget perl -y  # For CentOS/RHEL-based systems
apt install wget perl -y  # For Debian/Ubuntu-based systems

# Download and Install CSF
cd /usr/src
wget https://download.configserver.com/csf.tgz
tar -xzf csf.tgz
cd csf
sh install.sh

# Enable CSF and LFD
systemctl enable csf
systemctl enable lfd
systemctl start csf
systemctl start lfd

# Verify Installation
perl /usr/local/csf/bin/csftest.pl
Once installed, you can manage CSF using command-line tools or through the web interface in cPanel or CyberPanel.
Final Thoughts
CSF is one of the best security solutions for Linux servers. Whether you’re running a WordPress site, a hosting company, or a business server, CSF provides essential protection against cyber threats while remaining easy to manage. If you want to harden your server security, installing CSF is a must!
How to enable csf cyberpanel ubuntu 22.04:
The process of installation of CSF is the same for all OS.
CyberPanel offer API access for different porposes. You can enable CyberPanel API access and you can use to connect your server with cyberpanel platfrom. You can use to do use CyberPanel API. And more things.
If you are managing a server with CyberPanel, enabling API access can significantly enhance your ability to automate tasks and integrate third-party tools seamlessly. CyberPanel’s API feature allows developers and administrators to connect their server with various platforms, enabling them to perform critical operations remotely with ease. This guide will help you enable CyberPanel API access quickly and efficiently.
How to enable CyberPanel API access?
Login to your cyberpanel on port 8090 using your server access url like
https://<IP>:8090
2. Now once you are loged in you just need to go to the User->API Access from the left side menu of you cyberpanel.
3. Now on this screen you can see a user and access select the user and enable the access like shown below.
4. Once all done press the Save Changes button and all done.
Why Enable CyberPanel API Access?
By enabling API access, you can:
Automate routine server tasks and operations.
Integrate your server with third-party platforms and applications.
Manage and monitor your server remotely with ease.
CyberPanel’s API is a powerful tool that brings flexibility and efficiency to server management. Whether you’re a developer looking to build integrations or a server administrator aiming to optimize workflows, this feature can make a significant difference.
How to install Redis in CyberPanel | Redis CyberPanel
CyberPanel offer you one click installtion of the Redis. CyberPanel allows you a very quick and easy setup for the Redis. Redis CyberPanel is a very advanced and new feature.
Redis is an open-source cache used to cache databases and is used as a message broker. Nowadays it is very important to use cache and boost your website. CyberPanel helps you to do this.
CyberPanel is a web hosting control panel designed to manage websites and servers. It is built on top of OpenLiteSpeed or LiteSpeed Enterprise, which are high-performance web servers known for their speed and security. CyberPanel provides an easy-to-use graphical interface for handling website management tasks such as creating and managing domains, setting up SSL certificates, handling DNS, and managing databases.
Redis CyberPanel | Setup Redis Using CyberPanel:
Follow these steps to set up Redis on your server.
Login to CyberPanel: Access your CyberPanel control panel by visiting https://yourdomain.com:8090, then log in with your username and password.
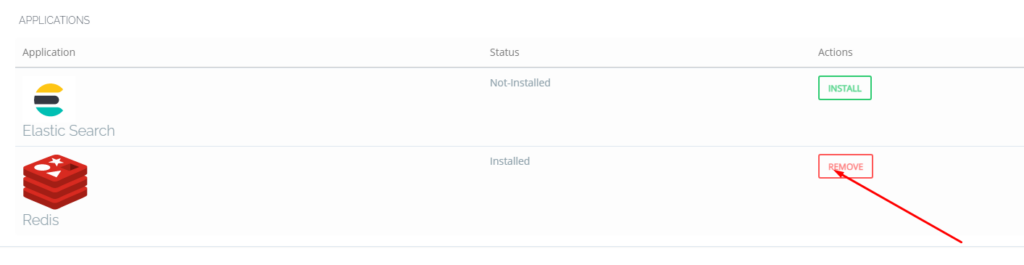
One-Click Redis Installation: Navigate to the Manage Services section in CyberPanel, select Applications, and click Install Redis for a quick, automatic setup of the Redis server on your machine.
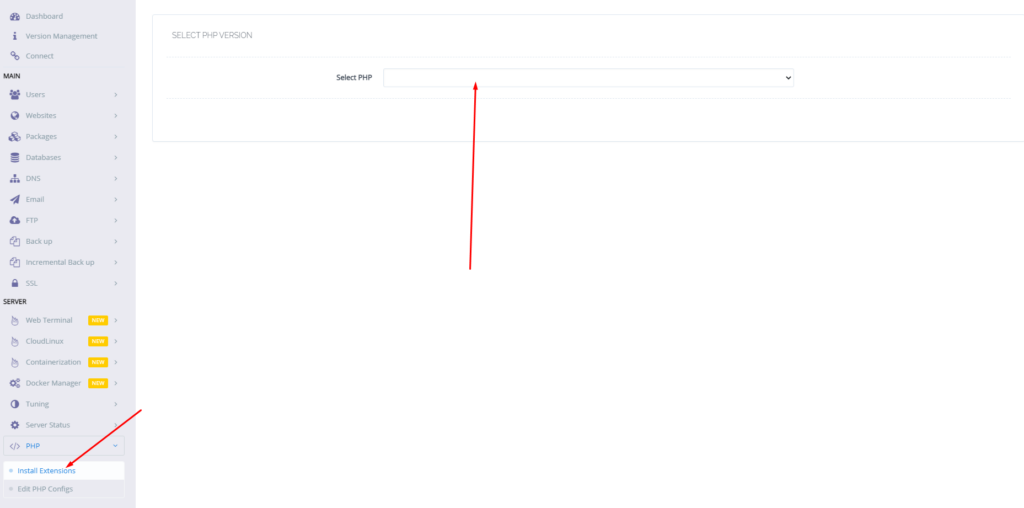
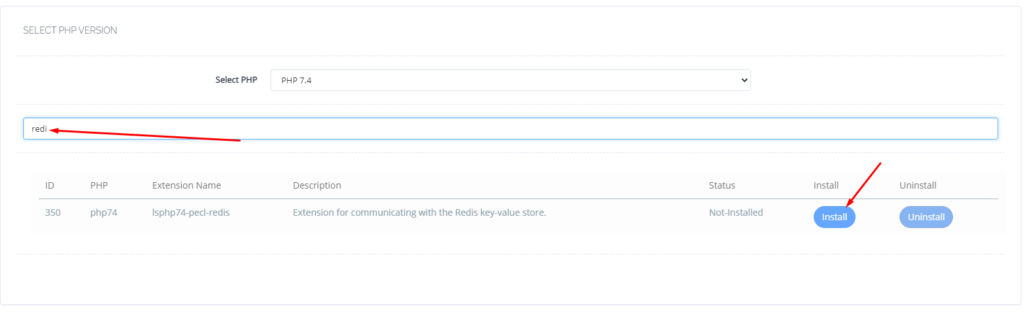
Install the Redis PHP Extension: Go to the PHP section in CyberPanel, click on Install Extensions, search for Redis, and click Install to add the Redis PHP extension for Redis-PHP communication.
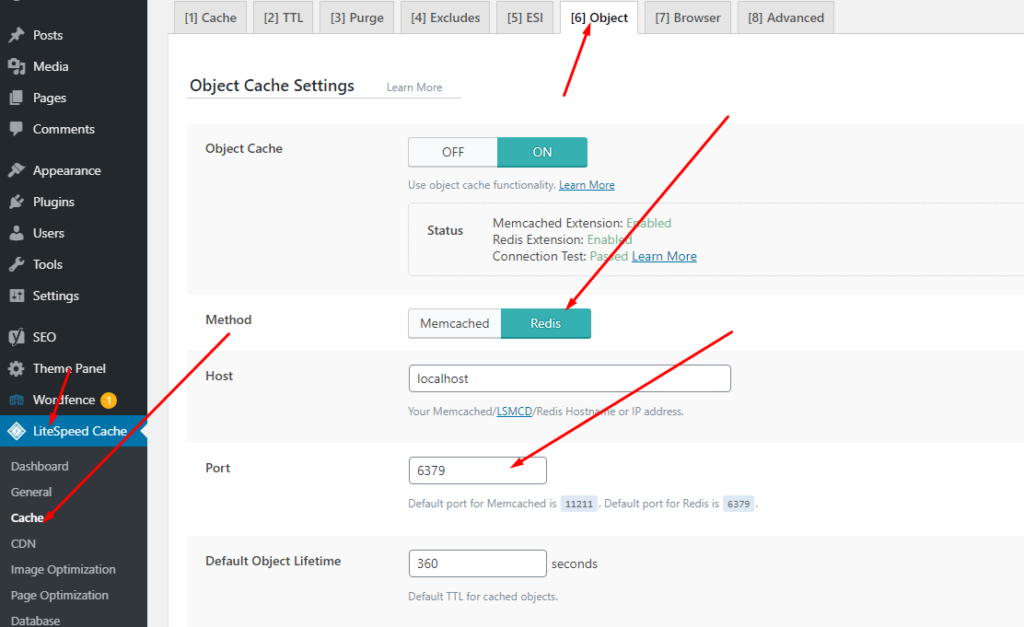
Setup Redis on WordPress using LiteSpeed Cache (LS Cache): Log in to WordPress, navigate to LiteSpeed Cache > Cache > Object, enable Object Cache, set Redis as the method, change the port to 6379, and save the settings; ensure that both the Redis PHP extension and connection test pass to confirm Redis is configured properly.
Login to CyberPanel:
Login to your CyberPanel using the credentials. Follow the link with port 8090.
https://<Your_IP>:8090
CyberPanel
One-Click Redis Install:
To install Redis on your server you have to go to the Manage Services->Application -> Redis then you can see the install button there. Click that and your Redis will be installed.
Now your Redis is installed and you have to install the PHP extension to run properly.
Install Redis PHP extension:
Now go to the PHP-> Install Extension Then you have to select the PHP version for which you want to install Redis Extension. You can also follow this link.
Now search Redis on the search bar and you can see the Redis PHP extension press the Install button and everything is good to go.
Redis
Setup Redis on WordPress using LS Cache:
Now it’s time to set up Redis on your WordPress site. We will tell you here how you can set up Redis on your WordPress site without any extra plugins. The Ls cache plugin will all do for you. Let’s begin with how to do it.
In the WordPress dashboard, locate the LiteSpeed Cache plugin on the left-hand menu and click on the Cache option.
From the Cache settings page, switch to the Object tab, where you’ll find the configurations for object caching.
Turn on the Object Cache by toggling the option. Once enabled, set the caching method to Redis.
Update the Redis port to 6379, which is the standard port for Redis, and then click Save to store your settings.
After saving, check the status indicators on the same page. You should see confirmation that the Redis extension is installed and that the connection test has passed. If both show success, your object caching is correctly configured and ready to go!
Why Redis CyberPanel is a Game-Changer for Speed and Performance
In today’s online world, speed is everything. Whether you’re running a website, an app, or an e-commerce store, slow performance can drive users away. That’s where Redis comes in—a powerful, lightning-fast data store that helps businesses handle large amounts of data without slowing down.
Blazing-Fast Performance
Imagine opening a website and waiting for it to load. Frustrating, right? Redis solves this by keeping frequently used data in memory, making it incredibly fast. Unlike traditional databases that have to fetch data from disk, Redis serves it instantly, keeping users engaged.
Handles High Traffic with Ease
As your website or app grows, so does the demand on your database. Many systems struggle under heavy loads, but Redis is built to scale. Whether you’re dealing with thousands or millions of users, Redis helps keep things running smoothly without crashes or slowdowns.
Faster Load Times with Caching
Some websites load instantly, while others take forever. One major reason is caching. Redis stores frequently accessed data, like user sessions and product listings, so your website doesn’t have to fetch the same information repeatedly. This results in faster page loads, improved SEO, and a better user experience.
More Than Just a Key-Value Store
Many think of Redis as a simple data store, but it supports advanced data structures like lists, sets, and sorted sets. This makes it ideal for use cases like leaderboards, messaging apps, and recommendation engines, providing a more dynamic experience for users.
Keeps Data Safe and Available
One concern with in-memory storage is data loss, but Redis offers solutions. It provides persistence by saving data to disk and replication by copying data to multiple servers. These features ensure data is safe and available even if something goes wrong.
Reduces Database Load
Databases like MySQL and PostgreSQL are powerful, but when overloaded, they slow down. Redis helps by handling frequent requests, reducing the load on the main database. This improves overall efficiency and system performance.
Perfect for User Sessions and Authentication
Many websites and applications rely on user sessions for login and personalization. Redis is widely used for session management, ensuring that user data is stored and retrieved quickly without unnecessary delays.
Cost-Effective and Open Source
Redis is open source, meaning businesses can use it without expensive licensing fees. Its efficiency reduces infrastructure costs while delivering high performance, making it a cost-effective solution for businesses of all sizes.
Final Thoughts on Redis CyberPanel
If you want your website or application to be fast, reliable, and scalable, Redis is an excellent choice. It improves user experience, enhances SEO, and ensures smooth operations even under heavy traffic. Whether you are running an online store, a social media platform, or a real-time analytics dashboard, Redis can help you stay ahead of the competition.
Suppose you want to learn how to remove CyberPanel from your server. Here I will guide you through the possibility of that. Sometimes due to some issues, users want to remove cyberpanel from the Linux server. So here I will write what you can do for this case.
What is CyberPanel and what is it used for?
CyberPanel is an open-source web hosting control panel designed to simplify and automate the process of managing web servers. It is built to work with the LAMP (Linux, Apache, MySQL, PHP) or LEMP (Linux, Nginx, MySQL, PHP) stack, providing users with a user-friendly interface to manage their websites and associated services.
Here are some key features and uses of CyberPanel:
Web Server Management: CyberPanel allows users to easily configure and manage web servers like Apache or Nginx. It streamlines the process of creating virtual hosts, setting up domains, and managing website files.
Database Management: It supports various database management systems, such as MySQL and MariaDB. Users can create, modify, and delete databases through the CyberPanel interface.
PHP Management: Users can manage PHP configurations and versions easily within CyberPanel. This is crucial for web developers who may need specific PHP settings for their applications.
Email Management: CyberPanel includes tools for managing email services, such as creating email accounts, setting up domains for email, and configuring mail server settings.
DNS Management: The control panel provides features to manage Domain Name System (DNS) settings, allowing users to configure DNS records for their domains.
SSL/TLS Certificates: CyberPanel simplifies the process of installing and managing SSL/TLS certificates, enhancing the security of websites.
Security Features: It includes security features such as firewalls, intrusion detection, and malware scanning to help protect websites and servers.
Resource Monitoring: CyberPanel provides insights into server resource usage, helping users monitor CPU, memory, and disk space utilization.
One-Click Applications: Some control panels offer the ability to install popular web applications like WordPress, Joomla, or Magento with just one click.
It’s important to note that the features and capabilities of CyberPanel may have evolved or changed since my last update, so I recommend checking the official CyberPanel website or documentation for the most up-to-date information.
A common reason to remove CyberPanel From the server:
Reinstallation of CyberPanel
Server errors
Change of OS
Change of Panel
Change of server Provider
if you have any other in mind do comment below.
There may be other reasons for this as well but in the end user wants a command or a way to get with it.
How to remove CyberPanel?
There is no specific command to run or any button in UI to do so but there are few ways to do.
Rebuilt your server from the server provider.
Reinstall OS from the server provider
Change server from server provider
These are the only ways to remove CyberPanel from your server.
Here are some Operating systems that cyberpanel supports for the installation link.
We also have a complete guide to Cyberpanel that can help you understand each and every feature of Cyberpanel. Also how to use that feature is also written there. So here is the guide.
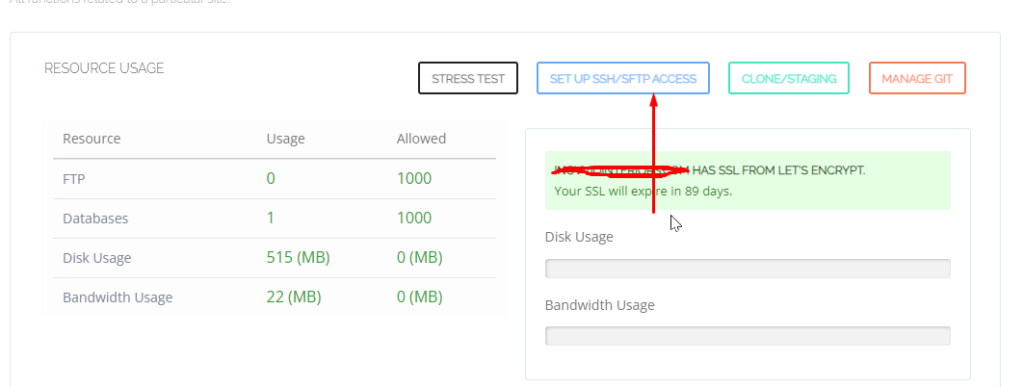
How to create an SFTP account in CyberPanel for your website
CyberPanel allows you to play with root SSH, website-level SSH, website-level sftp, and the FTP accounts. In this article, we will learn How to create an SFTP account in CyberPanel for your website.
SFTP Account CyberPanel:
Login to your cyberpanel using your cyberpanel login details.
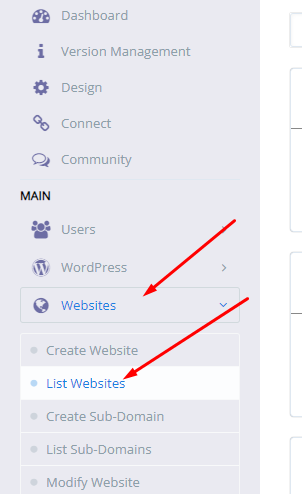
Go to the Websites-> List website from the left menu
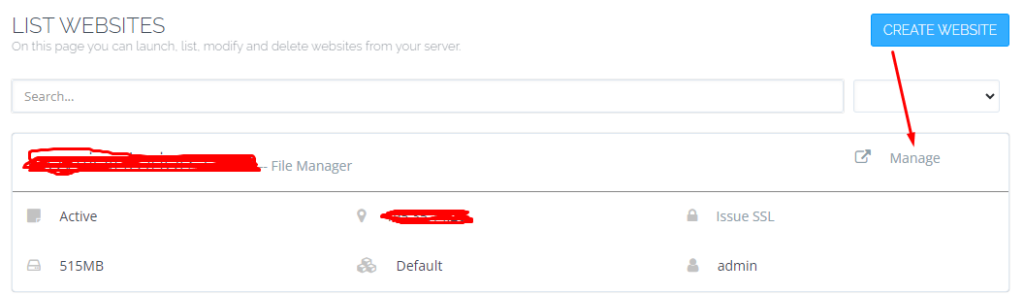
Now click the Manage button in from of your site.
In the Manage Dashboard go to the sftp/shh for the website section
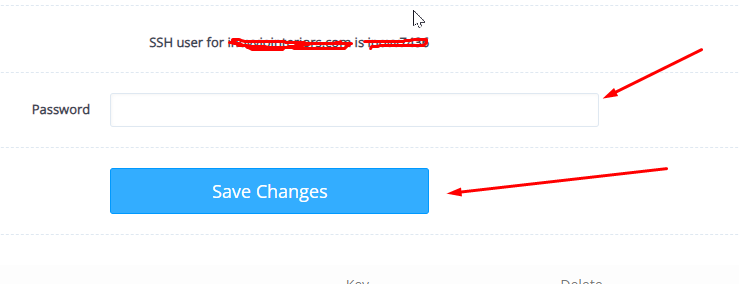
Click on the Setup SFTP/SSH for the website button that will take you to a new screen.
Now change the sftp user password for your site
access through any SSH or FPT client using port 22
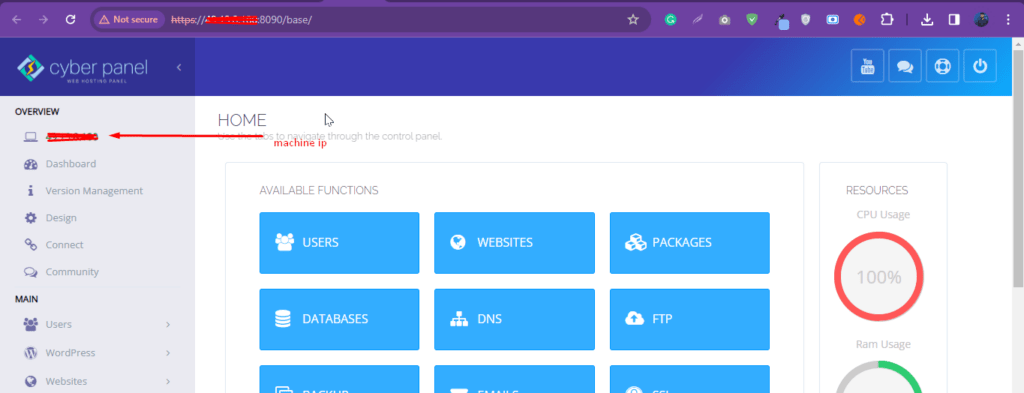
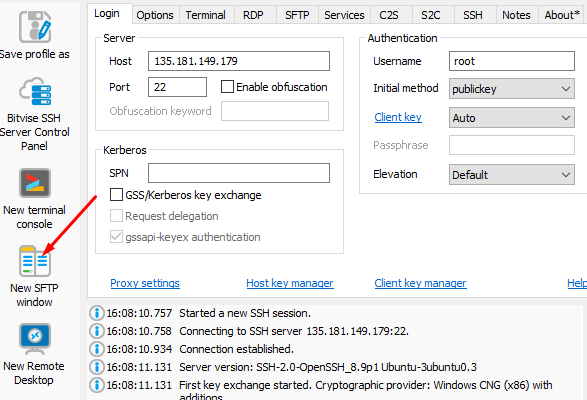
Sometimes your provider updates the IP of your server but in CyberPanel you can access the CyberPanel using a new IP in the dashboard. The old IP is showing so here is a quick guide on how to update the machine IP in CyberPanel. In this case, you have to update the machine IP in cyberpanel.
Here is the IP you can understand from the picture.
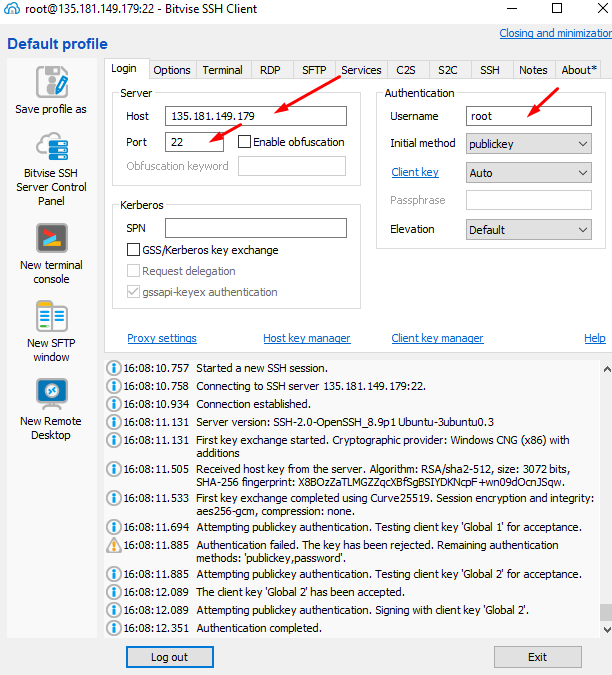
Step 1. Login to your server SSH access and add the IP address username password and port. After entering the details Click on the login button at the bottom
Step 2. Click on the left-side menu new SFTP window
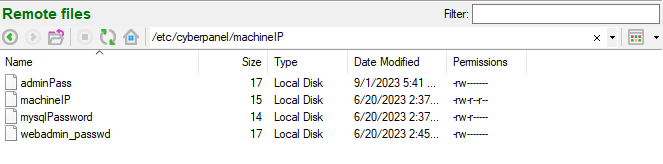
Step 3. You go to this page now and add the file name
/etc/cyberpanel/machineIP
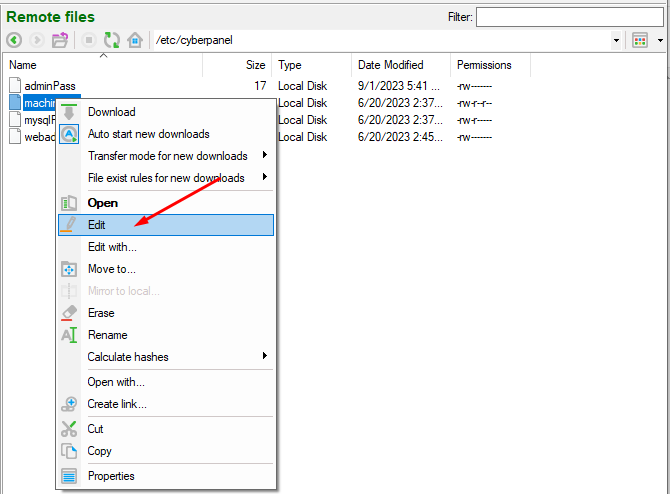
Step 4. Open the machineIP file. Click on edit file.
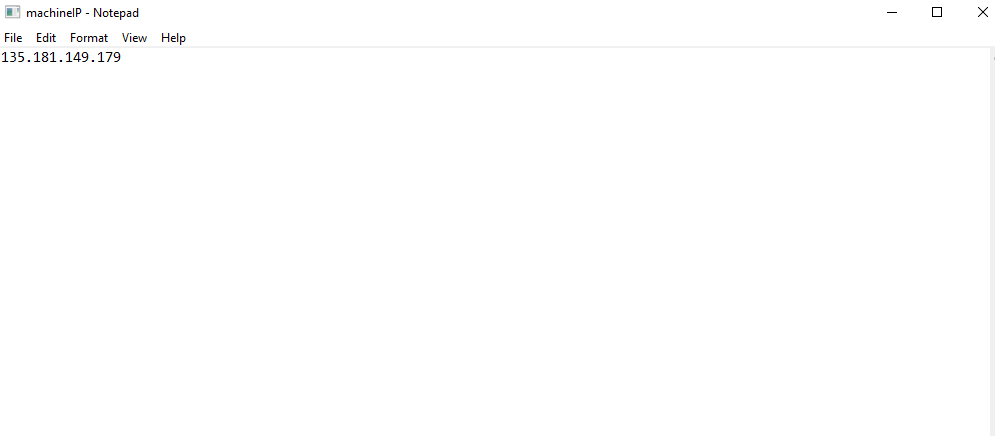
Step 5. Here you can change the IP and save the file
Step 6. After saving the file Go to the terminal and Run the command on the terminal: