Access Cyberpanel Via Hostname with SSL- Issue SSL for Hostname

DO you want to access CyberPanel via a hostname with valid SSL ?

By default, you can access your cyber panel using the IP of your server and Port 8090. But For a valid SSL certificate, you must need a valid domain to access cyber panel with a valid SSL.

In this article, we will discuss how you can select a hostname and then issue SSL for that. So follow all steps along to access Cyberpanel Via Hostname with SSL.

Table of Content:

  1. Select a Valid Domain
  2. Create a Website on CyberPanel
  3. Issue SSL for HostName
  4. Access Cyberpanel

Select a Valid Domain

To access CyberPanel through a hostname and valid SSL first you need a domain through which you want to access CyberPanel. Like you want to use https://domian.com:8090 to access your CyberPanel you need to add domain.com to your CyberPanel.

Before creating a domain make sure that your DNS A records are point this server where you want to add a domain.

Create a Website on CyberPanel

To do so login to your CyberPanel using your Credentials then go to Websites->Create Website :

Create a Website on CyberPanel

Now provide all the required details and press Create Website button.

Now provide all the required details and press Create Website button.

Now your required website is created. SSL may be working for this domain But we need to issue for the Hostname and select this domain as the hostname.

Issue SSL for HostName:

Go to the SLL->Hostname SSL

Issue SSL for HostName:

Now select that domain you want to use for the Hostname. Then Press the Issue SSL.

Now select that domain you want to use for the Hostname. Then Press the Issue SSL.

This domain has now SSL for hostname you can use this to access cyberpanel

Access Cyberpanel:

Now it’s time to check that is this domain is working to access the CyberPanel. Go to your brewers and visit the Link https://your-domain.com:8090 it should work for your Hostname now you can access CyberPanel using this link.

Read More: How to set up Google Drive Backup on CyberPanel?
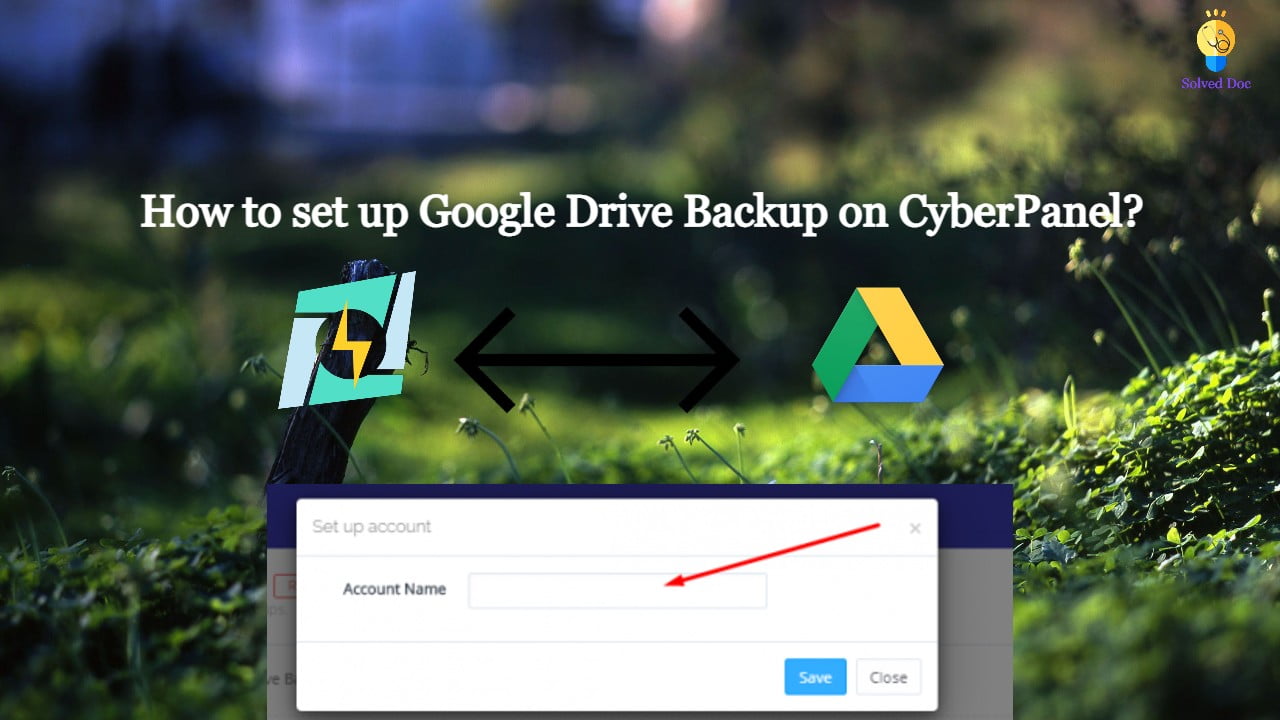
How to Integrate Google AdMob to your React Native Application?

Do you want to integrate your AdMob to React Native Application?

If you want to earn from your React Native Applications you need to integrate AdMob with your React Native Application. So Google AdMobs helps you to earn from your applications.

Mostly React Native Packages are installed using a single command. In this article, i will tell you the simplest way to install, Integrate, and use AdMob in your react native application.

Create AdMob Account:

First of all you must have a AdMob account. Go to this Article and check how you can create Admob account. The process of creating Admob account is very straight and simple. In this Article All steps are mentioned and described briefly.

How to Install React Native AdMob:

For the integration of Admob with react native first of all we have to Install React native AdMob in your project its is very easy to do so here we discuss the steps :

There are different packages to integrate Admob with your React Native Project but here I discuss that one which I personally use and I think have easy integration than Others.

React-native-admob is bossily a react-native module for Google AdMob Banners, Interstitials, and Rewarded Videos, and also DFP Banners. To install this module Run the command stated below.

npm i @talaikis/react-native-admob

In older versions of React native, you need to configure this module manually but now This fork is a working version for RN 0.60+. Don’t link this package, auto-linking works fine. No need to do extra linking at all.

Open your already created application and install this module using the line stated above.

Open your already created application and install this module using the line stated above.

Once installation process is done. Nothing to do other than this.

React native AdMob Types:

React native AdMob Allows four types of Ads units for its user:

  • AdMobBanner,
  • AdMobInterstitial,
  • PublisherBanner,
  • AdMobRewarded,

AdMobBanner,

AdMobBanner is the Banner Add for your Application you can add it as sticky location on at any place on any page of your applicatio.

To read more about this click here.

Usage

import {
  AdMobBanner,
 } from 'react-native-admob'

// Display a banner
<AdMobBanner
  adSize="fullBanner"
  adUnitID="your-admob-unit-id"
  testDevices={[AdMobBanner.simulatorId]}
  onAdFailedToLoad={error => console.error(error)}
/>

AdMobInterstitial,

This type of React-native AdMob has imperative API. You can use this at any function call.

To ready more Click Here.

Usage

import {
  AdMobInterstitial
} from '@talaikis/react-native-admob';

  componentDidMount() {
  AdMobInterstitial.setTestDevices([AdMobInterstitial.simulatorId]);
  AdMobInterstitial.setAdUnitID('ca-app-pub-your_ad-uint');

  AdMobInterstitial.addEventListener('adLoaded', () =>
    console.log('AdMobInterstitial adLoaded'),
  );
  AdMobInterstitial.addEventListener('adFailedToLoad', error =>
    console.warn(error),
  );
  AdMobInterstitial.addEventListener('adOpened', () =>
    console.log('AdMobInterstitial => adOpened'),
  );
  AdMobInterstitial.addEventListener('adClosed', () => {
    console.log('AdMobInterstitial => adClosed');
    AdMobInterstitial.requestAd().catch(error => console.warn(error));
  });
  AdMobInterstitial.addEventListener('adLeftApplication', () =>
    console.log('AdMobInterstitial => adLeftApplication'),
  );

  AdMobInterstitial.requestAd().catch(error => console.warn(error));
}

componentWillUnmount() {
  AdMobInterstitial.removeAllListeners();
}


showInterstitial() {
  AdMobInterstitial.showAd().catch(error => console.warn(error));
}

  componentWillUnmount() {
    AdMobRewarded.removeAllListeners();
  }

PublisherBanner,

This is just Like AdMobBanner with the addition of 2 extra properties:

Click here for more details:

Usage:

import {
  PublisherBanner,
  } from 'react-native-admob'
 
 <PublisherBanner
  adSize="fullBanner"
  adUnitID="your-admob-unit-id"
  testDevices={[PublisherBanner.simulatorId]}
  onAdFailedToLoad={error => console.error(error)}
  onAppEvent={event => console.log(event.name, event.info)}
/>

AdMobRewarded,

In comparison to the AdMobBanner and PublisherBanner which have a declaritive API, the AdMobRewarded has an imperative API, just like the AdMobInterstitial.

Click Here to read more:

Usage:

import {
  AdMobRewarded,
  } from 'react-native-admob';
 

componentDidMount() {
  AdMobRewarded.setTestDevices([AdMobRewarded.simulatorId]);
  AdMobRewarded.setAdUnitID('your ad unit');

  AdMobRewarded.addEventListener('rewarded', reward =>
    console.log('AdMobRewarded => rewarded', reward),
  );
  AdMobRewarded.addEventListener('adLoaded', () =>
    console.log('AdMobRewarded => adLoaded'),
  );
  AdMobRewarded.addEventListener('adFailedToLoad', error =>
    console.warn(error),
  );
  AdMobRewarded.addEventListener('adOpened', () =>
    console.log('AdMobRewarded => adOpened'),
  );
  AdMobRewarded.addEventListener('videoStarted', () =>
    console.log('AdMobRewarded => videoStarted'),
  );
  AdMobRewarded.addEventListener('adClosed', () => {
    console.log('AdMobRewarded => adClosed');
    AdMobRewarded.requestAd().catch(error => console.warn(error));
  });
  AdMobRewarded.addEventListener('adLeftApplication', () =>
    console.log('AdMobRewarded => adLeftApplication'),
  );

  AdMobRewarded.requestAd().catch(error => console.warn(error));


}

componentWillUnmount() {
  AdMobRewarded.removeAllListeners();
}

showRewarded() {
  AdMobRewarded.showAd().catch(error => console.warn(error));
}

How to change Upload Limit on CyberPanel? Increase or decrease Upload Size through CyberPanel?