How to export Database from PHPMyAdmin?

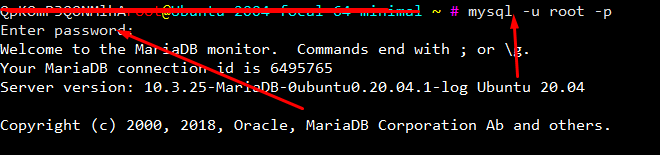
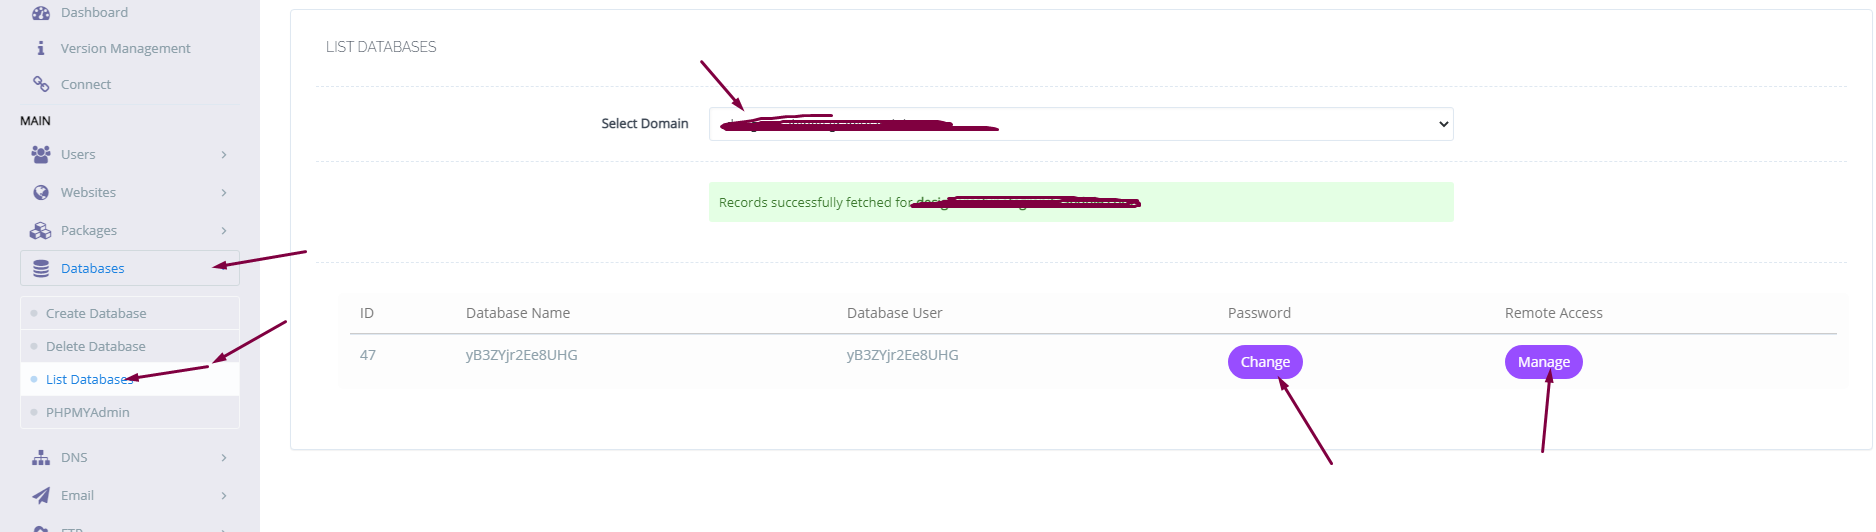
While transferring your website from one server to another you may need to export your database in some cases. In this article, I am going to show you how to export Database from PHPMyAdmin.

Exporting a database is just a few-click process. Just login to your PHPMyAdmin dashboard providing username and password. to export Database from PHPMyAdmin

export Database from PHPMyAdmin

You can see all the database you have created In your database is there.

Select the database you want to export. To select a database click on it. And you can see all the tables of your database on your screen.

Read more: How to create, delete and manage Child Domains in CyberPanel?

database

Now from the top bar click on the Export button to start the export database.

go button

Now you have to select the type of file in which you want to export your database. After selecting file type click on the Go button on the right bottom side.

file type

on clicking the Go button process will start and you can see the download progress on your browser.

download

Once done you can use it for importing anywhere.

Also read: How to resolve PHPMyAdmin blank page error CyberPanel?

Read: How to connect CyberPanel with CyberPanel Cloud?

Follow US on Facebook / Twitter Instagram .

How to access MySql root user using the command line?

Often in the case of big databases or lack of user interfaces you need to do MySQL functions using the command line on your server. In this article, we will discuss How to access MySql root users using the command line?

We try to minimize this article as we can.

  1. Login to SSH using your credetial vis putty/bitvise etc.
  2. Now copy this comand and paste on your ssh terminal.
mysql -u root -p

After this terminal will ask for the root MySQL password provide a password to be processed.

In the case of cyberpanel Mysql root password location is. /etc/cyberpanel/mysqlPassword. use cmd to show.

cat /etc/cyberpanel/mysqlPassword

Read: How to connect CyberPanel with CyberPanel Cloud?

Read more: How to create, delete and manage Child Domains in CyberPanel?

Follow US on Facebook / Twitter Instagram .

How to create a Database in CyberPanel?

If you want to create a Database in CyberPanel. And do not know how to do this you are on right place read this article to know how you can create a new DataBase on CyberPanel for your Website.

Table of Contents:

  1. Login to CyberPanel
  2. Create New Database
  3. Access Database

Login to CyberPanel:

First of all visi the CyberPanel login URL to login to your CyberPanel it must be with port 8090, Look like:

https://<somainname/IP>:8090

Provide username and password and login to your CyberPanel dashboard.

CyberPanel Login

Create New Database:

Once you logged in go to the Database->Create Database: in the left menu.

Create New Database
Create New Database

On this create database page you have to select the domain for which you want to create a new database.

select domain
select domain

Now screen ask you to provide the details for database.

  1. Username
  2. Database name
  3. Password
provide the details for database
Provide the Details for Database

When you press Create Database button this will create a new one for you on your server.

you can also list the database for any of your site on sever from Database-> List Database then select the domain and you can see the list.

list the database
list database

Access Database:

To access your database you created you have to go to Database-> PHPMYADMIN. Then press Access Now button.

You can see the PHPMyAdmin screen now. Where you can see all database for all domains. You can check the database your created and do any operation you want to do on this database.

Read more: How to create, delete and manage Child Domains in CyberPanel?

Follow US on Facebook / Twitter Instagram .

How to Install Node Js on Windows?

You want to Install node js on windows 10 machine?

To start the guide to install node js on your windows 10 machine. First of all, we have to know what actually node js is. Before knowing how to install node js on your windows 10 know about the node js.

Basic node js is a JavaScript runtime environment. It simply means that the node js run-time environment includes everything you need to execute a program written in JavaScript. Now I would like to mention some points about node js for better understanding.

What is node js?

  1. Node js is free and opensource environment.
  2. Node js uses javascript on the server.
  3. Node js can generate dynamic pages, can do many operation on databases and its is available for different platforms (Operating Systems).

How to Install Node js on windows 10?

In order to install node js to your windows 10 machine. You need to follow different steps.

Download Node.js

In order to install node js on your windows 10, you have to download the Node js. To do so click here or visit this link https://nodejs.org/en/download/ in your favorite browser. Here you can see this screen.

Download Node.js

You can see the latest and current version always chose the current version from them because that is the stable one then chose the windows installer from the operating systems. you can also download:

Windows Installer (.msi)
Windows Binary (.zip)
Source Code

In 32 and 64 bits depending on your operating system.

Install Node js on windows 10:

Once your download completed now its time to install it on your machine to do so follow these steps:

  1. Click on the download file and then click install.
Install Node

2. You will receive a screen that asks you to run Wizard to install node js. Press Next.

Run Install Node

3. Now accept the License Agreement. To go to the next step.

Agreement Install Node

4. You can specify the location in your computer where you want to install the node js. By default its C:/Program Files/nodejs/ and leave as its and click Next.

Path Install Node

5. In this step you can see which node js packages you are going to install and what is disk usage, and all. Click Next to proceed.

Install Node next

6. In this step you can allow node js to Automatically install the necessary tools. you can follow the instruction from the link given on-screen. Then press Next.

Auto Install Node

7. All setup is done Press Install to install node js on your windows 10.

Install Node

Allow the installation and this installation may take some time to complete wait until the status bar show completion.

Install Node js status

8. All done now your node js is installed and you can press Finish and go ahead.

Install done Node

Verification of node js installation

Once the installation process has done you need to verify the installation of your node js on windows 10. to do so just run a simple command:

npm -v
Node js version

You can see the installed version it’s mean your installation is complete. Now your system is good to go.

How to migrate WordPress Site using Migrate Guru Step by Step guide