In some cases, you need to change the SSH port and create and use an SSH key. Securing SSH is one of the most important tasks of a system administrator. CyberPanel allows you to change SSH ports, disable root login, and save your SSH keys. In his article, we learn about how to add your SSH key to the server using CyberPanel
Step 1: Login to the CyberPanel dashboard
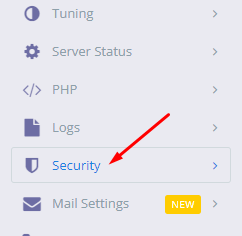
Step 2: On the left side menu scroll down Click on the Security
Step 3: Go to the Security->Secure SSH
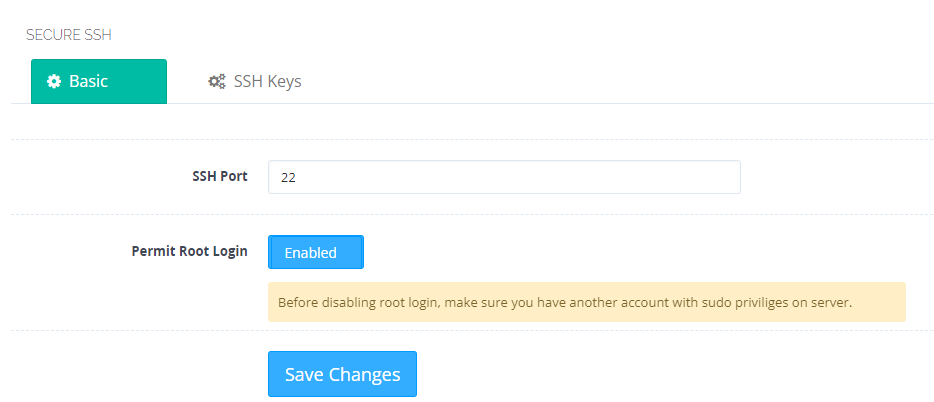
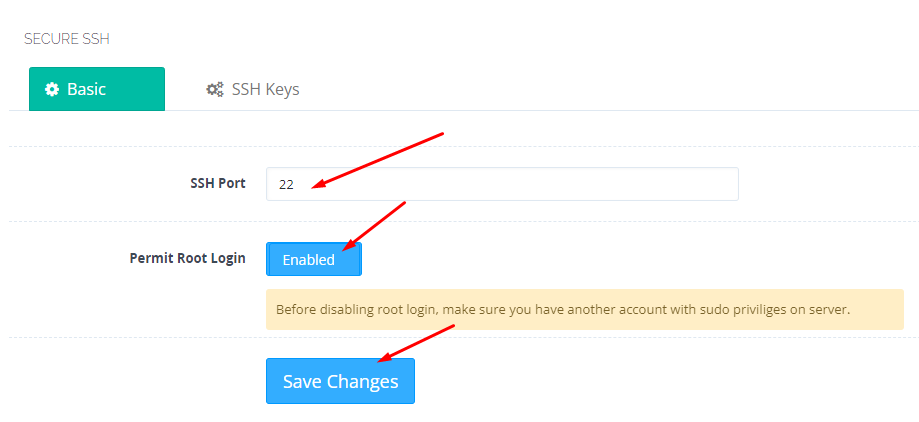
Now this page will be open. Here you can see the SSH port,permit root login
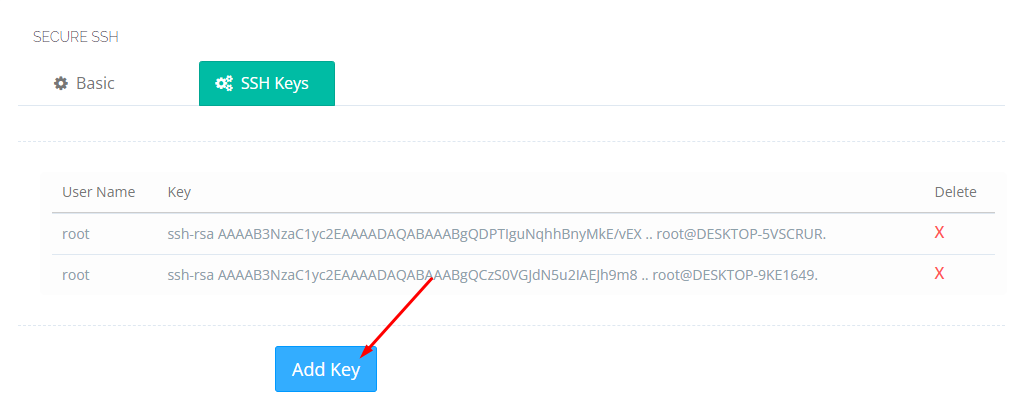
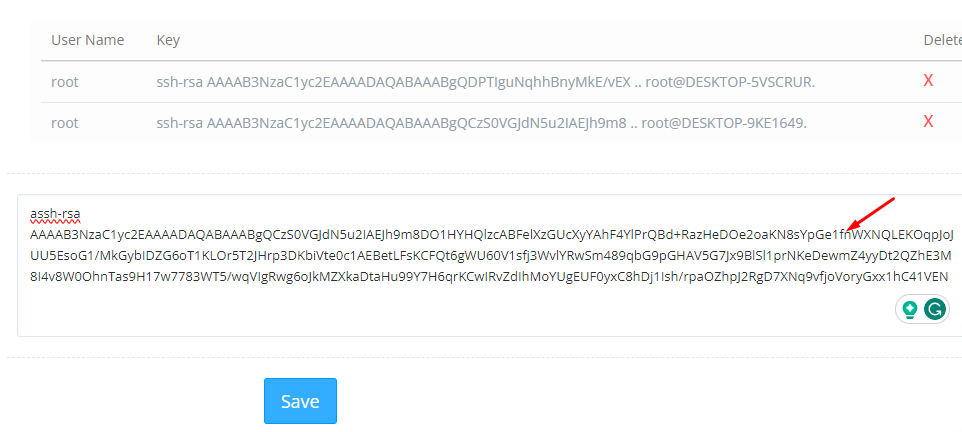
Step 4: Click on the SSh keys-> Add key
Step 5: After Clicking on the Add key you can paste your key and Click on save
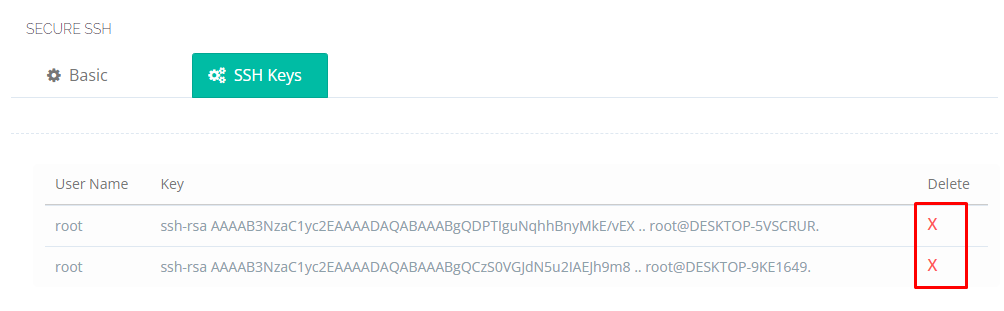
Step 6: You can delete your key By clicking on the ‘X’ button Listed here
Step 7: You can also change your port and enable or disable the permit root login after changing these Click on Save changes
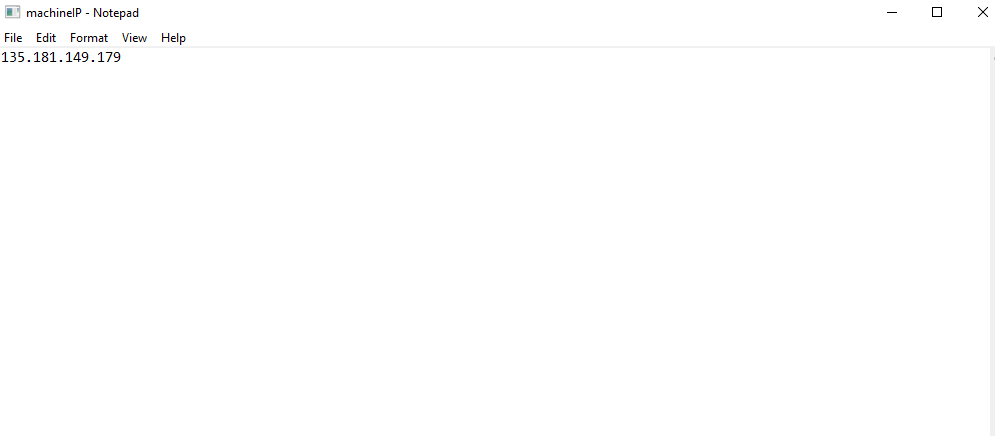
Sometimes your provider updates the IP of your server but in CyberPanel you can access the CyberPanel using a new IP in the dashboard. The old IP is showing so here is a quick guide on how to update the machine IP in CyberPanel. In this case, you have to update the machine IP in cyberpanel.
Here is the IP you can understand from the picture.
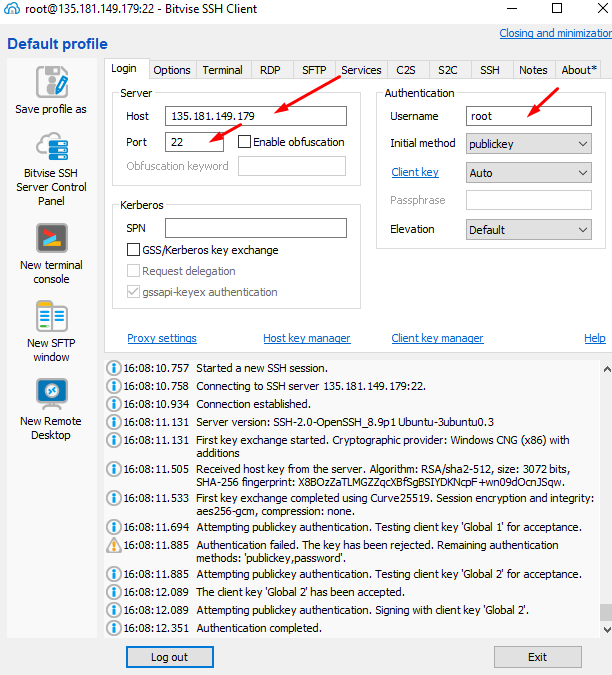
Step 1. Login to your server SSH access and add the IP address username password and port. After entering the details Click on the login button at the bottom
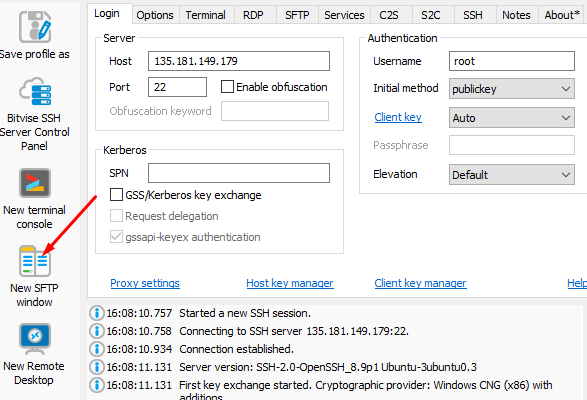
Step 2. Click on the left-side menu new SFTP window
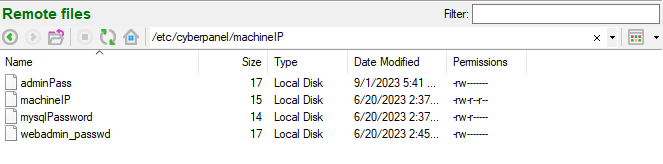
Step 3. You go to this page now and add the file name
/etc/cyberpanel/machineIP
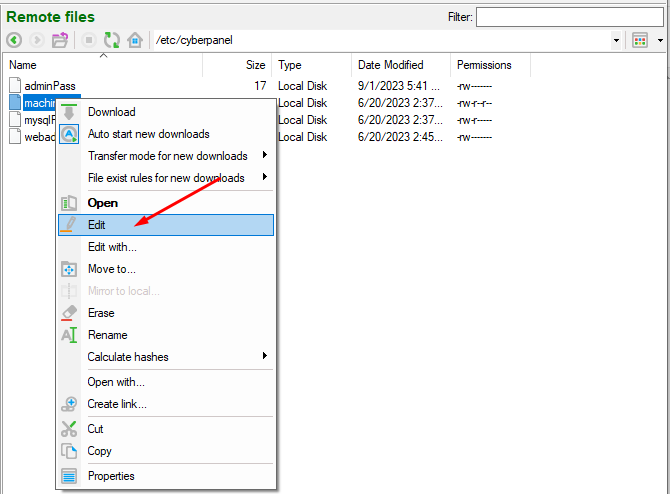
Step 4. Open the machineIP file. Click on edit file.
Step 5. Here you can change the IP and save the file
Step 6. After saving the file Go to the terminal and Run the command on the terminal:
CloudPanel vs CyberPanel, Which one is better? so this is a very simple compression article of both of these panels. These days people are finding a very cheap and useful hosting management panel for their sites to manage. So without going into a lot of discussions, I will straight go to the features, pricing, and details of both cyberpanel and cloudpanel then will compare both as well.
cloudPanel vs cyberPanel
CyberPanel:
CyberPanel is a free and open source product that supports Open LItspeed and LiteSpeed enterprise as well. The CyberPanel is serving in market science 2015 at that time cyberpanel was the only panel that supported LiteSpeed. The CyberPanel is a web hosting control panel designed to simplify the process of managing web servers and hosting websites. It is a free and open-source control panel that is designed to work with the LiteSpeed web server. LiteSpeed is known for its high performance and efficiency, making it a popular choice for web hosting.
WebSite:https://cyberpanel.net/
CyberPanel Features:
CyberPanel comes with a long list of great features. In general, cyberpanel is considered an alternative to cpnale. Because it has all the features and specialties like cpnale. It has the email, FTP, DNS, database, user, and database management in its dashboard.
In CyberPanel you will get the complete webhosting managed panel feature list.
Email services
FTP services
DNS services
SFTP services
User management
WordPress manager
Email debugger
Mod Security
Let’s encrypt SSL
SSL v2
Remote backup
S3 backups
SFTP Backups
G drive backups
Local Backups
CSF
Firewalld
SSH Management
Rspamd
Website Management
Packages Management
CyberPanel Pricing:
The basic version of CyberPanel comes totally free and you can just buy a VPS, cloud, or dedicated server to install this and use this.
But CyberPanle also has some paid add-ons you can check here. Ready to Complete the CyberPanel tutorial here.
CloudPanel:
CloudPanel is a user-friendly, open-source control panel that simplifies server management. It’s built with efficient components like NGINX, PHP-FPM, and MySQL to ensure high performance. With CloudPanel, you can have your server up and running in just 60 seconds, making it a quick and accessible solution for managing web hosting, websites, and related services, all at no cost.
Website:https://www.cloudpanel.io/
CloudPanel pricing:
Now let’s discuss cloudpanel. CloudPanel is totally free and you can install this at your server.
CloudPanel features:
There is a large list of CloudPanel features as well.
Easy to Use Interface
Provided Technologies
Domain Management
Database Management
Cron Jobs
(DNS) Domain Name System
Cloud Support
User Management
SSL Certificates / Let’s Encrypt
Backups (Automated & Scheduled)
Security
Documentation
Action Logs
Restart Services
CloudPanel vs CyberPanel
Feature
CyberPanel
CloudPanel
Pricing
Free
Free
OLS
Yes
Yes
LSWS
Yes
No
Free SSL
Yes
Yes
CSF
Yes
No
Support
Yes
Yes
Email
Yes
No
FTP
Yes
No
ModSecuirty
Yes
No
Final Words:
In the quest for an efficient and cost-effective hosting management panel, the comparison between CloudPanel and CyberPanel stands as a pivotal choice. While delving into the features, pricing, and core details of both solutions, we find that each offers a unique set of advantages. CloudPanel shines with its lightweight technology stack, providing an array of features for optimized server management. On the other hand, CyberPanel boasts a user-friendly interface and quick setup, making it an attractive choice for those who prioritize ease of use. The choice between these panels ultimately depends on your specific needs and preferences, as both CloudPanel and CyberPanel bring valuable tools to the table. It’s advisable to weigh the distinct features and capabilities of each to align with your hosting requirements, budget, and user experience expectations.
In this quick article, we will write how you can setup CyberPanel 2fa and how you can use 2fa to access Cyberpanel? this will be a quick guide for all this process.
From the version 2.03 to onward now CyberPanel support 2fa for users. So you can make thing more secure by using that.
How to setup two factor authentication in cyberpanel?
To setup this security feature just login to your cyberpanel by visiting URL access URL and using your login access.
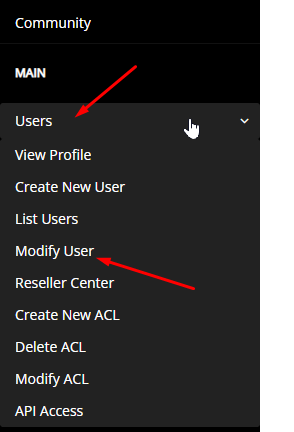
Now got to User->Modify User from the left menu.
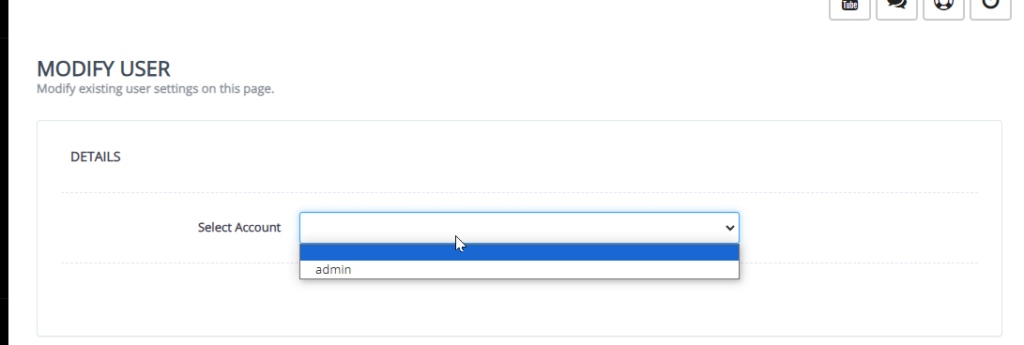
Now on this page you have to select the user for that you want to enable the 2fa.
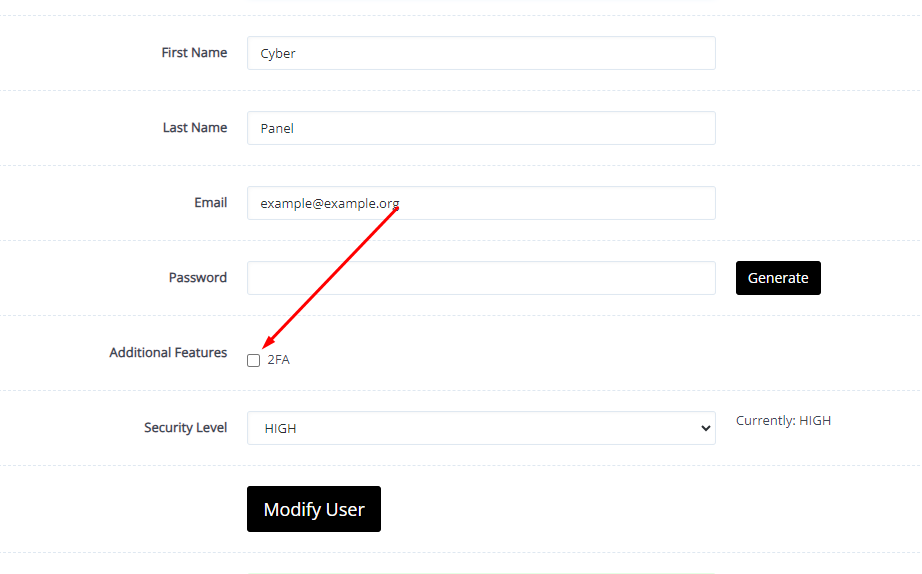
Here after selection you can see the screen with all of user modification details just enable the 2fa by clicking the addition features tick.
Once you click that the QR code will appres to scan and check authenticate.
This will be a very easy and short article. In this, I will just tell you how you can access CyberPanel once it’s installed on your server.
Before going to explain and tell how you can access your panel that is installed on top of your server you must know how you can install CyberPanel on your server.
Before installing CyberPanel on your server your server you must know about the support OS on which you can install CYberPanel click here.
To install CyberPanel on your server just follow their official guide here.
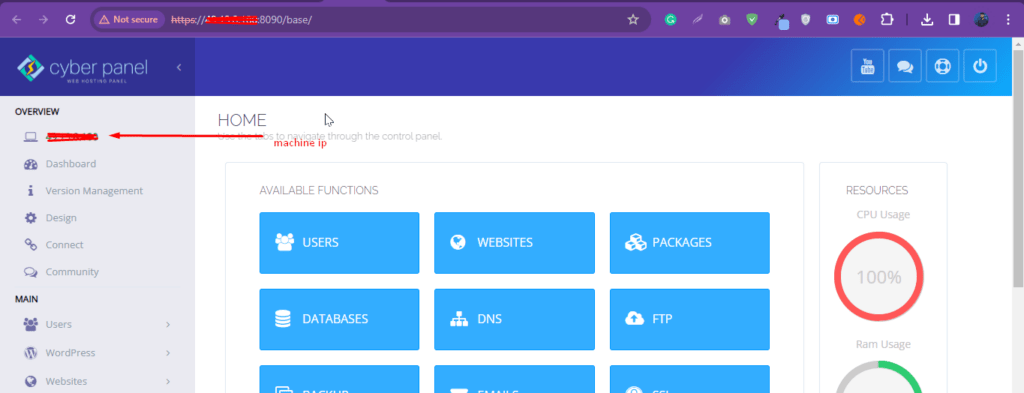
Access CyberPanel Via server IP:
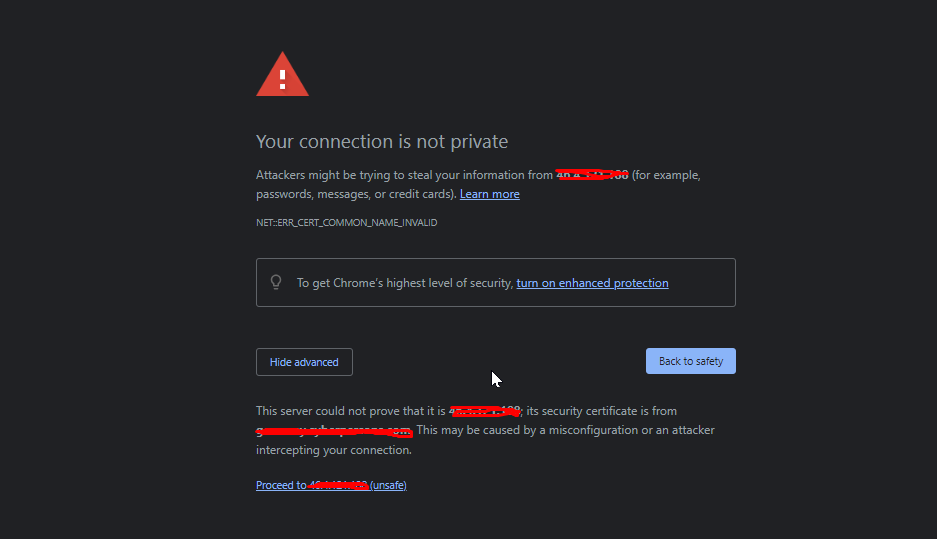
Basically, when you install CyberPanel on your server it will only allow you to log in via IP address in start. You can access using the IP and the port 8090,
https://<IP>:8090
This will not have SSL to access.
Just click on the advance button on this page and then process to the unsafe.
After this login screen will appear and you can provide the username and password to access this.
Access CyberPanel via Hostname:
To login CyberPanel via hostname just issue the hostname SSL using this article here.
Once you issued a hostname SSL to a valid domain name just use the link like domain with port 8090.
htts://domainname:8090
Last Words:
This will be a very easy and short article. In this, I will just tell you how you can access CyberPanel once it’s installed on your server.
Before going to explain and tell how you can log in to your panel that is installed on top of your server you must know how you can install CyberPanel on your server.
CyberPanel stands out as a popular hosting control panel among its peers. You can install CyberPanel with different Operating systems. Here in this article, we will discuss the best os for Cyberpanel installation as there are a lot of operating system where you can install CyberPanel and use it. But we will discuss all and get an answer about this.
Supported Operating Systems for CyberPanel installation:
These are some top supported OS by CyberPanel. Centos is no longer recommended.
In the realm of operating systems supported by CyberPanel, there are several noteworthy choices. While it’s important to mention some of the top-supported OS options, it’s also crucial to note that CentOS is no longer recommended. CyberPanel, a popular hosting control panel, offers compatibility with various operating systems, including Ubuntu, Debian, and even CentOS. Supported operating systems are chosen for their robustness and compatibility with CyberPanel’s features, ensuring users have a reliable and efficient hosting experience.
However, it’s worth noting that CentOS, which was previously a favored choice among users, has seen a shift in recommendations. The change is due to CentOS’s altered versioning strategy, moving from CentOS Linux to CentOS Stream, which brought uncertainty regarding long-term support and stability. As a result, CyberPanel users are now encouraged to explore alternative options like Ubuntu or Debian for their hosting needs to ensure they have access to a dependable and well-maintained operating system that aligns with CyberPanel’s performance goals.
Best OS for CyberPanel installation:
So the decision of best depends upon the usability and your attachment to that OS. In the past, most users like Centos 7 to use with cyberpanel but as now Centos is going to stop updating so people are shifting toward Alama Linux and Rocky.
But one of the best operating systems is Ubuntu 22.94 update and smooth. i personally like this to use with CyberPanel be a lot of users do not agree with this.
We also have a complete guide to Cyberpanel that can help you understand each and every feature of Cyberpanel. Also how to use that feature is also written there. So here is the guide.
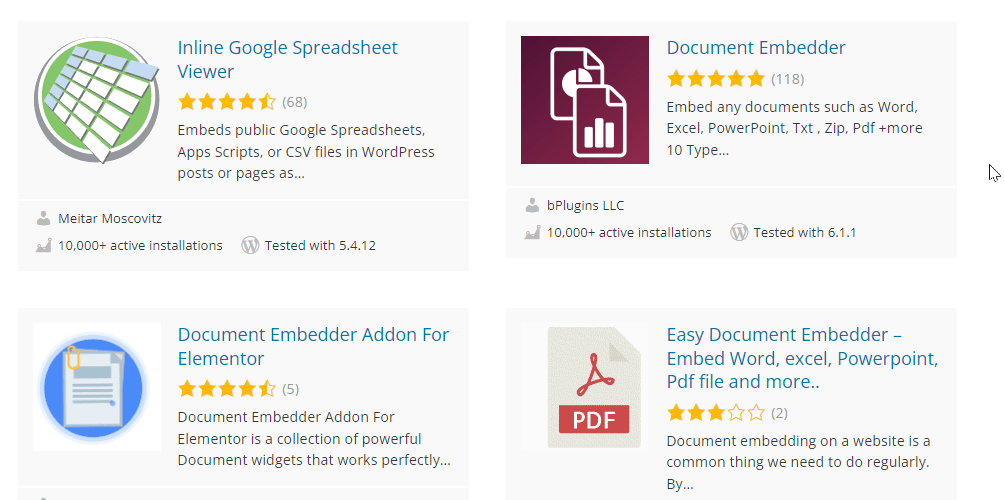
There are a few different WordPress plugins that you can use to embed Google Docs on your WordPress site. One popular option is the Simple Google Docs Viewer plugin, which allows you to embed a variety of Google Docs, including documents, spreadsheets, and presentations, using a simple shortcode.
How to install and use the WordPress google docs viewer plugin?
To use the Simple Google Docs Viewer, you will need to install and activate it on your WordPress site.
To add the Simple Google Docs Viewer plugin to WordPress, you can follow these steps:
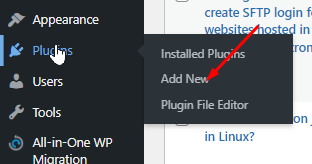
Go to the “Plugins” menu in your WordPress dashboard and click “Add New“
In the search field, type “Simple Google Docs Viewer” and press Enter
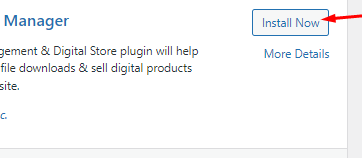
Find the Simple Google Docs Viewer plugin in the search results and click the “Install Now” button
After the plugin has finished installing, click the “Activate” button
The Simple Google Docs Viewer plugin is now installed and activated on your WordPress site
To use the plugin, you will need to get the URL of the Google Doc that you want to embed on your WordPress site. Then, you can use the following shortcode to embed the doc:
[gview file="YOUR_DOC_URL"]
Replace “YOUR_DOC_URL” with the URL of the Google Doc that you want to embed.
That’s it! The Google Doc should now be embedded on your WordPress site.
There are also other WordPress plugins that you can use to embed Google Docs, such as the Google Doc Embedder plugin and the WP Google Docs plugin. You may want to compare the features and user reviews of these different plugins to see which one is the best fit for your needs.
Show-hide or collapse-expand functionality allows users to hide or show content on a web page by clicking on a designated button or link. This can be useful for displaying large amounts of information in a compact way, or for organizing content into sections that can be revealed as needed. So here in this article, we will learn about show-hide / collapse-expand WordPress.
In WordPress, this functionality can be implemented using plugins, which are add-ons that extend the capabilities of the WordPress platform. There are many different show-hide/collapse-expand plugins available, and the best one for you will depend on your specific needs and preferences. Some popular options include WP Collapse-O-Matic, Simple Show Hide, and Collapse-Pro. To find the right plugin for your site, you may want to do some research and read reviews to compare the features and functionality of different options.
WP-ShowHide
WP-ShowHide is a WordPress plugin that allows you to easily add a show/hide toggle to your WordPress site. This can be useful for hiding or revealing content on your sites, such as spoilers, spoilers, or additional information. To use the plugin, you can follow these steps:
Install and activate the WP-ShowHide plugin on your WordPress site.
Configure the plugin settings by going to Settings > WP-ShowHide in the WordPress admin dashboard. This may include options such as the toggle text, toggle style, and other customization options.
To add a show/hide toggle to your content, you can use the [showhide] shortcode provided by the plugin. The shortcode takes two arguments: the text to show (enclosed in ) and the text to hide (enclosed in ). For example:
[showhide]
[show]Click here to reveal the hidden content.[/show]
[hide]This is the hidden content.[/hide]
[/showhide]
This will display a toggle link with the text “Click here to reveal the hidden content”. When the link is clicked, the hidden content will be revealed.
Note that this is just an example of how to use the WP-ShowHide plugin. You may need to consult the plugin’s documentation or support resources for more detailed instructions and information.
Ultimate Blocks
Ultimate Blocks is a collection of custom blocks for the WordPress block editor (Gutenberg), designed to add additional functionality and design options to your WordPress site. The blocks included in Ultimate Blocks provide a range of features, including tables, testimonials, and call-to-action buttons. The blocks are designed to be easy to use and customize and can be added to any page or post on your site by simply inserting them into the block editor. Ultimate Blocks is a popular plugin among WordPress users and has received positive reviews for its feature-rich blocks and user-friendly interface.
As I mentioned earlier, there are many different show-hide/collapse-expand plugins available for WordPress. Some popular options include WP Collapse-O-Matic, Simple Show Hide, and Collapse-Pro. These plugins allow you to add show-hide/collapse-expand functionality to your WordPress site, allowing you to hide or show content on your pages and posts as needed.
To find the right plugin for your needs, you may want to do some research and read reviews to compare the features and functionality of different options. You can also try out different plugins on your site to see which ones work best for you. Keep in mind that not all plugins are compatible with all versions of WordPress, so be sure to check the plugin’s compatibility before installing it on your site.
Easy Accordion WordPress plugin:
An accordion is a user interface element that allows users to expand and collapse sections of content. The Easy Accordion plugin is a WordPress plugin that allows you to easily create accordion elements on your WordPress site. To use the plugin, you can follow these steps:
Go to the plugin settings page, which can be found under Settings > Easy Accordion in the WordPress admin dashboard.
Configure the plugin settings as desired. This may include options such as the accordion style, animation settings, and other customization options.
Create a new accordion by going to the Easy Accordion page in the WordPress admin dashboard, and clicking on the “Add New” button.
Enter a title for the accordion, and add the content for each accordion section using the editor provided.
Publish the accordion by clicking on the “Publish” button.
To display the accordion on your site, you can use the shortcode provided by the plugin, or you can use the Gutenberg block editor to add the accordion block to your page or post.
This is just an example of how to use the Easy Accordion plugin. You may need to consult the plugin’s documentation or support resources for more detailed instructions and information.
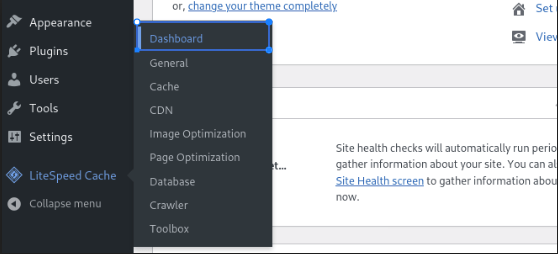
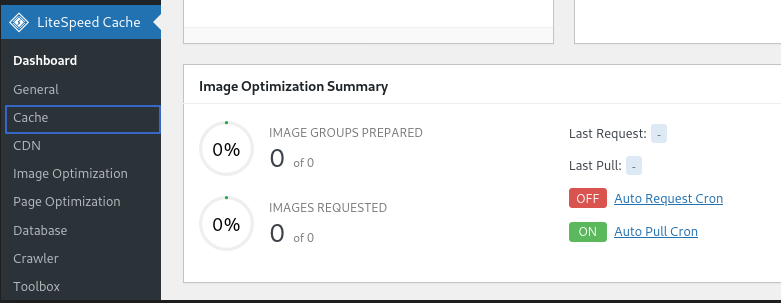
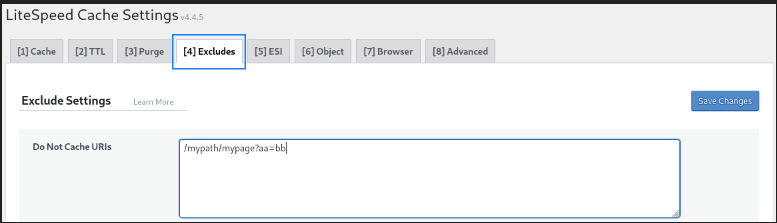
In some cases you need to exclude some pages from being cached from Litespeed. in this article, we are going to discuss How to exclude a specific page from LiteSpeed Cache?
Login to the Word Press dashboard, click on Lite Speed cache, and then click the Dashboard button.
After clicking the Dashboard button select the cache option.
When you click on the cache, you will see LiteSpeed Cache Settings. Select the Excludes button and paste the URL for the page you want to exclude.
Downloading any desk and installing is an easy process. In this article, I will tell you how can we easily download and install Anydesk. so you can easily download any desk by following this article.
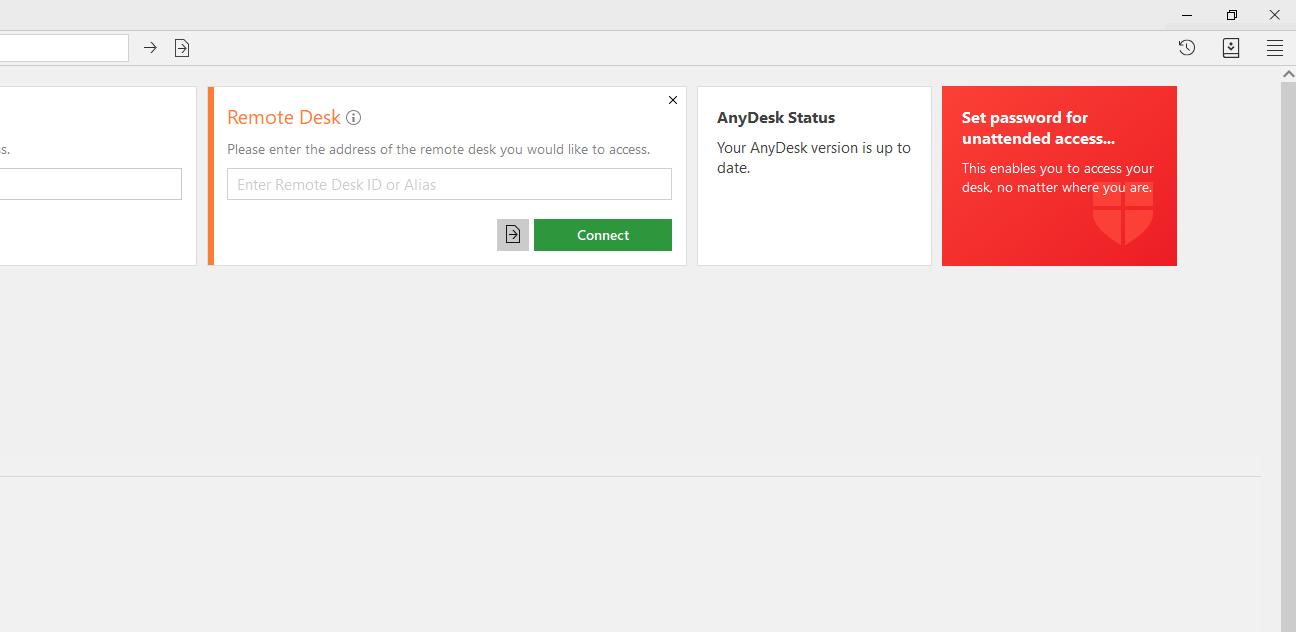
Any desk means a “Remote desktop application“. we can use any desk for remote control, file transfer, and VPN function.
Now follow these steps to download and install any desk:
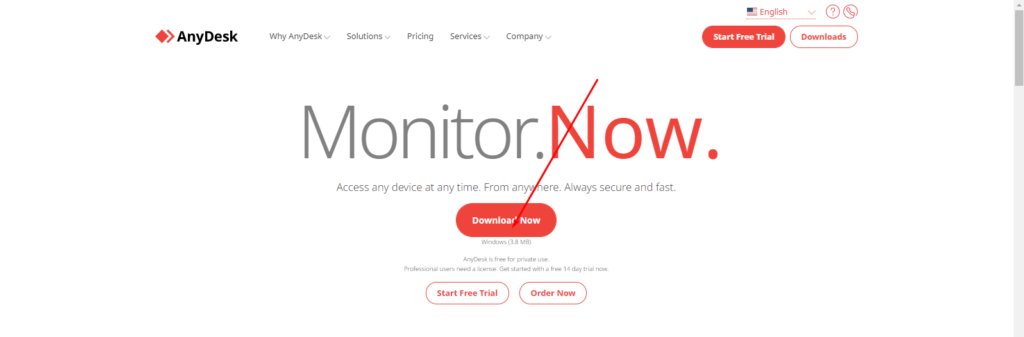
1- Any Desk Website:
Firstly, The user will go to Any desk Website. The user can download AnyDesk by using the link “www.anydesk.com“.
2-Click Any desk:
Click the first option: Any Desk “The Fast Remote Desktop Application“.
3- Click Download and Install Anydesk:
The user can download Any desk to use the “Download Now Button“.
4- Available For other Platform:
The user can also use various platforms as the users can use for MacOS, Android etc.
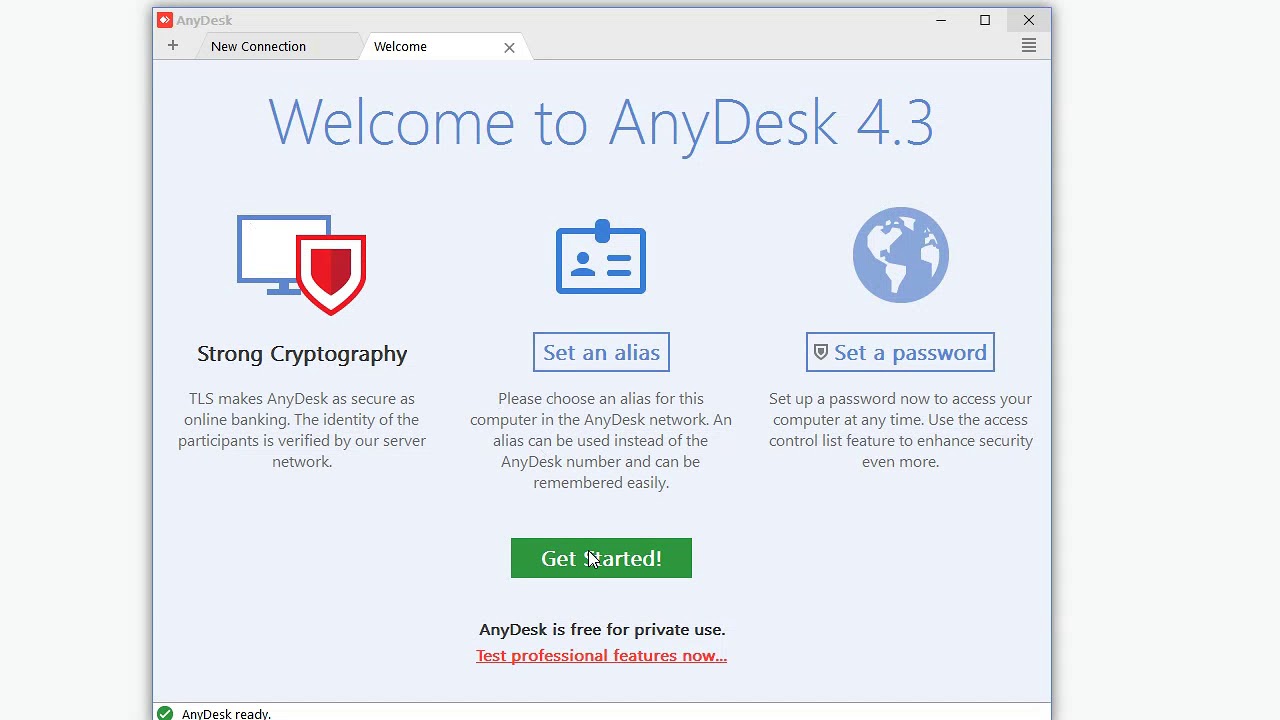
5-Open the program
When the desktop has been downloaded user will press the right button and click “Run as administration” and click the “yes” button.
6- Giving Access
The desktop provides the address to the user, so the user can give get access another person easily.
7- Accept And Install
The user Can also install Any desk to click the “installation” option that appears on the left side.
Creating a new server in Hetzner is a very easy process. In this article, I am going to tell you how easily you can create a server in Hetzner? You can create a server on the Hetzner cloud easily by following this article.
Hetzner is a service provider that provides you Hetzner dedicated server, Hetzner VPS server, and all. YOU just have to create an Hetzner account and log in to Hetzner and deploy any type of server.
Hetzner supports many Operating systems like ubuntu, centos, Debian, etc. the location of this service provider is only in Germany.
Now follow these steps to set up a Hetzner server for you.
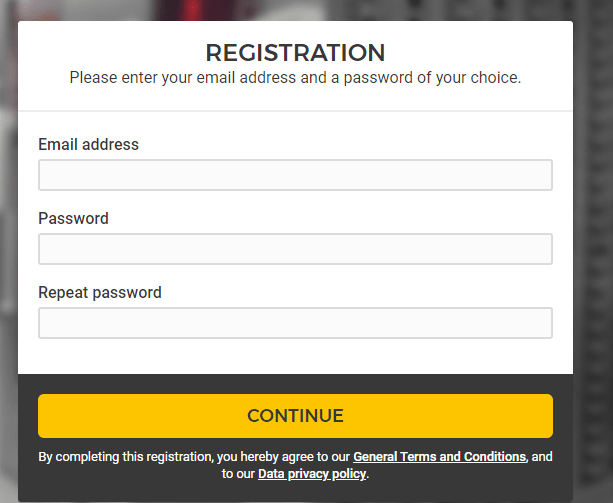
1. Login to Hetzner account:
first of all, you have to log in to your Hetzner account if you already and click here and login if you don’t have then create an account and then log in.
Provide all information to create an account and click the continue button to process for the creation of an account.
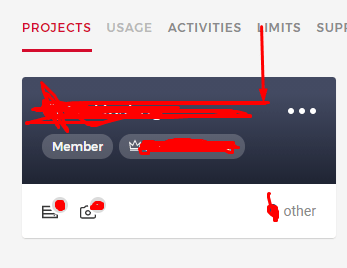
2. Go to you project
Once you created or logged in to your Hetzner account now have to go to any project that you have created in your account.
Click on the project and go to the project dashboard to create a new server.
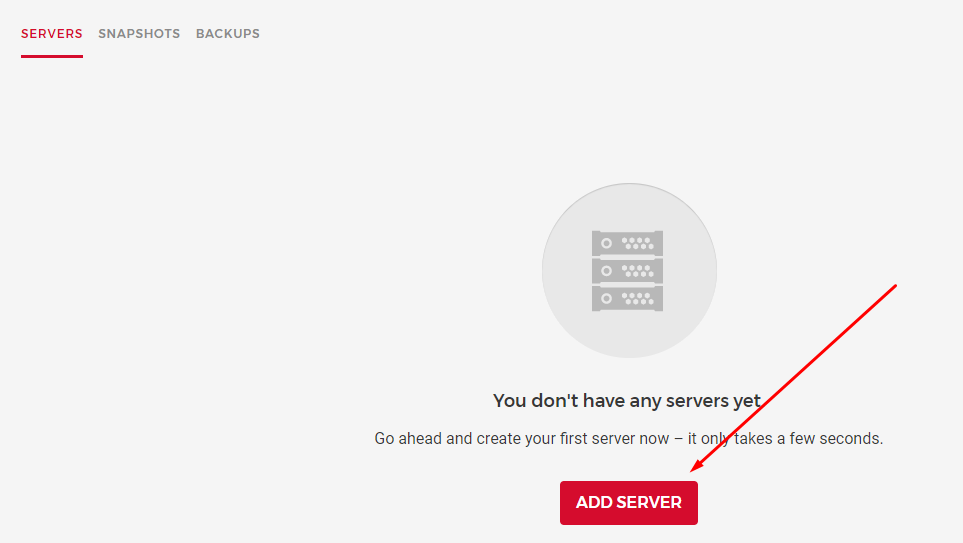
3. Create a server
once you are in the project dashboard you can see a create a server button there. Click on that.
And it will redirect to the page where you have to provide and do all setup.
Now you have to provide and select all information to create a server. This is the basic information that you need to provide while creating Hetzner dedicated server or Hetzner VPS.
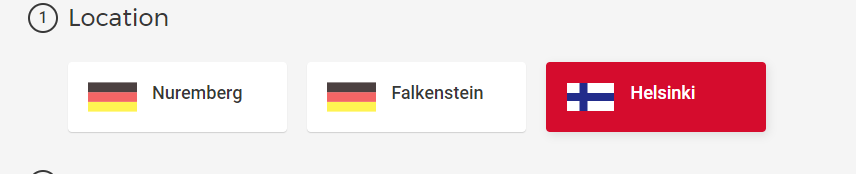
3.1 Location:
In first here you have to select the location where you want to take your server. Hetzner has only Germeny locations.
there are Nuremberg, Falkenstein, and Helsinki. You can go with any you are comfortable with.
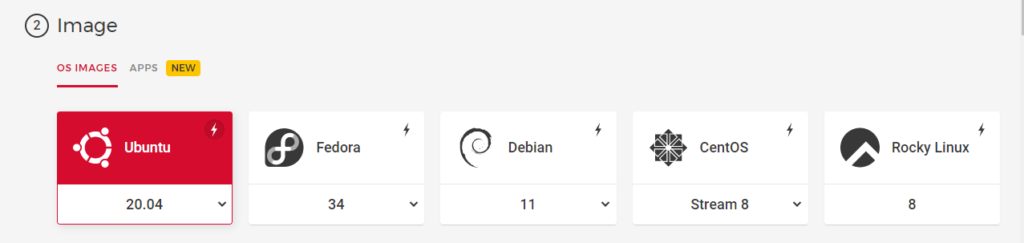
3.2 Image:
After selecting the location now select the Operating system for your server. You can select any OS on hetzner that you want to use for the server.
Hetzner Operating systems are:
Ubuntu 20.04
Fedora
Debian
CentOS
Rocky Linux etc
You can get any according to your choice.
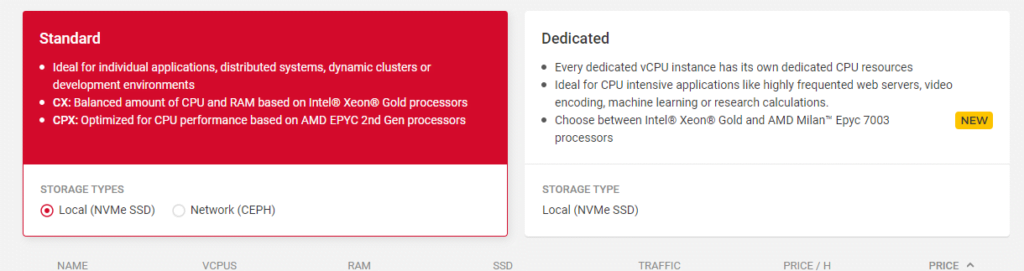
3.3 Type:
IN this step you can choose a dedicated Hetzner server or a standard Hetzner VPS. You also have to choose the specification which you want for your server. like how many CPUs, ram, etc
3.4 Volume:
if you want any extra volume you can attach it from here.
3.5 Network:
This option will allow you to create a Network do your server. DO if you want.
3.6 Firewalls- BETA:
The firewall is right now in Beta but if you want to order and use
3.7 Additional features:
Use Hetzner additional features in this option
3.8 SSH key:
Integrate the user SSH key that you want to access and use the server.
3.9 Name:
Give a name to your server and press the Create button all done to create an Hetzner server.
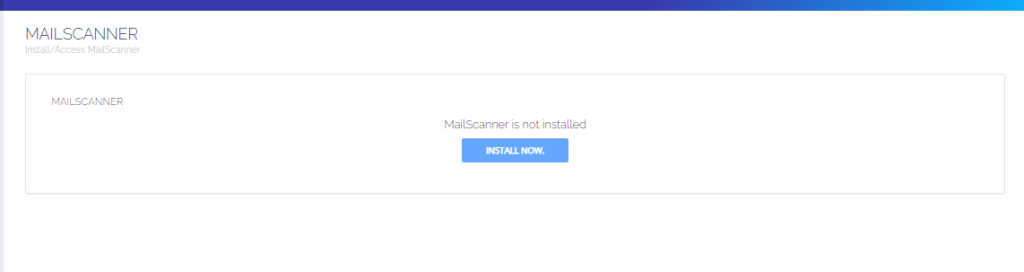
To install MailScanner on CyberPanel is very easy and a few click process. MailScanner is one of the core requirements for the email system now. And CyberPanel has a MailScanner which you can install from the CyberPanel dashboard.
In CyberPanel MailScanner is done by the community and this feature have a goof version but i am not sure that if it is 100% stable. So maybe MailScanner causes any issue in your mail server.
To install MailScanner on CyberPanel follow these steps.
Login to CyberPanel :
Login to your Cyberpanel account using your CyberPanel credentials. You have to visit the link:
https://<your-ip>:8090
Provide username and password and log in.
Install MailScanner on CyberPanel:
To install MailScanner on the server just follow these steps.
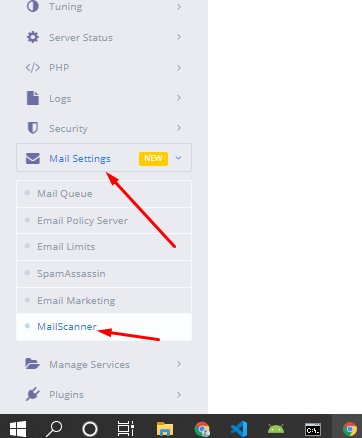
After login to CyberPanel dashboard just go to the Mail Settings-> MailScanner
2. On the next screen you can see you have an Install button just press that and your MailScanner will be installed.
The installation process will take some time to complete and once the installation is done you can access the mail scanner on the server.
After clicking this button your Mailscanner is installed. And now you can access your MailScanner by clicking Access Now button.