How to Enable Developer Mode and Enable USB Debugging on Android Phone?

How to Enable Developer Mode and Enable USB Debugging on Android Phone?

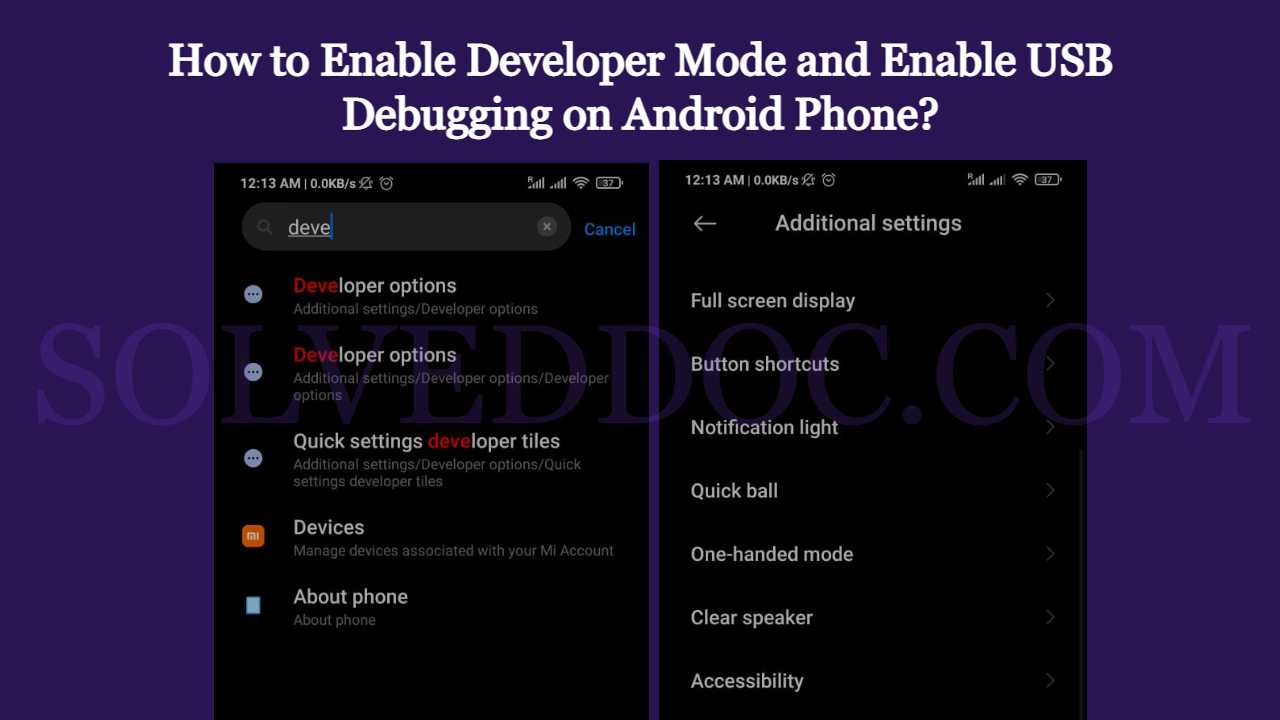
As a normal Android user you do not need the to enable developer mode and enable USB debugging on you device.

But If you are an android developer and want to run the Andriod app directly on your phone you need to enable developer mode and enable USB debugging on your device.

To turn on the Developer option on your android phone you just need to follow some easy steps.

Enable Developer Option From Settings

  1. Go to the Settings option of your Phone.
  2. You can see the About Phone option in your settings.
About Phone
About Phone

3. Now click on this About Phone option and you will see a Build Version in the case of my device it’s MIUI Version.

Click again and again on this option until this massage came, You are already on the developer mode.

developer mode
Developer mode

Once you see this massage its mean developer mode is already enabled.

Enable USB dubbuing from Developer Option:

  1. Once you completed all steps stated above now go to the Settings and Additional Features (In some cases it is on the main settings page). Here you will find the Developer Option if you scroll down.
  2. You can also search for Developer Options in the search bar of the settings page.
Additional Features
Additional Features

3. Go to the Developer Options and scroll down you will see the Debugging part on this screen.

4. You need to enable Both USB Debugging and Intall VIA USB.

USB Debugging and Intall VIA USB

All done for this and now you can easily use your android phone to test your Application in debugging phase.

Also Read About: How to create an AdMob account?

Follow US on Facebook / Twitter Instagram .

How to add Subdomain in CyberPanel?

add subdomain

The process to add Child domain or subdomain in CyberPanel is very easy and short. Here i will tell you how to add subdomain in CyberPanel under any main domain or website.

How to Create Child Domain under main website?

To create child domain for a main or master domain you just need to go to.

Websites->List Websites->Manage

Manage of that website for which you want to create the subdomain.

Websites->List Websites->Manage

And click the Manage button you can also follow this URL:

https://<YOUR IP>:8090/websites/example.com

When you click the manage button you can see the website manager screen. This screen has a a lot of option. Like LOGS, DOMIANS, FILES, CONFIGRATIONS, ETC.

Got to the Domains part and click the Add Domains button.

Add Domains
Add Domains

When you click on this option you are asked to provide the details for the subdomain you want to add.

Details for the subdomain you want to add

After providing the details like:

  1. Domain name
  2. Path (Leave it empty)
  3. Select PHP version
  4. In additional features (Select SSL, DKIM, Open_basedir Protection)

Click the Create Domain button and you will receive a success massage from the panel.

Create Domain
Create Domain

Once child domain is created from here. Now you can list child domain from two ways.

  1. Go to website-> List child Domain
website-> List child Domain

2. From the Websites-> List Websites -> Manage-> List Domains

Websites-> List Websites -> Manage-> List Domains

Read more about child domain: How to create, delete and manage Child Domains in CyberPanel?

Follow US on Facebook / Twitter Instagram .

How to add live chat on WordPress Website – Integrate Tawk.To Live Chat to WordPress

How to add live chat on WordPress Website – Integrate Tawk.To Live Chat to WordPress

In this Article I am going to share my personal experience that how i added the Twak.to Live Chat in my WordPress Site. After reading you come to know how to add live chat on WordPress Website.

This tutorial is basically my personal experience that how I integrate live chat on my WordPress Website. So without wasting time lets start tutorial.

Steps to add live chat on WordPress:

  • Add Plugin to your WordPress website.
  • Create account on Tawk.To Live Chat
  • Integrate Tawk.To with your website.

Step 1: Add Plugin to your WordPress website:

The first thing to do during the process of setup Live chat on your website. You have to add Tawk.To Live Chat WordPress plugin on your WordPress.

You can add this plugin using different ways. You can follow this guide to add tawk.To plugin on your WordPress website. Click Here to follow guide.

Add WordPress Plugin on your Website.

Once plugin is added to your WordPress site. Now you have to check your plugin here.

Now go to Setting-> Tawk.to option.

Setting-> Tawk.to
Tawk.to Settings

This page need some details from your Tawk.to account. its time to signup on tawk.to.

Steps 2: Create account on Tawk.To Live Chat

To configure your Tawk.to with your WordPress site you need to create Twak.to account on there platfrom first.

To create your account please click here.

  1. Click on the signup button and provide all required details. Provide all the following details EMAIL, NAME, PASSWORD.
signup button and add live chat on WordPress Websit
Sign up on tawk.to

If all of your information is correct then next screen appears that ask you to chose the Language for your live chat like i chose ENGLISG US.

chose the Language
Language Selection for tawk.to

After the selection of language click on Create Property and provide Property Details.

  1. Site Name
  2. Site URL
  3. Widget Name
Property Details
Property Details

Click on Team Members button and add there details.

Team Members
Team Members

Your email is default admin for your account but if you want to add someone else you can add.

Now you will asked to select type of your website and widget. you can add on this screen and click on done.

Install Wiidget
Install Widget

Once process completed you can see take a tour screen.

take a tour and know to add live chat on WordPress Websit
take a tour

Step 3: Integrate Tawk.To with your website:

You have to integrate your tawk.to account to your website now.

Go to the Settings-> Tawk.to Add email and password for your tawk.to account that you created in last step.

Settings-> Tawk.to
Settings-> Tawk.to

Now after sign in you have to select property that you created there on tawk.to account to enable live chat on your wordpress site.

live chat on your wordpress site
Select a property

You can visit the dashboard from here also.

dashboard
Dashboard

Now if you visit your site you can see this option for live chat on your WordPress site.

live chat on your WordPress site.
Live chat on your WordPress site.

Read More: How to set up Google Drive Backup on CyberPanel?

Follow US on Facebook / Twitter Instagram .