How to Integrate Google AdMob to your React Native Application?

Do you want to integrate your AdMob to React Native Application?

If you want to earn from your React Native Applications you need to integrate AdMob with your React Native Application. So Google AdMobs helps you to earn from your applications.

Mostly React Native Packages are installed using a single command. In this article, i will tell you the simplest way to install, Integrate, and use AdMob in your react native application.

Create AdMob Account:

First of all you must have a AdMob account. Go to this Article and check how you can create Admob account. The process of creating Admob account is very straight and simple. In this Article All steps are mentioned and described briefly.

How to Install React Native AdMob:

For the integration of Admob with react native first of all we have to Install React native AdMob in your project its is very easy to do so here we discuss the steps :

There are different packages to integrate Admob with your React Native Project but here I discuss that one which I personally use and I think have easy integration than Others.

React-native-admob is bossily a react-native module for Google AdMob Banners, Interstitials, and Rewarded Videos, and also DFP Banners. To install this module Run the command stated below.

npm i @talaikis/react-native-admob

In older versions of React native, you need to configure this module manually but now This fork is a working version for RN 0.60+. Don’t link this package, auto-linking works fine. No need to do extra linking at all.

Open your already created application and install this module using the line stated above.

Open your already created application and install this module using the line stated above.

Once installation process is done. Nothing to do other than this.

React native AdMob Types:

React native AdMob Allows four types of Ads units for its user:

  • AdMobBanner,
  • AdMobInterstitial,
  • PublisherBanner,
  • AdMobRewarded,

AdMobBanner,

AdMobBanner is the Banner Add for your Application you can add it as sticky location on at any place on any page of your applicatio.

To read more about this click here.

Usage

import {
  AdMobBanner,
 } from 'react-native-admob'

// Display a banner
<AdMobBanner
  adSize="fullBanner"
  adUnitID="your-admob-unit-id"
  testDevices={[AdMobBanner.simulatorId]}
  onAdFailedToLoad={error => console.error(error)}
/>

AdMobInterstitial,

This type of React-native AdMob has imperative API. You can use this at any function call.

To ready more Click Here.

Usage

import {
  AdMobInterstitial
} from '@talaikis/react-native-admob';

  componentDidMount() {
  AdMobInterstitial.setTestDevices([AdMobInterstitial.simulatorId]);
  AdMobInterstitial.setAdUnitID('ca-app-pub-your_ad-uint');

  AdMobInterstitial.addEventListener('adLoaded', () =>
    console.log('AdMobInterstitial adLoaded'),
  );
  AdMobInterstitial.addEventListener('adFailedToLoad', error =>
    console.warn(error),
  );
  AdMobInterstitial.addEventListener('adOpened', () =>
    console.log('AdMobInterstitial => adOpened'),
  );
  AdMobInterstitial.addEventListener('adClosed', () => {
    console.log('AdMobInterstitial => adClosed');
    AdMobInterstitial.requestAd().catch(error => console.warn(error));
  });
  AdMobInterstitial.addEventListener('adLeftApplication', () =>
    console.log('AdMobInterstitial => adLeftApplication'),
  );

  AdMobInterstitial.requestAd().catch(error => console.warn(error));
}

componentWillUnmount() {
  AdMobInterstitial.removeAllListeners();
}


showInterstitial() {
  AdMobInterstitial.showAd().catch(error => console.warn(error));
}

  componentWillUnmount() {
    AdMobRewarded.removeAllListeners();
  }

PublisherBanner,

This is just Like AdMobBanner with the addition of 2 extra properties:

Click here for more details:

Usage:

import {
  PublisherBanner,
  } from 'react-native-admob'
 
 <PublisherBanner
  adSize="fullBanner"
  adUnitID="your-admob-unit-id"
  testDevices={[PublisherBanner.simulatorId]}
  onAdFailedToLoad={error => console.error(error)}
  onAppEvent={event => console.log(event.name, event.info)}
/>

AdMobRewarded,

In comparison to the AdMobBanner and PublisherBanner which have a declaritive API, the AdMobRewarded has an imperative API, just like the AdMobInterstitial.

Click Here to read more:

Usage:

import {
  AdMobRewarded,
  } from 'react-native-admob';
 

componentDidMount() {
  AdMobRewarded.setTestDevices([AdMobRewarded.simulatorId]);
  AdMobRewarded.setAdUnitID('your ad unit');

  AdMobRewarded.addEventListener('rewarded', reward =>
    console.log('AdMobRewarded => rewarded', reward),
  );
  AdMobRewarded.addEventListener('adLoaded', () =>
    console.log('AdMobRewarded => adLoaded'),
  );
  AdMobRewarded.addEventListener('adFailedToLoad', error =>
    console.warn(error),
  );
  AdMobRewarded.addEventListener('adOpened', () =>
    console.log('AdMobRewarded => adOpened'),
  );
  AdMobRewarded.addEventListener('videoStarted', () =>
    console.log('AdMobRewarded => videoStarted'),
  );
  AdMobRewarded.addEventListener('adClosed', () => {
    console.log('AdMobRewarded => adClosed');
    AdMobRewarded.requestAd().catch(error => console.warn(error));
  });
  AdMobRewarded.addEventListener('adLeftApplication', () =>
    console.log('AdMobRewarded => adLeftApplication'),
  );

  AdMobRewarded.requestAd().catch(error => console.warn(error));


}

componentWillUnmount() {
  AdMobRewarded.removeAllListeners();
}

showRewarded() {
  AdMobRewarded.showAd().catch(error => console.warn(error));
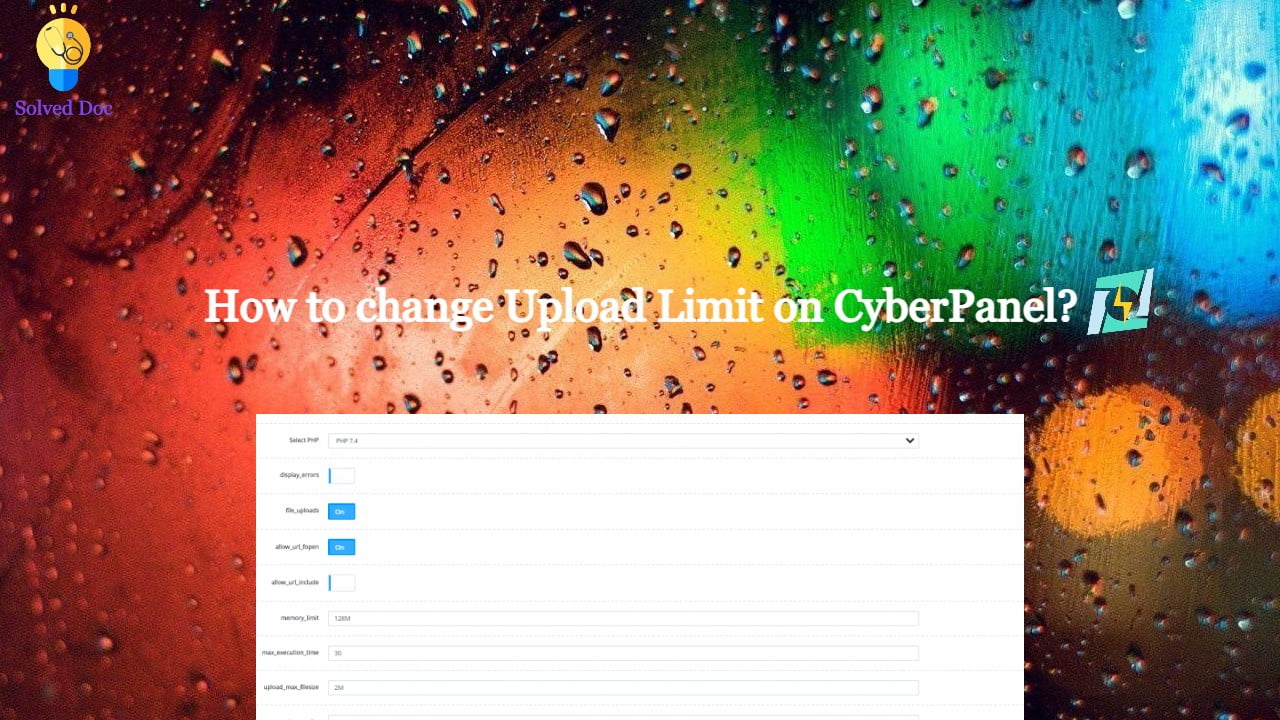
}

How to change Upload Limit on CyberPanel? Increase or decrease Upload Size through CyberPanel?

How to create a staging or clone of the WordPress site from CyberPanel?

Sometime you may need to create a clone or staging site of your WordPress site to make changes and test them. CyberPanel allows to create staging or clone site easily.

In this article, I will tell you how you can create a staging or clone of your WordPress site from CyberPanel.

You can create a staging site from CyberPanel and after doing that you can merge it back to the Original or master site.

Always keep backup before doing anything. So if you lost anything you can restore. The process of creating a staging site is very easy to follow along to do so.

Create a Clone or create a Staging for your site:

Step 1: Log in to CyberPanel and Go to Manage Website

Create a clone or staging site in cyberpanel is very easy. I will write the steps below to do so.

The first thing to do is login to your cyberpaner using your credentials on port 8090.

Then go to the Websites->List Websites->Manage

 login to your cyberpaner using your credentials on port 8090

Step 2: Create a clone or Staging site

In the manage Dashboard, you can see the CLONE/STAGING button press that to process.

Create a clone or Staging site

Add the Domain name which you want to use as staging or clone.

Add the Domain name which you want to use as staging or clone

It will take some time and once staging is done it will show you this screen.

It will take some time and once staging is done it will show you this screen

Now you must have to set A records for the staging domain you create Like staging.yourdomain.com. Visit your DNS manager and add A record for this staging site. No need to add any other records. A record is enough for staging.

In cyberpanel got to Websites->List Child Domains you can check the staging site.

Push back, Copy or sync site to Master:

Once you did all changes to staging and now you want to sync the staging back with the master site CyberPanel allows to do this very easy to do so follow steps:

Go to the Websites-> List Child Domains:

Now on this page, you can see your staging site press the Manage button in front of your site.

you can see your staging site press the Manage button in front of your site

Now you are in the management dashboard of the staging site. You can see COPY/SYNC TO MASTER from here you can push back your staging to the original.

You can see COPY/SYNC TO MASTER from here you can push back your staging to the original.

Here you can chose the options:

  1. Copy complete Data
  2. Sync Database
  3. Copy Changed Files
Copy complete Data

Chose any option from them according to your requirement. Once the process of sync or coping is done now go back to your original site and check the changes if you have any cache plugin clear cache and then check the changes.

How to set up Google Drive Backup on CyberPanel?

How to create a New User in CyberPanel?

CyberPanel is next generation hosting control panel. CyberPanel is powered by LiteSpeed Technologies.

In CyberPanel you can create new users easily and allow them access so they can manage their website settings there.

CyberPanel allow three types of user access ADMIN, USER, and RESALLER. You can easily create new account of any type according to the requirement of user.

How to create a new user account in CyberPanel:

The process of creating user, admin and reseller account is same i will tell you where the difference is during creation steps.

Login to your cyberpanel using port 8090.

Step 1:

In left menu go to Users-> CREATE NEW USER or navigate to this URL

https://<Yourip>:8090/users/createUser
Login to your cyberpanel using port 8090

Step 2:

Now Provide the information that need to create new user:

  1. First Name
  2. Last Name
  3. Email
  4. Select ACL ( admin, reseller, user)
  5. Websites Limit (Put 0 for unlimited)
  6. Username
  7. Password (Press Generate for strong)
  8. Security Level (High or Low)
Now Provide the information that need to create new user:

Here in Select ACL you can create the admin, user or reseller permissions. Admin has access for every thing, reseller has less access then admin and at last user has some specific access.

Step 3:

After providing these required information press create a user and user is created successfully now you can see your user by navigating to USERS->LIST USERS. Or visit this URL

https://<your ip>:8090/users/listUsers
you can see your user by navigating to USERS->LIST USERS. Or visit this URL

How to create a staging or clone of the WordPress site from CyberPanel?

How to Transfer the whole Website From one CyberPanel to Other CyberPanel using a backup method?

If you want to transfer your web site from one cyberpanel to any other cyberpanel without losing any data, you are on right place follow this article step by step.

If you are thinking to transfer your site from any other CyberPanel. Maybe you Changed your server. In this article, I will tell you how you can transfer your site from one Cyberpanel to another Cyberpanel. I will use the backup method to transfer the whole website from one CyberPanel to the second Cyberpanel.

Table of Contents:

  1. Create a Backup
  2. Set Permissions or Move Public_html
  3. Download to local Computer or Download on a remote server
  4. Move to the backup folder
  5. Restore Backup
  6. Check through the Host file.

Create a Backup:

To tranfer your website from CyberPanel to CyberPanel this methode is one of the simple and easy method. Follow along with me to setup:

  1. Login to your CyberPanel through your cyberpanel link like https://<your-ip>:8090: Provide credentials and press login.
Login to your CyberPanel

2. Now in the left menu bar Go to the Backup->Create Backup section. You can also navigate to this link. https://<your-ip>:8090/backup/backupSite

Now in the left menu bar Go to the Backup->Create Backup section.

Click on create back up button here.

3. Now cyberPanle asks you to select a site and the destination where the backup will store. The site for which you want to create a backup. Select your website, and leave the path as empty. And press Create back up button to start the backup creation process.

The site for which you want to create a backup

4. Now you can see the process of backup creation is running and in process.

 Now you can see the process of backup creation is running and in process.

wait until it will give you the massage Done. After creation you can see the massage of completed and can see a backup with its id on screen.

After creation you can see the massage of completed and can see a backup with its id on screen.

Done for backup process go to next step.

Set Permissions or Move Public_html:

If you are going to download files from cyber panel to a local computer then skip this step. Now in this step, you need to login to your SSH terminal. Using any software like putty or Bitvise. For this article, I am going to use Bitvise.

  1. Login to Bitvise SSH you must have credentials:
    1. Your server IP
    2. Username (root)
    3. Port number (22)
    4. Password
Login to Bitvise SSH you must have credentials

After providing all details press the Login button. Now open STFP to check and confirm the backup.

open STFP to check and confirm the backup

2. Now go to this path in sfpt

/home/yoursite/backup
go to this path in sfpt

Here you can use two method one is to change permissions and download this file directly from this path on the remote server and other is move it into the public_html and then download. Second one is recommended.

Change Permission:

Click on the file and the go to Properties->Permissions :

Click on the file and the go to Properties->Permissions

Change the permission to 777 as shown in picture. And press OK

Move to Public_html:

Type this command:

cp /home/yourdomain.com/backup/backupfilename home/yourdomain.com/public_html

Go and check the file.

Download to local Computer or Download on a remote server:

Now its time to download the file to the local pc or on another server in order to restore the backup. Make sure that the cyber panel is installed on this server.

Download to local computer and then upload:

This way is time taking way but if you dont have credentials fo SSH then go for this.

Go to the Websites->List website

Websites->List website

Press Manage button on the right side of website

Press Manage button on the right side of website

Press Manage button on the right side of website

Press Manage button on the right side of website

Go to the backup folder and Click the file and then click download you can see the file while downloading

click download you can see the file while downloading

Download Remotely using command:

Login to your SSH terminal and type this command if backupfile is in public_html folder:

wget yourdomain.com/backupfilename

If backup files are in back folder then type:

wget yourdomain.com/backup/backupfilename

Move to backup folder:

Now in order to restore Backup, you have to create a directory backup at home. use these commands to create a backup directory

cd /home
mkdir backup

Restore Backup:

Now its ite to restore backup for this log in to the new cyberpane.

  1. Go to the Backup->Restore backup:
Backup->Restore backup

Select the backup file that you placed inside the backup folder

2. Click start backup I will take some time to restore wait until backup is completed.

 I will take some time to restore wait until backup is completed.

Check through Host file:

At last step confirm that the backup is restored properly foe this open host file from your local computer.

  1. Write Notepad in search bar of window.
Write Notepad in search bar of window.

Open Notepad as administrator

Open Notepad as administrator

Now open the file host place in

C:\Windows\System32\drivers\etc
Now open the file host place in

Write your new ip and then press TAB then write your site

 press TAB then write your site

Go to your browser and visit your site is working or not.

How to set up Google Drive Backup on CyberPanel?

How to Setup Catch-All Email Account in Postfix?

Do you want to catch-all emails in postfix? Does missing emails due to misspelling addresses bothered you? Then this article is for you.

A catch-all email account is used to get all emails sent from every email account of your domain. No matter that email account exists or someone misspelled that email. Catch-all is usually used when you do not want to lose any email due to the wrong email address or email that did not exist.

Here we discuss all steps that are needed to set up a catch-all email account in Postfix.

Follow along so you can easily setup and never miss any Email.

Create Catch All Account:

The first step is to create a catch-all account where you will receive all emails. Which are lost due to misspelling or non existing email?

To do so you have to add a virtual alias to the Postfix server. The path of file where you have to add the alias is /etc/postfix/virtual.

You have to edit this file in your favorite Editor I chose vi editor. Use this command to edit the file.

vi /etc/postfix/virtual
Setup Catch-All Email Account in Postfix

Now add the address for catch-all at the end of this file. Add the address like:

@yourdomain.com username

You can also specify any email account where you want to catch-all emails. You can specify different email account for this operation also. like:

Support@example.com Support@example.com
team@example.com  team@example.com
help@example.com help@example.com

If you didn’t specify the valid account then your valid account’s email will also go to that specific email you specify for catch-all. This account helps to Catch-all email that you miss due to non existing account or misspelled email addresses.

After adding these Alias to /etc/postfix/virtual save and exit.

After this we have to run a command to execute this file again.

postmap /etc/postfix/virtual

Now your updated file is loaded shift to next step.

Setup Postfix Configuration:

After editing the virtual file now its time to do some configurations in the postfix configuration file. In order to do this go to the file etc/postfix/main.cf. Edit this file in vi or any other editor you like. for vi use this command:

vi /etc/postfix/main.cf

you have to add virtual_alias_maps in this file add this line at the end of this main.cf file:

virtual_alias_maps = hash:/etc/postfix/virtual

Reload Postfix for new settings:

Now Postfix needs to reload so it can fetch the new settings. To reload postfix run the command:

systemctl reload postfix

Now all done good to go.

How to Setup Two Factor Authentication in CyberPanel?

How to Create a Website and install WordPress on CyberPanel one-click installation?

In this article, I am going to tell you how to install WordPress on CyberPanel. This article is about the one-click installation of WordPress on CyberPanel.

I will briefly describe how to create a website on CyberPanel. And then we will go toward the installation of WordPress on CyberPanel. The main theme is how you can create a website and install WordPress on CyberPanel.

if you are new on CyberPanel and want to know the basic Information and usage of CyberPanel then do not leave the article i will explain some basic at the end of article.

How to create a new Website on CyberPanel?

Creating a website on CyberPanel is very simple and easy. Here the all steps to create a Website on CyberPanel are listed.

Go to the Websites-> Create Website Option in CyberPanel Menu:

Can navigate to this ULR to Create new web site:

https://your_IP:8090/websites/createWebsite
 Websites-> Create Website Option in CyberPanel Menu

Provide the following details here

  • Select Package (Default )
  • Select Owner (Admin or any other)
  • Domain name (example.com without www)
  • Email (Your email address (youremail@xyz.com))
  • Select PHP (Latest is recommended )
  • SSL (Always check)
  • DKIM (Always check)
  • Open Basedir Protection (Check )
  • Create Mail Domain (Check if you want to you on same server)
Select Package
Select Owner
Domain name
Email
Select PHP
SSL
DKIM
Open Basedir Protection
Create Mail Domain

After providing all information press Create Website Button. It will take sometime to complete and will show the confirmation massage once its Done.

How to install WordPress on your domain from CyberPanel?

When creation of your website on cyberpanel is done. Time to install WordPress on that site using CyberPanel. Just Follow these steps and do it quickly.

  1. Go to the Websites-> list websites

Can follow this URL to list all websites

https://your_IP:8090/websites/listWebsites
How to install WordPress on your domain from CyberPanel?

2. Click the Manage button to navigate to the manage website dashboard

Navigate to this URL to list all websites

https://your_IP:8090/websites/listWebsites
Manage button to navigate to the manage website dashboard

3. On the management dashboard to the last section there you found WordPress click on that.

You can also get access the dashboard through this Url

https://your_IP:8090/websites/yoursite.com
management dashboard to the last section

4. Once you click this button now you can see a screen asking for the WordPress details.

  • Blog Title (Your site Title)
  • Login User (Username)
  • Login Password (Password)
  • Email (your email address)
  • Path (Leave empty )

you can visit this URL to install WordPress.

https://Your_IP:8090/websites/yourdomain.com/wordpressInstall
WordPress details

Just Provide the information and click Install Now. It take some time and your site is there. you can check by visiting your site.

How to create an AdMob account?

How to migrate WordPress Site using Migrate Guru Step by Step guide

Do you want to transfer your site from Local to live server? Do you want to create a clone of your site? Do you want to migrate your site from one server to another server? the question is How to transfer your website to another host?

So you are in the right place. In this article, I am going to tell you how to migrate the WordPress site using migrate Guru.

This guide helps you to migrate WordPress site using migrate guru from local to live, from one live server to another live server, from one domain to any other domain and all.

But first of all, I am going to add some information about the Migrate Guru plugin. So before going deep you have some knowledge about the migrate guru plugin.

Top features of Migrate Guru:

  • 1 click migration
  • Migrate large site
  • No addons
  • No space required for migration
  • Compatible with almost every host
  • Fully Automatic
  • Timely alters
1 click migration:

Migrate Guru made the WordPress migration on click migration. You just need to enter the details of remote server (host) and click to processed.

Migrate large site:

Migrate Guru allows you to migrate large sites even the large as 200 GB. There is no limit for transfer. Large site migrations usually fail because of live-site server import limits.

No addons:

You don’t need any add-ons to move multi-sites. You know that sometimes we need add-ons to migrate multi sites from one place to another.

No space required for migration:

As the migration process of the wordpress site is done on there server so no extra space need for the migration process.

After the migration is complete, the copy is erased.

Compatible with almost every host:

Migrate guru plugin is compatible with a large amount of web hosts. you can see them when you are going to perform migration. Like FTP, BLUEHOST, GoDaddy, A2 hosting, etc.

Fully Automatic:

The process of migration is fully automatic and you didn’t need to perform any task manfully. Migrate Guru will take care of each and every thing.

Timely alters:

The main thing that i like about them is timely alerts. They alert instantly when the process began and inform immediately when the process complete.

Step-by-Step Guide to Migrate Your WordPress Site to a New Host

Follow these steps:

  1. Install Migrate Guru
  2. Setup site where need to move
  3. Move Site using Migrate Guru

Install Migrate Guru:

To install migrate guru Go to the Plugins-> add new

Plugins Option in Dashboard

Type migrate guru into the search bar and install this one.

install migrate guru

Activate migrate guru by pressing the activate button.

Activate migrate guru

Your migrate guru is installed and activated you can see the Migrate Guru in the menu.

migrate guru view

Video link

Setup WordPress site where need to move:

Migrate Guru migrate WordPress site from one server to another. For this process, we need to create the WordPress site on the other server to make the migration possible.

Simply Go to the control panel or the environment that you are using to create a new website there and then install the WordPress on that website.

You need to create a just simple WordPress site.

For FTP transfer:

For the transfer through FTP create an FTP account also on your host provider. different host provider has different methods to create FTP account.

Move Site using Migrate Guru

Noe the phase to transfer the site from one place to another started. Follow these steps to migrate the site.

Step1: Start Migrate Guru:

Click the migrate guru from the menu and provide details write your email, check the agreement and press the migrate button.

Run migrate guru
Setp2: Select your Server:

Now select your host from here to transfer site. I selected FTP to show you how to transfer through FTP. You can go with others.

migrate guru FTP

Step3: Provide detials to tranfere:

Provide all the required details for the transfer. The following details and press migrate

  • your domain
  • your host IP
  • FTP user name
  • FTP account password
  • Path as(public_html)
Information for migration

After this, you can click the migrate and go to the migrate WordPress site using migrate guru. You can see the screen that show the process of migration.

migrate guru status

At the beginning and end of the migration. Migrate Guru will send you email there are very good in timely updating.

Migrate Guru is a free Plugin powered by BlogVault. Migrate Guru plugin helps you to migrate your site from one place to any other with out risk of losing any thing.

You can migrate even a large site in a short time using this plugin. Migrate guru makes the migration 1 click process. You have nothing to do manually migrate guru will do everything automatically.

How to Create a Website and install WordPress on CyberPanel one-click installation?

How to Install Node Js on Windows?

You want to Install node js on windows 10 machine?

To start the guide to install node js on your windows 10 machine. First of all, we have to know what actually node js is. Before knowing how to install node js on your windows 10 know about the node js.

Basic node js is a JavaScript runtime environment. It simply means that the node js run-time environment includes everything you need to execute a program written in JavaScript. Now I would like to mention some points about node js for better understanding.

What is node js?

  1. Node js is free and opensource environment.
  2. Node js uses javascript on the server.
  3. Node js can generate dynamic pages, can do many operation on databases and its is available for different platforms (Operating Systems).

How to Install Node js on windows 10?

In order to install node js to your windows 10 machine. You need to follow different steps.

Download Node.js

In order to install node js on your windows 10, you have to download the Node js. To do so click here or visit this link https://nodejs.org/en/download/ in your favorite browser. Here you can see this screen.

Download Node.js

You can see the latest and current version always chose the current version from them because that is the stable one then chose the windows installer from the operating systems. you can also download:

Windows Installer (.msi)
Windows Binary (.zip)
Source Code

In 32 and 64 bits depending on your operating system.

Install Node js on windows 10:

Once your download completed now its time to install it on your machine to do so follow these steps:

  1. Click on the download file and then click install.
Install Node

2. You will receive a screen that asks you to run Wizard to install node js. Press Next.

Run Install Node

3. Now accept the License Agreement. To go to the next step.

Agreement Install Node

4. You can specify the location in your computer where you want to install the node js. By default its C:/Program Files/nodejs/ and leave as its and click Next.

Path Install Node

5. In this step you can see which node js packages you are going to install and what is disk usage, and all. Click Next to proceed.

Install Node next

6. In this step you can allow node js to Automatically install the necessary tools. you can follow the instruction from the link given on-screen. Then press Next.

Auto Install Node

7. All setup is done Press Install to install node js on your windows 10.

Install Node

Allow the installation and this installation may take some time to complete wait until the status bar show completion.

Install Node js status

8. All done now your node js is installed and you can press Finish and go ahead.

Install done Node

Verification of node js installation

Once the installation process has done you need to verify the installation of your node js on windows 10. to do so just run a simple command:

npm -v
Node js version

You can see the installed version it’s mean your installation is complete. Now your system is good to go.

How to migrate WordPress Site using Migrate Guru Step by Step guide