In some cases you need to exclude some pages from being cached from Litespeed. in this article, we are going to discuss How to exclude a specific page from LiteSpeed Cache?
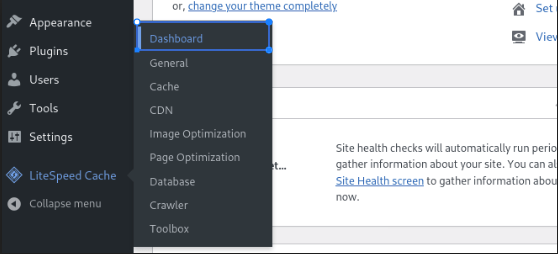
Login to the Word Press dashboard, click on Lite Speed cache, and then click the Dashboard button.
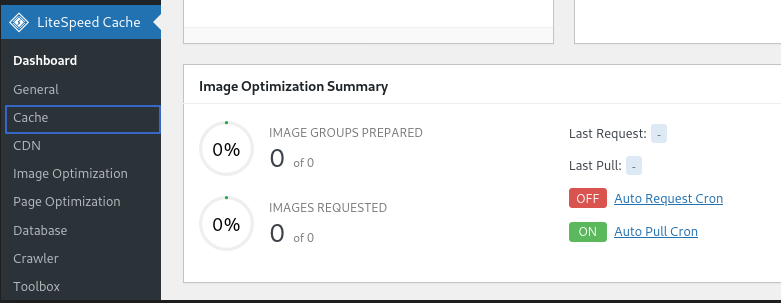
After clicking the Dashboard button select the cache option.
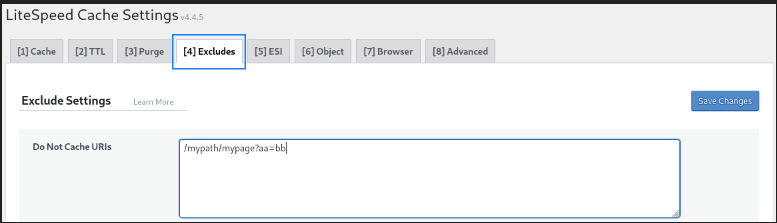
When you click on the cache, you will see LiteSpeed Cache Settings. Select the Excludes button and paste the URL for the page you want to exclude.
Many users faced WordPress installation error in CyberPanel as it is not working some time throwing installation failed. error message: [404]. In this article, I will tell you a few reasons and possible solutions for this issue.
Sometimes you want to install WordPress from the CyberPanel and it through this error and you are not able to install it. There are a few reasons for this.
WordPress installation error Reasons:
Your CyberPanel installation goes well but may be there is no WP nCLi on your server.
If you have allpied any kind of mysql optimizations may be after that also this function will not work.
Possible Solution:
Update you cyberpanel to the latest version and it may be resolve the non WP CLi issue follow this article to update cyberpanel.
If you want to check MySQL and dont know how to check just access your SSH and go to the /etc/my.cnf or /etc/mysql/my.cnf and paste the content in coment i will check if there is any optimizations or not.
Create a post in WordPress is the first and the starting step in blogging and even all fields if you want to start a blogging website then this will be the first thing you need to do. Although to create a post in WordPress is a very easy and steps process.
For creating a post in WordPress user should follow these steps:
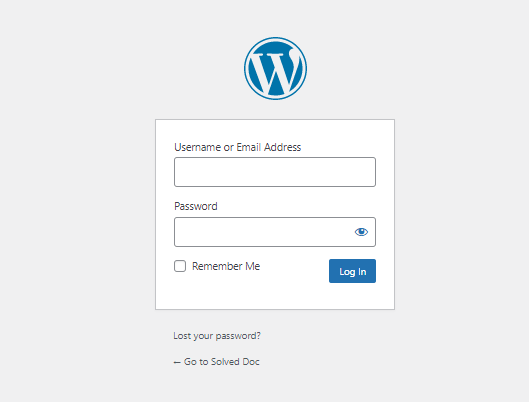
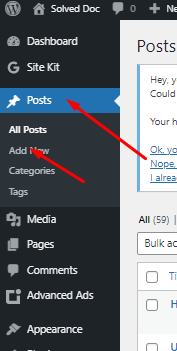
Step 1: login the site “WordPress Dashboard“.
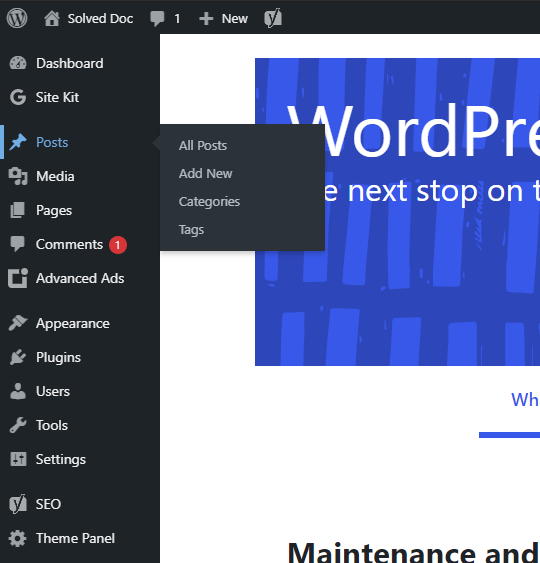
Step 2: click the posts icon on the left side display in navigation menu.
Step 3: Four options will appear. So the user click Add new button on the Posts page for creating a new post.
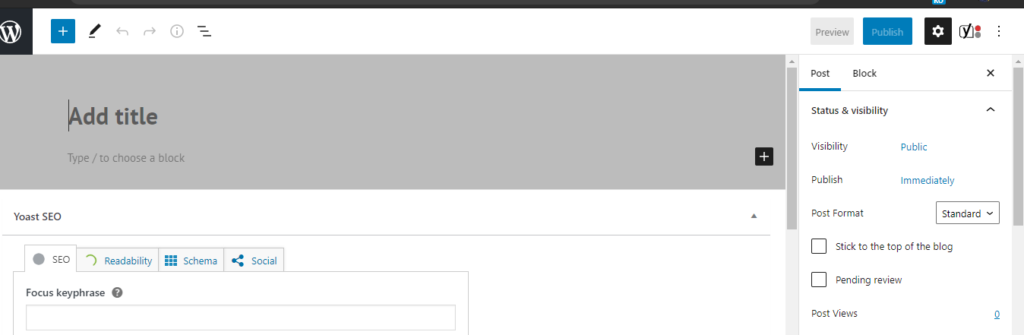
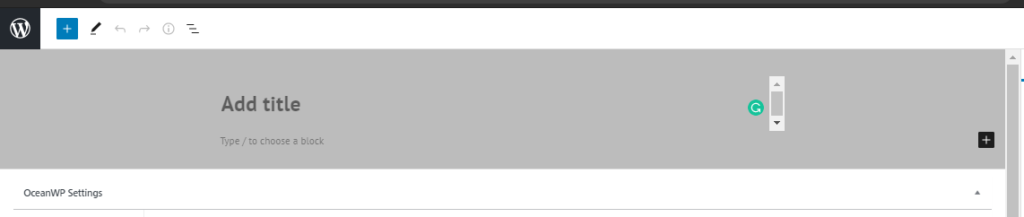
Step 4: Enter the title in a title bar it will appear on the top of the post.
Step 5: After giving the title, type content in a content bar. Users can format the text of content using an editor, like users can bold italic and also change colors of text.
Step 6: The user can also add images. The user can add an image with the help of the “Add Media button”.
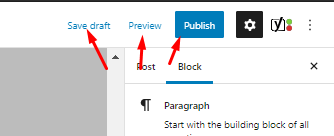
Step 6: when the user has entered the information in the posting user can click the publish button. Then the post is displayed on our website.
Step 7: User can also click on save draft to save the information if user does not want to publish his post publicly.
When you want to do some work with WordPress the first step is to write a blog post in WordPress. To start writing a post in WordPress is a very easy process. In this article, I am going to tell you how you can write a post in WordPress.
When someone new starts a new blog or any type of other site using WordPress. So you must have knowledge about creating and managing posts with WordPress. This is one of the cores and basic requirements of WordPress.
So before going to do anything else in WordPress you just have to know how to create a blog in WordPress. As blog or post always have a great impact on the site ranking, site SEO, and all.
Login to your WordPress:
First of all, you have to log in to your WordPress admin dashboard. Normally your WordPress admin dashboard access is on:
https://www.yourwebsit.com/wp-admin
if you have any custom login link for the WordPress admin dashboard you can visit that and provide the user name and password to log in.
Login to your WordPress:
Create a post in WordPress:
Once you logged in now you can see a lot of options in the left side menu of the WordPress dashboard.
Go to the Posts-> Add new Post option in the left menu.
Create a post in WordPress
Once you click there this will redirect you to the posting page where you can write the post according to your choice and content.
On this page, you can write the content on the main page, and on the right side, you can see a lot of options like some important are Categories, tags, featured images in the post tab.
You can add categories to your posts, tag, and also set featured images to your posts.
Save post:
In WordPress, you can also make posts to draft and you can also publish them once.
But as you know one post needs many reviews so you have to save it to draft and maybe you have to preview it many times and after all, you can publish a zero error post. so these all buttons and options are present on the top of the right site on the posting page.
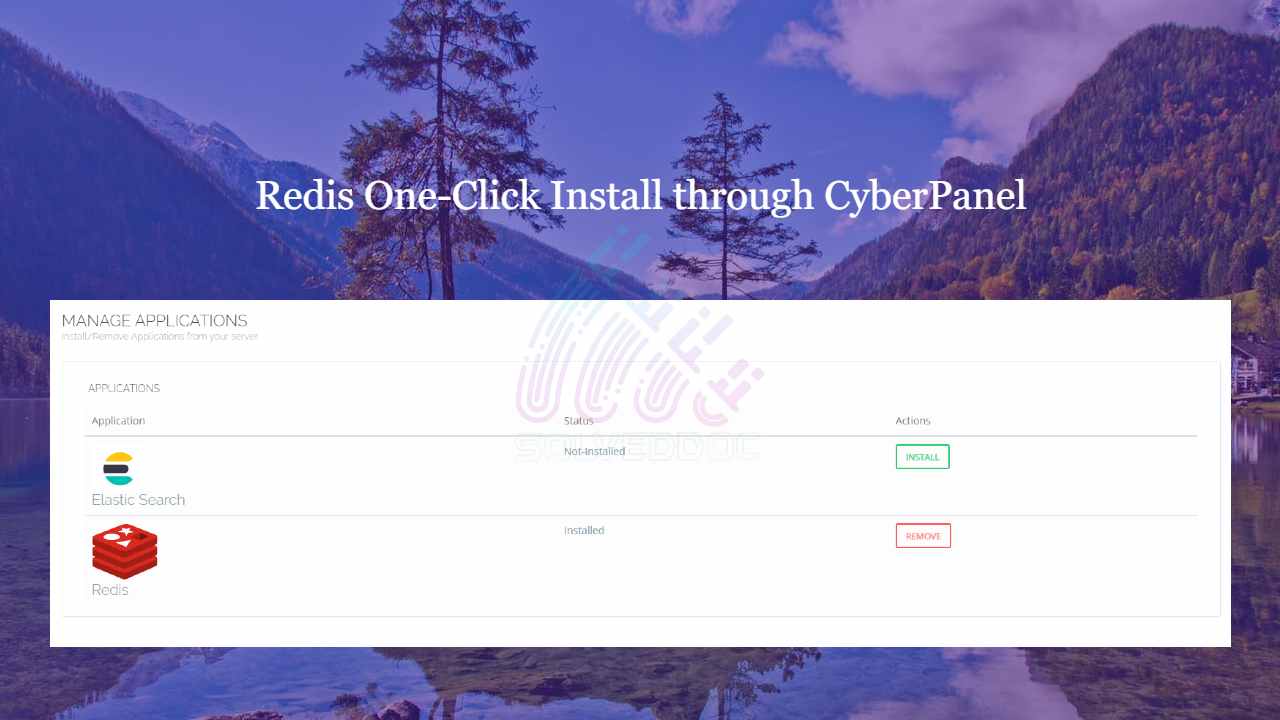
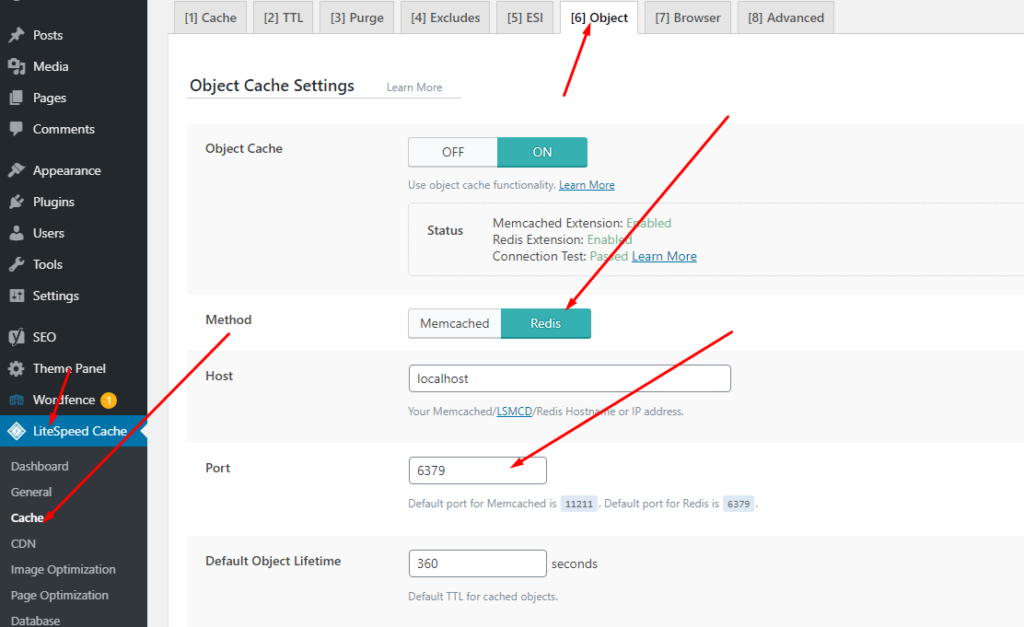
Do you know now from CyberPanel version 2.0.3 you can install Redis on your server using one click? Here we will tell you one-click Redis install through CyberPanel.
Now CyberPanel made the install and use of Redis cache on your server very easy.
Redis is an open-source cache use to cache database, and use as a message broker. Nowadays it is very important to use cache and boost your website. CyberPanel helps you to do this.
One-Click Redis install Through CyberPanel:
Follow these steps to setup Redis on your server.
Login to CyberPanel
One-Click Redis Install
Install Redis PHP extension
Setup Redis on WordPress using LS Cache
Login to CyberPanel:
Login to your CyberPanel using the credentials. Follow the link with port 8090.
https://<Your_IP>:8090
CyberPanel
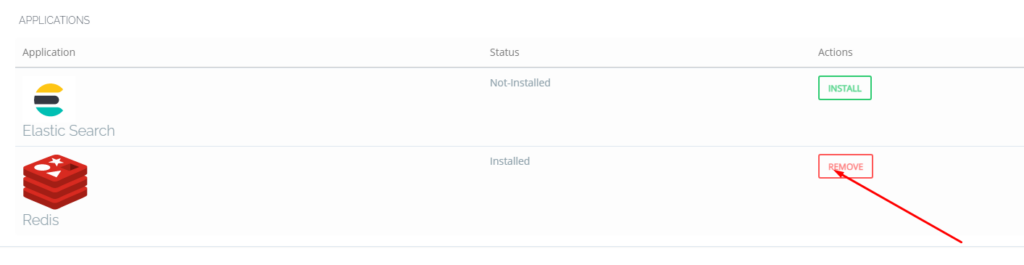
One-Click Redis Install:
To install Redis on your server you have to go to the Manage Services->Application -> Redis then you can see the install button there. Click that and your Redis installed.
Now your Redis is installed and you have to install PHP extension to run properly.
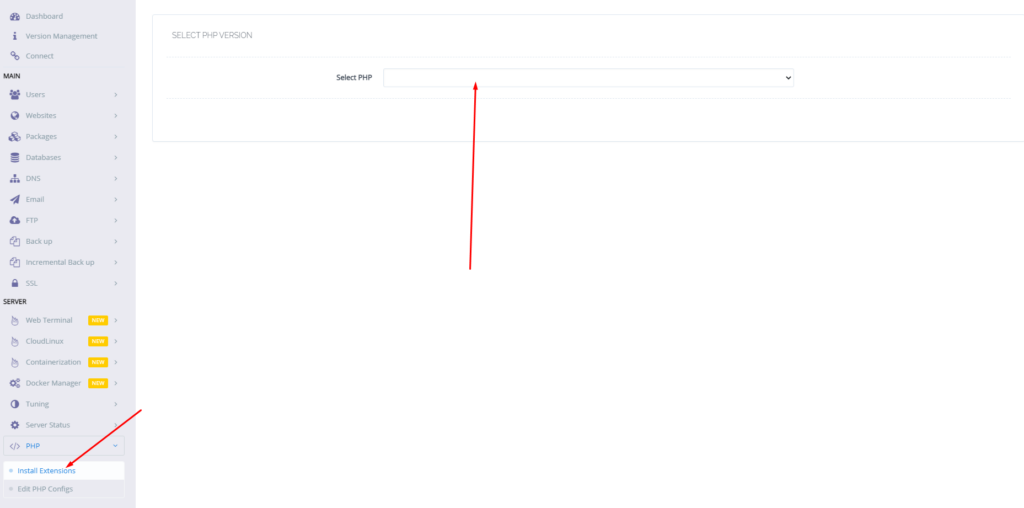
Install Redis PHP extension:
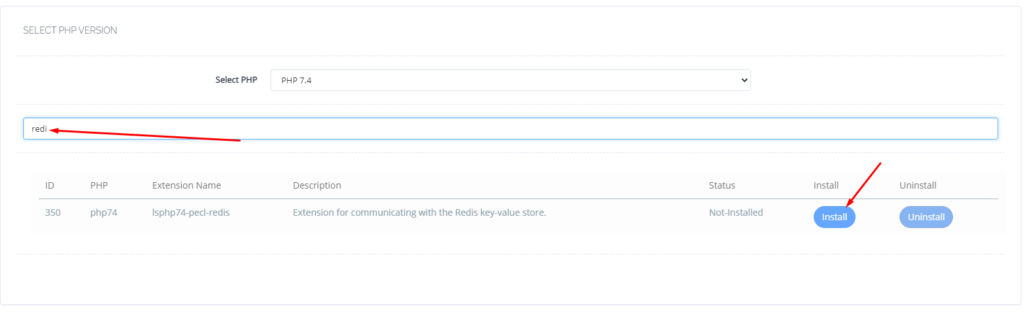
Now go to the PHP-> Install Extension Then you have to select PHP version for which you want to install Redis Extension. You can also follow this link.
Now search redis on the search bar and you can see redis PHP extension press the Install button and everything is good to go.
Redis
Setup Redis on WordPress using LS Cache:
Now it’s time to setup Redis on your WordPress site. We will tell you here how you can setup Redis on your WordPress site without any extra plugin. Ls cache plugin will all do for you. Let’s begin how to do.
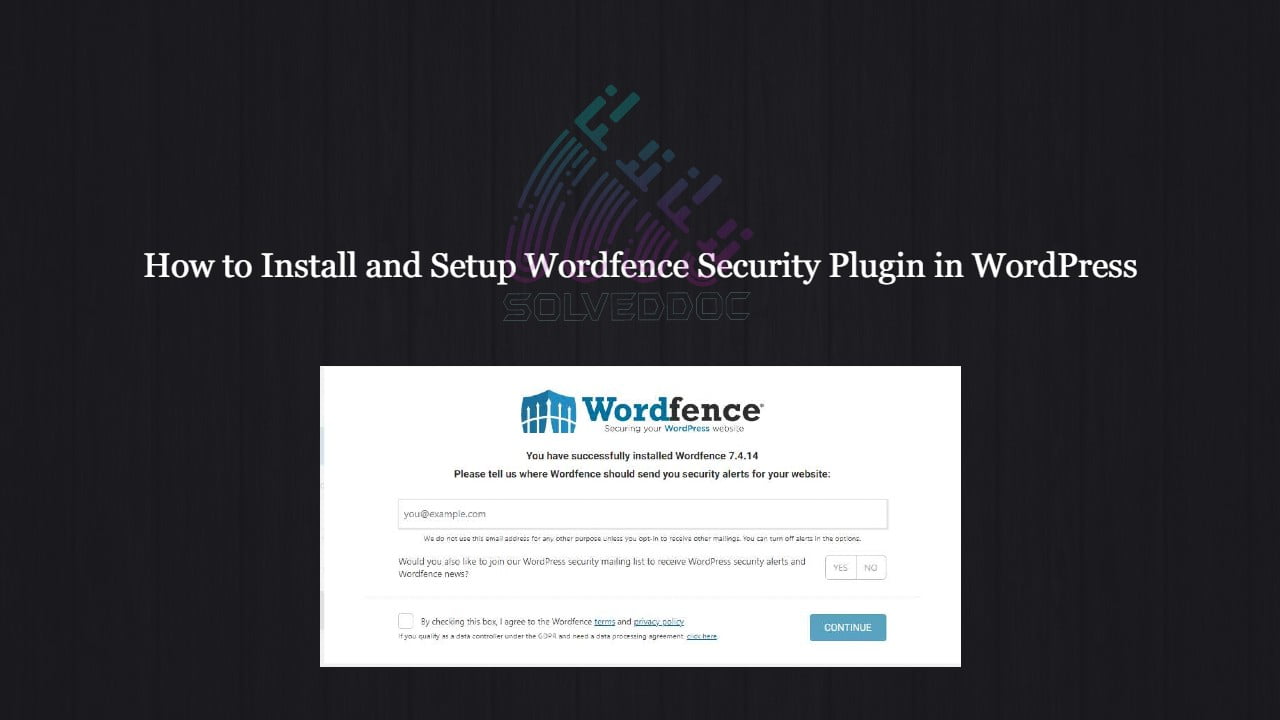
Do you want to secure your website from hackers? You want a secure website? Do you want to install and setup Wordfence Security Plugin to make your website more secure?
If you need anything above here in this article you will get all this information.
Wordfence Security is the most popular WordPress Scanner and Firewall. Wordfence uses to scan, remove malware, firewall again attacks, IP securing, 2FA login, etc.
You have to follow these steps to install and setup Wordfence in WordPress:
Install and Activate Wordfence
Setup Firewall in Wordfence
Scan your site from Wordfence
Login Security Setup
Other Security tools
Install Wordfence Plugin:
installation of Wordfence is just like any other WordPress Plugin. You can easily install Wordfence Plugin from the Plugin directory or you can download it from the Wordfence site and upload it.
After installation activate this Wordfence security plugin to configure it.
Install Wordfence Plugin
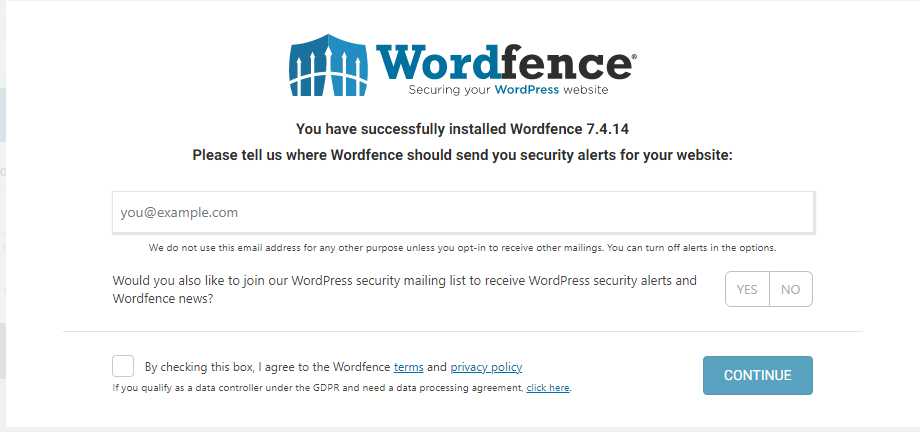
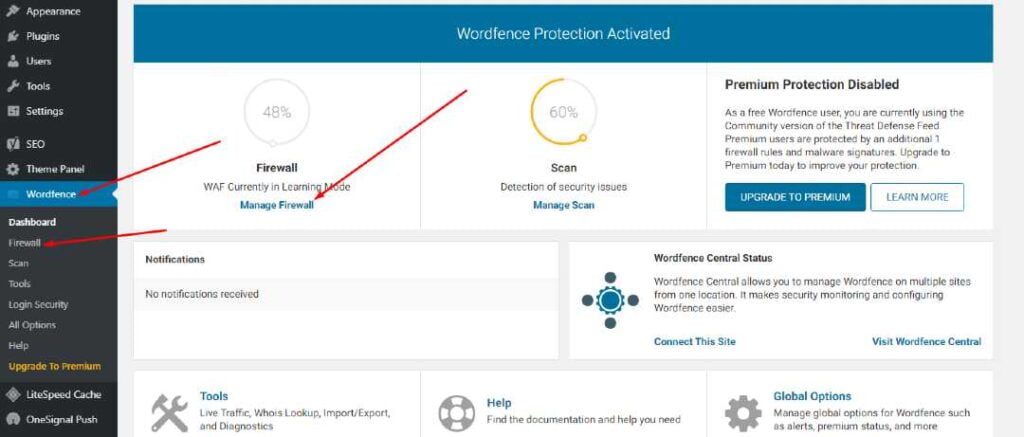
Once you completed the installation and check this privacy policy and terms link you can see the Dashboard of the Wordfence plugin by click on it from Wordfence -> Dashboard.
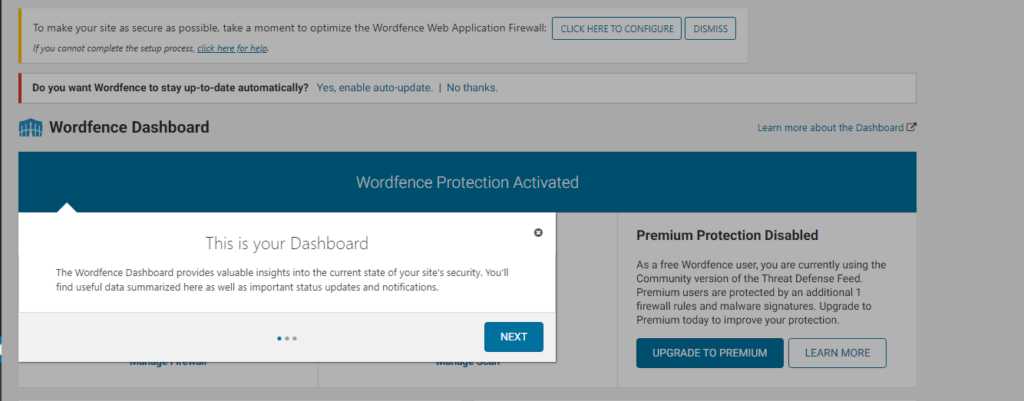
Wordfence Dashboard
They guide you through these steps and you can follow these but follow another part of this article in order to understand better.
Setup Firewall in Wordfence:
Wordfence Firewall saves your website from malleolus access of the website. The firewall has general real-time security and secures your website from brute force attacks on your website.
The free version of the Firewall of the workforce does most of the things for you but in the premium version, you will get all the advanced features also.
Premium versions include Real-time IP blocklist, Real-time firewall rules, and malware defense.
The firewall has two-level f protection one is basic and the other one is advanced level protection. The basic level of protection covers the threads and attacks on the website but may miss some plugin and themes attacks. Advanced level covers all these.
On the Dashboard page of your Wordfence plugin, you can see the firewall percentage.
Wordfence plugin
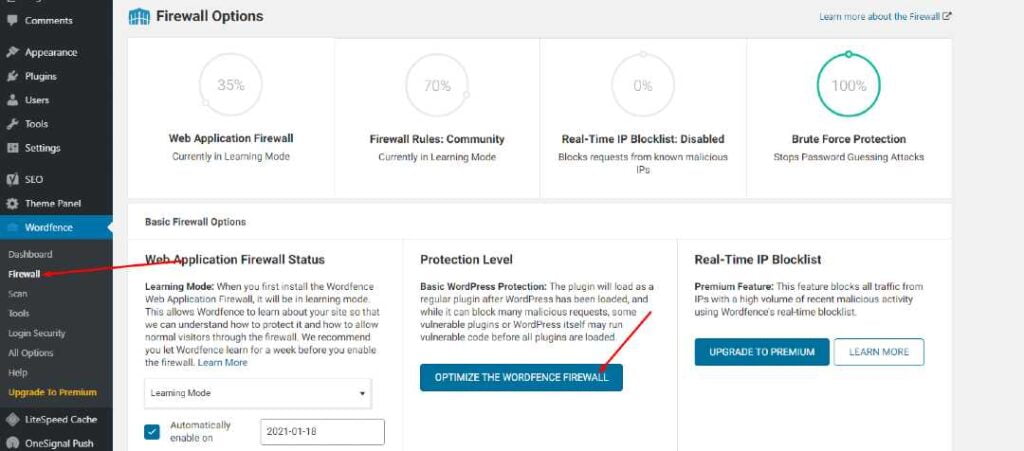
To configure your Wordfence firewall go to Wordfence->Firewall option.
Configure your Wordfence firewall
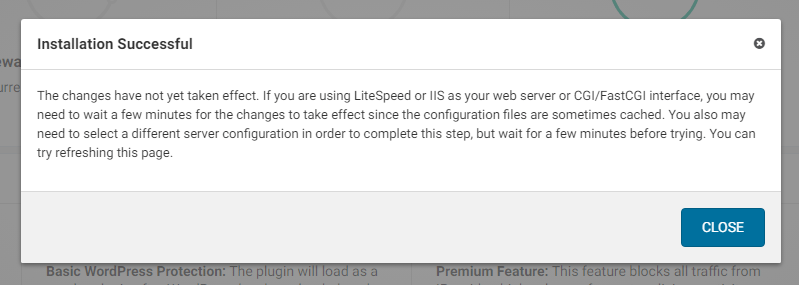
Once you click the Optimize The Wordfence Firewall you will see a notice click Continue and you can see your firewall is successfully installed.
Done
You can also see extended mode is enabled. if you check your firewall performance is also increased.
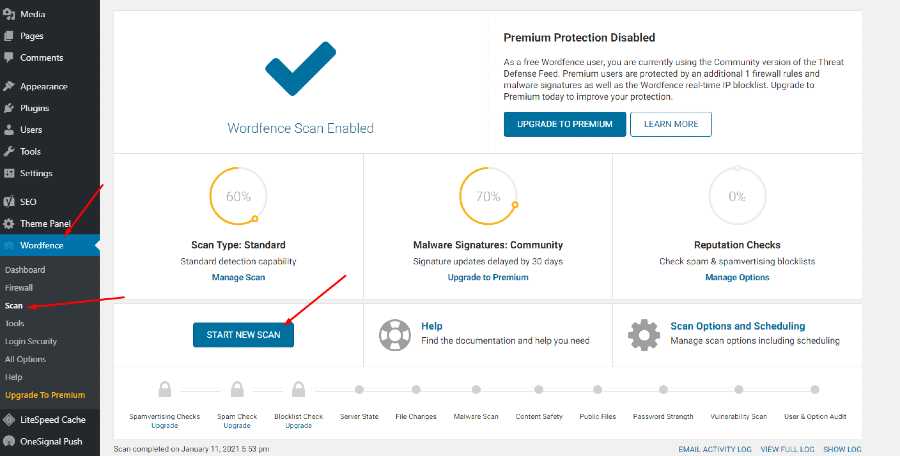
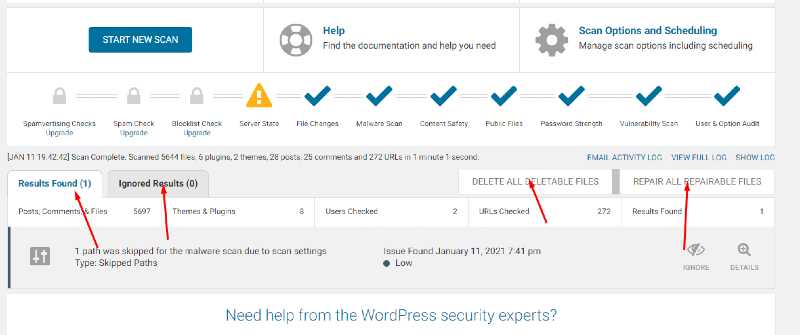
Scan your site from Wordfence:
You can scan your website using the Wordfence security plugin. To scan your website go to the Wordfence->Scan->Start Scan.
Scan your site from Wordfence
After clicking start scan you can see that your site starts scanning and now wordfence goes into the file of your WordPress site.
Basically, wordfence goes into the files of your websites and scans all the files present on your website directory. Note all changes that happen in that file and write those on your screen.
Wordfence tells you that which issue and changes of files are critical, which are ignorable, which files need to delete and which can be ignored.
The scanning process does not go into just one step it complete in a number of steps.
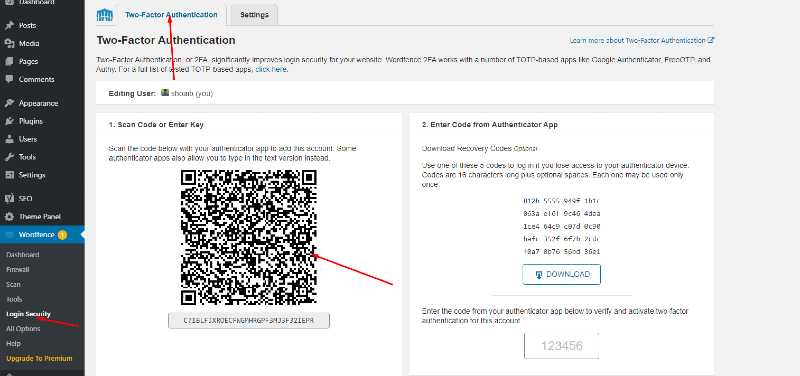
The coolest feature of worfence is that it has a Login security feaster also use this plugin you can set 2FA. Now your question is how to set up a 2FA login using wordfence security plugin?
To set 2FA login go to the Wordfence->Login->2FA scan code.
Login Security Setup
You can also go to settings and check for the other settings too like whom you want to 2FA for.
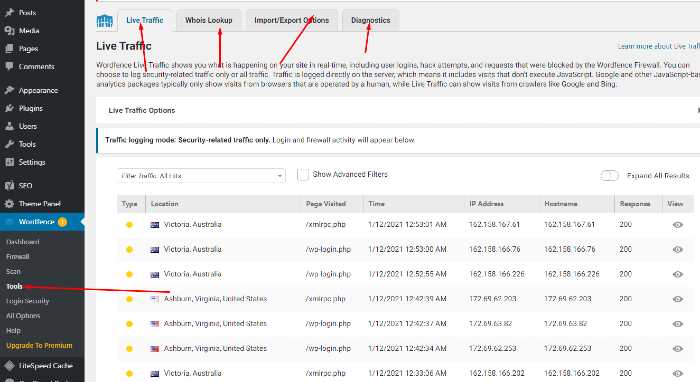
Other Security tools:
There are also other security tools like Live traffic, Whois Lookup, Import/Export Options, and Diagnostics.
These option also help user in security as well as performance.
Other Security tools
Security of your website is very important you have to secure your website no matter you use this plugin or use any other matter but the point is your site must be secure.
From this guide, How to Install and Setup Wordfence Security Plugin in WordPress you got a good idea to configure your Wordfence plugin with your website.
Here in this article we are going to discuss Factors Affecting WordPress website page Speed.
Do you like websites which take some time to load? Do you want to visit again on site on which you wait for page to open?
I think no one like to wait for loading of slow sites. Users always want a quick response from the website. After clicking the link they don’t want to wait and waste their time.
Above is the user perspective now if we come to the website owner’s view, the owner never wants to lose his/her visitor from the site. But we know there are a large number of things which affect page speed and load of our website. We know it is not possible to list all but we mention a few things that are common for this.
Irrelevant, extra, and outdated Plugins and themes
Cache Plugin and its configurations.
Extra and unoptimized CSS and JS.
Hosting server
How to check Page speed?
How to solve the problems stated above?
What is page load time and speed?
Page speed is the loading speed for your page. It mean that how fast your page loads for your user. Acutely the time between the click by user and the view of page.
You can say that page speed is the page load time or time taken for the first bit. Site speed and page speed are two different things but sometimes we mixed both as one.
Now if we look at load time, Load time is the total time taken to download whole page and display it. When the whole content is there then we can say that this is the load time for our page.
Why Page speed and load is important?
As we know that now the internet is going fast and fast every day. With the increasing speed of the internet websites also need to be fast. As we no if your site is slow then there is no space for your website.
Now users want that website to load fast. So he can get his result as soon as possible. The important issue with having a slow website is that your users will often lose patience and leave. But this is not your user that wants this there are a lot of other important things for which your page speed is important.
Website ranking depends upon different things and these all relate to your page speed. If you want to rank high your site you need to improve your bounce rate, SEO, etc. Google as well as other search engines check all these things.
If your website is fast google always prefer fast site. In this way your SEO score will improve and when your SEO took you up visitor come and they will navigate between the page if your site is fast. This will improve your bounce rate.
There are a large number of factor that affects your website page speed and make it slow here we will discuss the most common factor that affects the page speed. So stay with us to check these:
1: Unoptimized images
The most common mistake that people makes which cause there site slow Is the use of unoptimized images you create an image and upload it without optimizing it is not a good move. You must optimize your image before upload it on your site.
Use of unoptimized images is one of the common mistake made by most of us. We will also discuss how to overcome this issue later.
2: Irrelevant, extra, and outdated Plugins and themes
One of the big reason of getting site slow in WordPress user. The use of irrelevant, extra, outdated and pirated plugins. Sometime people see any new plugin and install it to test and they didn’t remove it, this thing slow down your site. There are also some user who like to use pirated plugin because they don’t want to pay for it that thing is very bad for their speed and security.
Many of us usually don’t like to update plugin scar of being destroy settings. More you have these thing more your site is slow.
When you install WordPress some Default themes also come with that. Most of the user never touch them and also never delete that make more load on server and cause site slow.
3: Cache Plugin and its configurations:
Use of cache plugin is very important to speed up your site. There are a lot of Cache plugin in market you can use them. There are a lot of free and also paid too. Use of cache plugin is is good but the important thing you have to configure it in right way. if you don’t know how to configure it then using this cause extra plugin only.
4: Extra and unoptimized CSS and JS:
The main function or propose to use cache plugin is to optimize extra and unoptimized CSS and JS. But where did it come. Acutely most of WordPress users like to buy ready made themes instant of making there own and all. They buy theme and plugin from any where and use it.
But the bad thing is that themes are not according to your requirement theme and plugin fulfill yours but also have a lot of extra and unoptimized JS and CSS files that caused the slow site issue.
6: Hosting server:
Chose of hosting is one of another important affect on site speed. If you have a big and high traffic site and you host it at a shared plan. then you cant get the required speed.
There are also other things which you need to keep in mind while selecting host. Like if your visitor are from India and your site is hosted in US then this is also a very bad move.
How to check Page speed?
There are a lot of ways to check Page speed of your website. Here we discuss some common page speed tools with are commonly used to check the performance of your website.
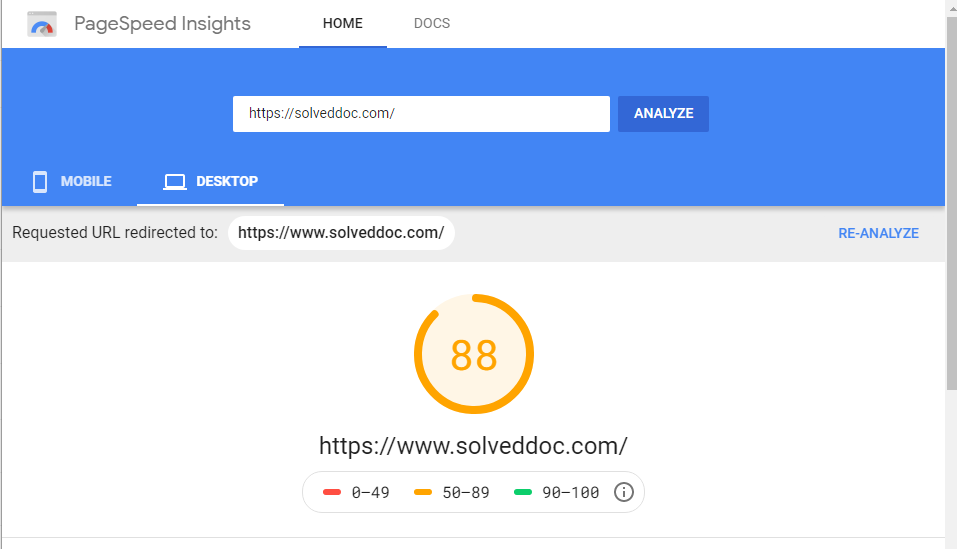
Google PageSpeed Insights:
Google PageSpeed Insights
Google PageSpeed Insights is one of the simple and most powerful tool to check the page speed of any website. It gives you both Mobile and Desktop page speed score. So you can easily check and compare the performance of your website.
This Google PageSpeed Insights also give you the issues details and this is very important for your SEO term.
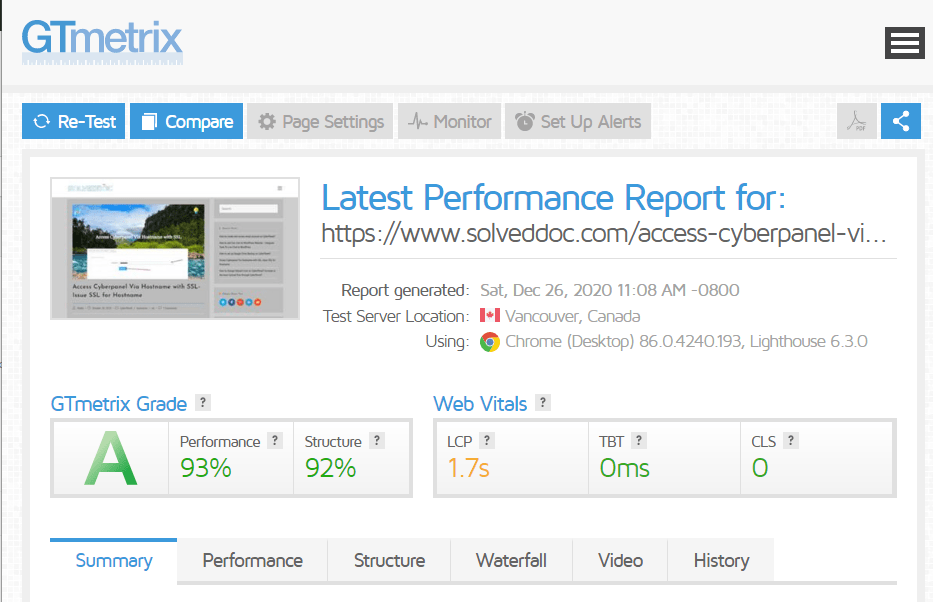
GT Metrix:
GT Metrix
This is an other tool that helps you to check your page speed and helps you to improve you site speed and ranking. GTMatrix is also a great tool to check the performance of you site click here to visit GTMatix and check you page speed.
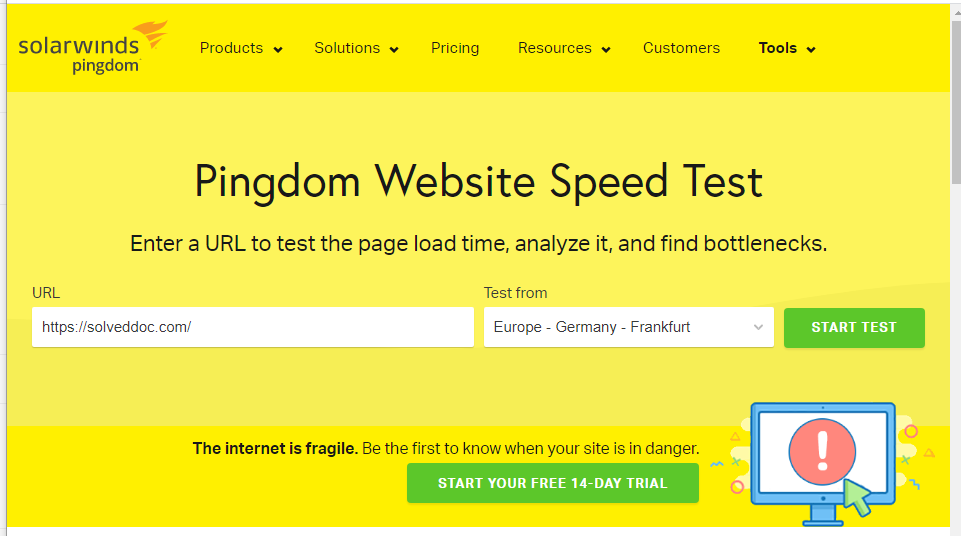
Pingdom Speed Test:
Pingdom Speed Test
Pingdom Speed Test is also a speed test tool. They says that they are cost effective and reliable uptime and performance monitoring provider for your website. They give you a kind of brief and detailed report about your website.
Web Page Test:
Web Page Test
This tool is not simple as other this a a tool which give you a detailed view about your website. But this tool worth look. This will give you information about the Security, First Byte, Keep-Live, Compress transfer, Cache static etc.
There are also many other tools but for now we will discuss only these.
How to solve the problems stated above?
AT the last of this article we will tell you how you can solve the problem stated above.
Optimize your Unoptimized images:
You have a lot of options to optimize your images, you can optimize you images using different ways like you can optimize before and after uploading we will give you name of some plugins and methods through which you can optimize your images before and after uploading to the site.
Optimize your images before upload:
You can optimize your images before uploading. This is one of the core factor from the factors affecting WordPress website page Speed.
The optimize your images there are few basic thing you have to take care of, Like always use JPG, webp, etc. versions of image files instant of using PNG.
This is a good and intelligent move to optimize images before uploading it on live site. You can optimize your Images before upload using differnt tools. I will state some of them here.
You can optimize your images before uploading using these tools and editors. there are large number of tutorials to do so. Go get any of these tools and optimize your image before upload.
Optimize your images before upload
Optimize Images Through Plugins:
Better move is you can upload optimize images but if you didn’t do that and after upload you fell that you have to optimize these so in this case you can now optimize your images using plugin.
Here I will mention some plugin through which you can easily optimize your images. Even you have old images and you want to optimize them.
Using these plugins you can easily optimize your images by just following some steps.
Optimize Images Through Plugins
Remove Irrelevant, extra, and outdated Plugins and themes:
This is one of the main reason and it is very easy to solve this issue.
Just need to login to your system and check how many plugins need Updates. Also check which are the inactive or extra plugins which you don’t need or without those you can easily do your work.
One of the best thing to remember in this section is to remove the default theme mostly people do not remove default theme and keep those.
GO to the admin dashboard and check the inactive plugins under PLUGIN->INSTALLED PLUGIN->INACTIVE.
PLUGIN->INSTALLED PLUGIN->INACTIVE
Cache Plugin and its configurations:
Now a days there are a lot of cache plugins which you can use to get a speed on your site but the question is how to use these plugins on your site.
I must say configuration of a cache plugin is an important and critical phase. Here are some popular cache plugins.
Using above plugins you can optimize extra CSS and JS but the question is where it came from. Extra CSS come in the Ready made themes so to avoid these better to use a custom theme that gives you the css and js that you needed.
Chose a Good Hosting server:
The best thing and the hard decision to make is the chose of good and reliable server.
If you have a big sized WordPress site and you bought a shared plan that is not a good move at all. There are some things which you need to take care of before buying a server.
Your target location and server location
Your site content and your server capacity
Selection of Server providers
Shared, VPS or dedicated server choice.
These are some steps and thing you need to take care of before doing and looking for speed. these are Factors Affecting WordPress website page Speed. And we also stated how you can remove Factors Affecting WordPress website page Speed.
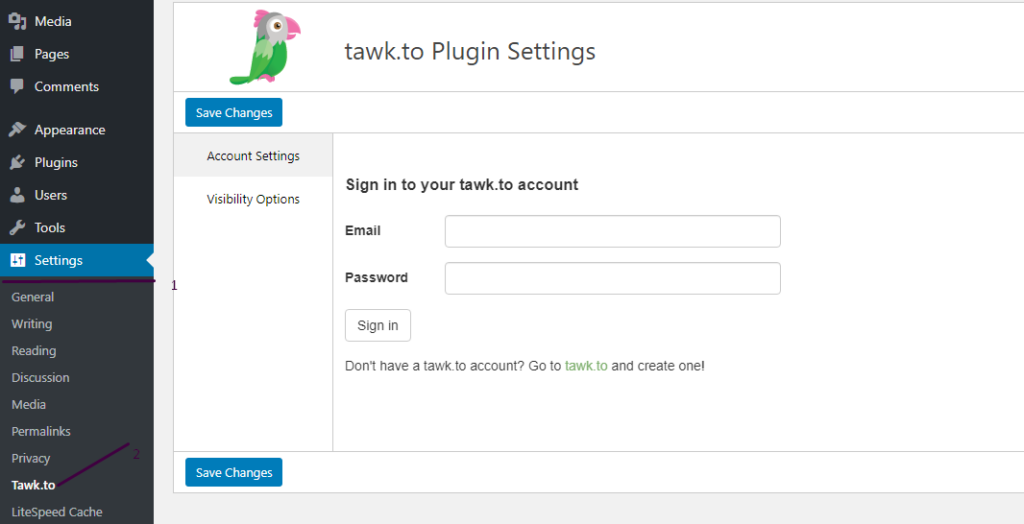
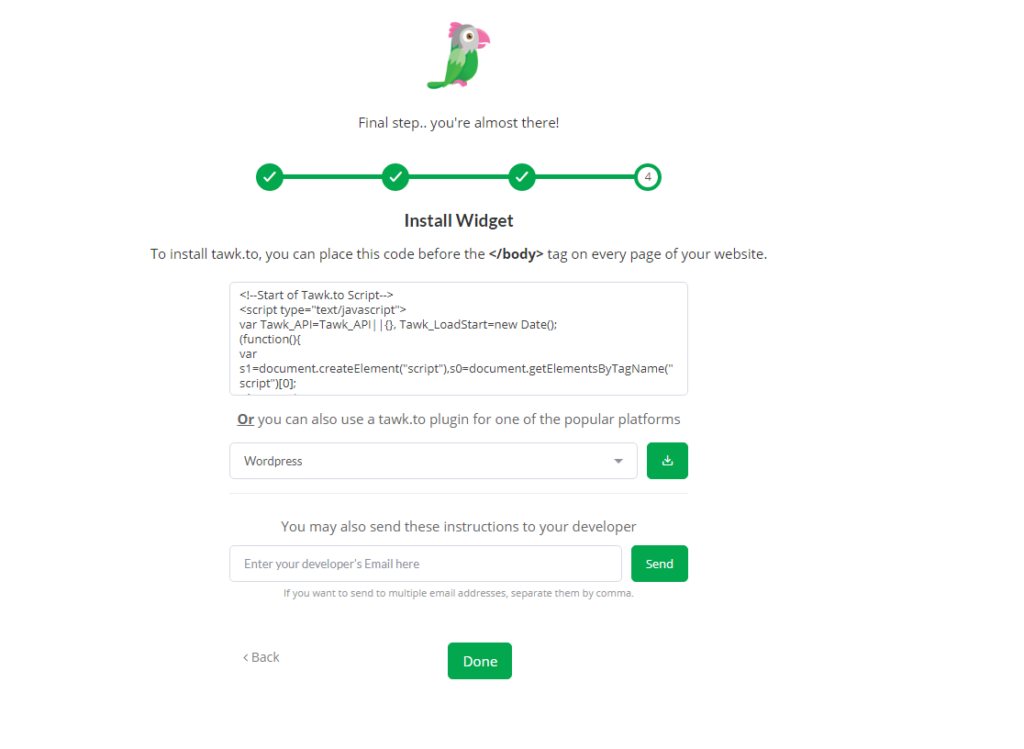
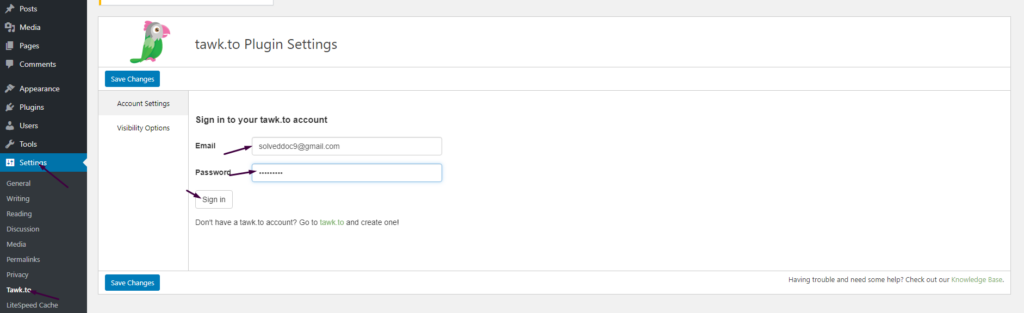
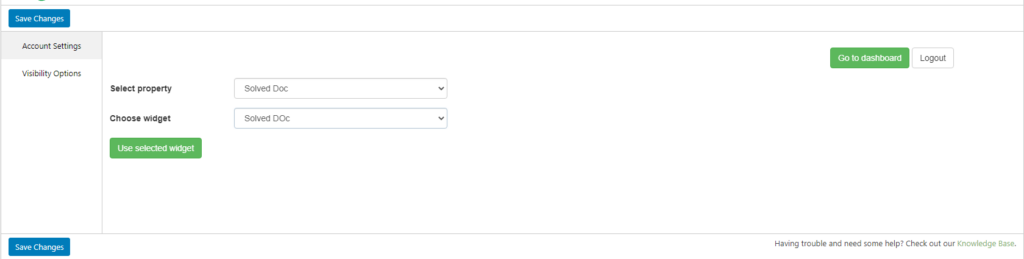
In this Article I am going to share my personal experience that how i added the Twak.to Live Chat in my WordPress Site. After reading you come to know how to add live chat on WordPress Website.
This tutorial is basically my personal experience that how I integrate live chat on my WordPress Website. So without wasting time lets start tutorial.
CyberPanel has a great feature to add Google Drive backups. They added this feature in their 2.0.2 version.
This G-Drive backup option makes the backup process easy and more reliable. The method to set up Google drive Backup is also so easy. there is nothing typical or complex.
You can follow this guide to add Google drive backup through CyberPanel.
Table Of Contents:
Login to your CyberPanel Account
Set up Google Drive Backup
Set Up New Account
Add Sites For Backup
Login To CyberPanel:
To initiate this process you must have to log in to the CyberPanel. So use your CyberPanel credentials to log in.
Set Up Google Drive Backup:
Now go to Back Up->Setup Google Drive to set up google drive backup for your site.
Set Up new Account
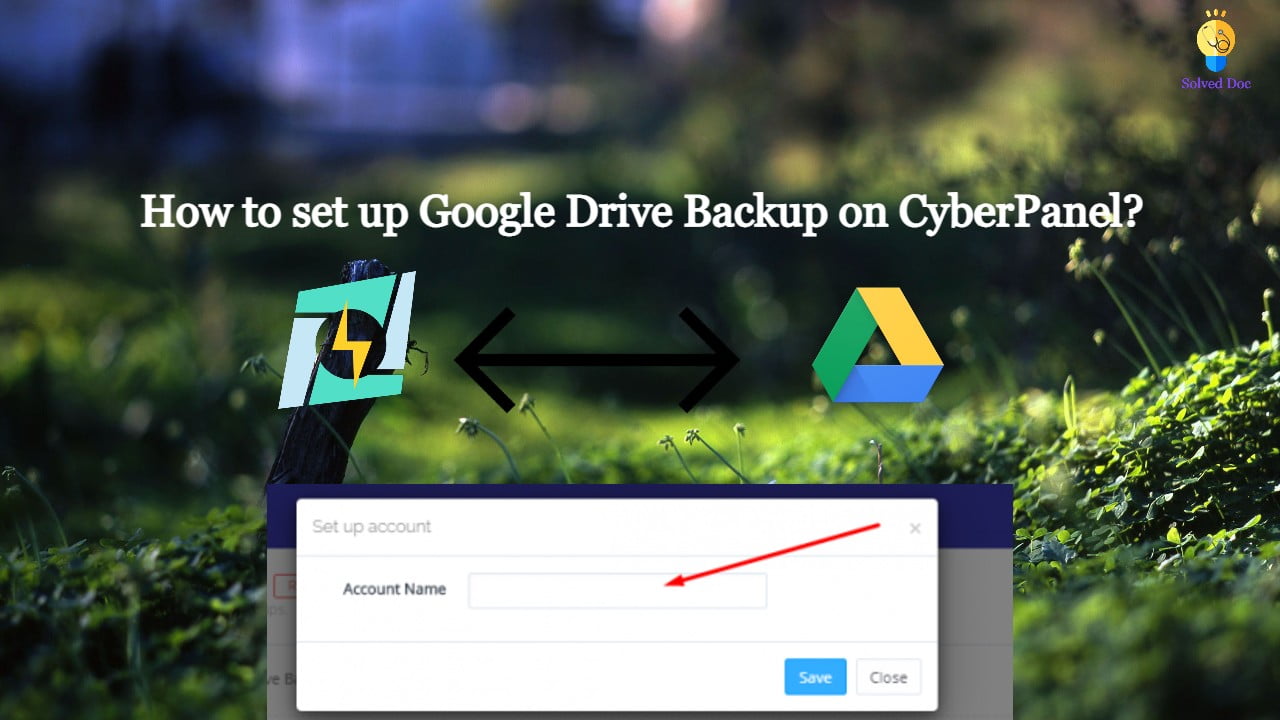
Here you can see the SETUP NEW ACCOUNT click that button to add a google drive account for backup.
You can see a Pop up asking for the name of the account you want to set up for your g-drive backup.
Enter your name here and then click the Save button. This will migrate you to a new screen for Google account setup.
Select any account if you are logged in or add a new one here
Now click the Allow button to processed.
Once it’s done now you will get back to the backup page. and you can select that account you just added.
Add Sites For Backup:
Now you can add backups for your sites from this screen. Select account from here.
Now provide the details and Press the Add button then you can see the Site added below.
DO you want to access CyberPanel via a hostname with valid SSL ?
By default, you can access your cyber panel using the IP of your server and Port 8090. But For a valid SSL certificate, you must need a valid domain to access cyber panel with a valid SSL.
In this article, we will discuss how you can select a hostname and then issue SSL for that. So follow all steps along to access Cyberpanel Via Hostname with SSL.
Table of Content:
Select a Valid Domain
Create a Website on CyberPanel
Issue SSL for HostName
Access Cyberpanel
Select a Valid Domain
To access CyberPanel through a hostname and valid SSL first you need a domain through which you want to access CyberPanel. Like you want to use https://domian.com:8090 to access your CyberPanel you need to add domain.com to your CyberPanel.
Before creating a domain make sure that your DNS A records are point this server where you want to add a domain.
Create a Website on CyberPanel
To do so login to your CyberPanel using your Credentials then go to Websites->Create Website :
Now provide all the required details and press Create Website button.
Now your required website is created. SSL may be working for this domain But we need to issue for the Hostname and select this domain as the hostname.
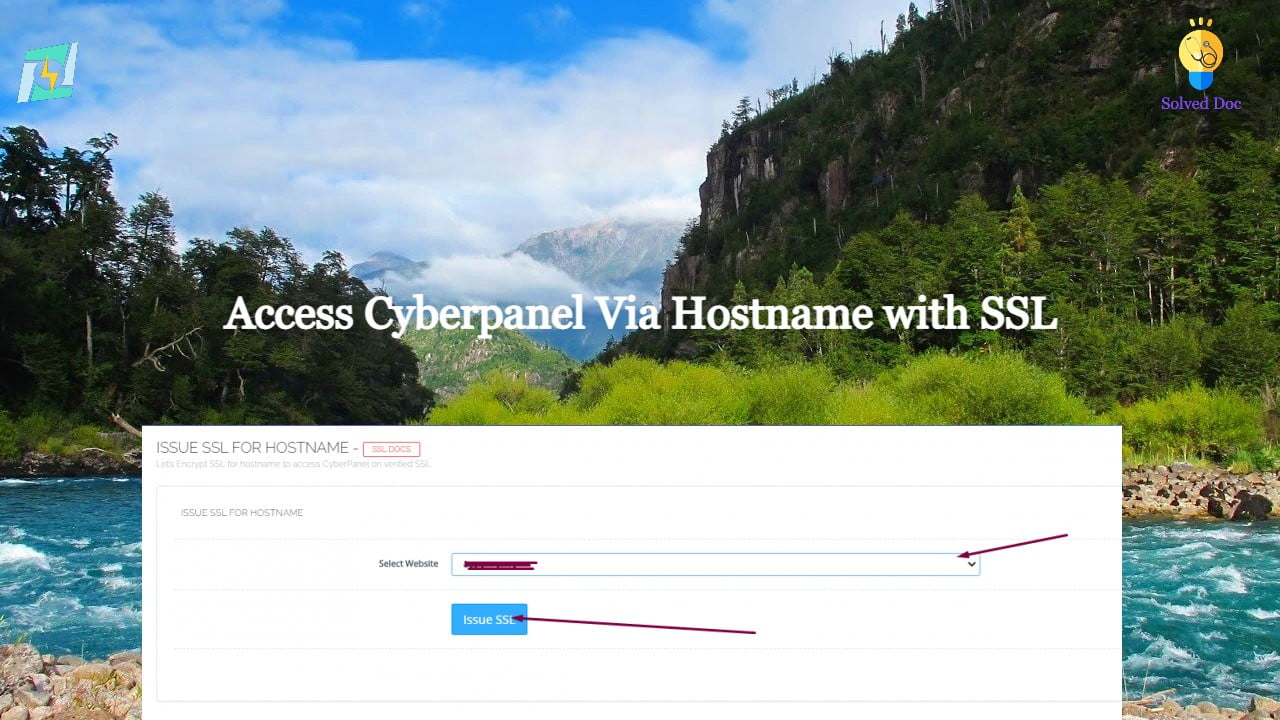
Issue SSL for HostName:
Go to the SLL->Hostname SSL
Now select that domain you want to use for the Hostname. Then Press the Issue SSL.
This domain has now SSL for hostname you can use this to access cyberpanel
Access Cyberpanel:
Now it’s time to check that is this domain is working to access the CyberPanel. Go to your brewers and visit the Link https://your-domain.com:8090 it should work for your Hostname now you can access CyberPanel using this link.
Sometime you may need to create a clone or staging site of your WordPress site to make changes and test them. CyberPanel allows to create staging or clone site easily.
In this article, I will tell you how you can create a staging or clone of your WordPress site from CyberPanel.
You can create a staging site from CyberPanel and after doing that you can merge it back to the Original or master site.
Always keep backup before doing anything. So if you lost anything you can restore. The process of creating a staging site is very easy to follow along to do so.
Create a Clone or create a Staging for your site:
Step 1: Log in to CyberPanel and Go to Manage Website
Create a clone or staging site in cyberpanel is very easy. I will write the steps below to do so.
The first thing to do is login to your cyberpaner using your credentials on port 8090.
Then go to the Websites->List Websites->Manage
Step 2: Create a clone or Staging site
In the manage Dashboard, you can see the CLONE/STAGING button press that to process.
Add the Domain name which you want to use as staging or clone.
It will take some time and once staging is done it will show you this screen.
Now you must have to set A records for the staging domain you create Like staging.yourdomain.com. Visit your DNS manager and add A record for this staging site. No need to add any other records. A record is enough for staging.
In cyberpanel got to Websites->List Child Domains you can check the staging site.
Push back, Copy or sync site to Master:
Once you did all changes to staging and now you want to sync the staging back with the master site CyberPanel allows to do this very easy to do so follow steps:
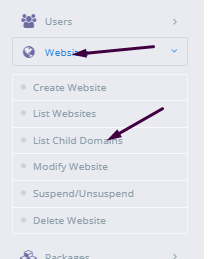
Go to the Websites-> List Child Domains:
Now on this page, you can see your staging site press the Manage button in front of your site.
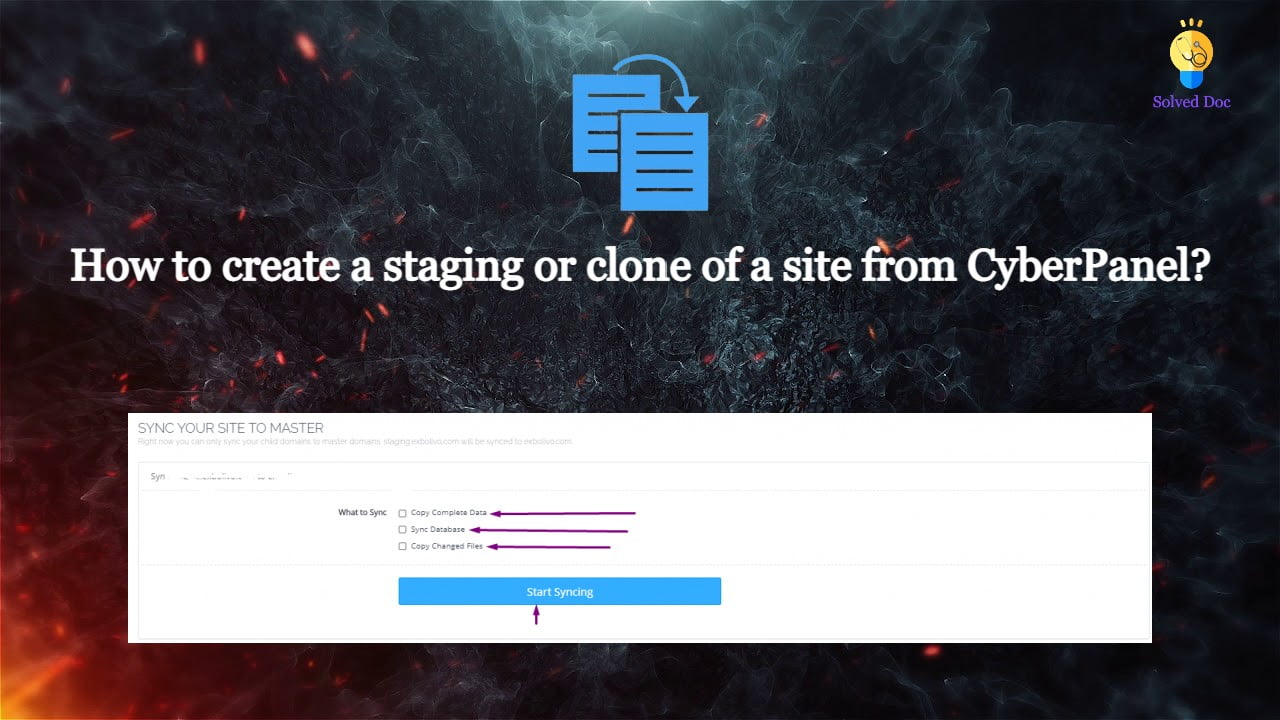
Now you are in the management dashboard of the staging site. You can see COPY/SYNC TO MASTER from here you can push back your staging to the original.
Here you can chose the options:
Copy complete Data
Sync Database
Copy Changed Files
Chose any option from them according to your requirement. Once the process of sync or coping is done now go back to your original site and check the changes if you have any cache plugin clear cache and then check the changes.
In this article, I am going to tell you how to install WordPress on CyberPanel. This article is about the one-click installation of WordPress on CyberPanel.
I will briefly describe how to create a website on CyberPanel. And then we will go toward the installation of WordPress on CyberPanel. The main theme is how you can create a website and install WordPress on CyberPanel.
if you are new on CyberPanel and want to know the basic Information and usage of CyberPanel then do not leave the article i will explain some basic at the end of article.
How to create a new Website on CyberPanel?
Creating a website on CyberPanel is very simple and easy. Here the all steps to create a Website on CyberPanel are listed.
Go to the Websites-> Create Website Option in CyberPanel Menu:
Can navigate to this ULR to Create new web site:
https://your_IP:8090/websites/createWebsite
Provide the following details here
Select Package (Default )
Select Owner (Admin or any other)
Domain name (example.com without www)
Email (Your email address (youremail@xyz.com))
Select PHP (Latest is recommended )
SSL (Always check)
DKIM (Always check)
Open Basedir Protection (Check )
Create Mail Domain (Check if you want to you on same server)
After providing all information press Create Website Button. It will take sometime to complete and will show the confirmation massage once its Done.
How to install WordPress on your domain from CyberPanel?
When creation of your website on cyberpanel is done. Time to install WordPress on that site using CyberPanel. Just Follow these steps and do it quickly.
Go to the Websites-> list websites
Can follow this URL to list all websites
https://your_IP:8090/websites/listWebsites
2. Click the Manage button to navigate to the manage website dashboard
Navigate to this URL to list all websites
https://your_IP:8090/websites/listWebsites
3. On the management dashboard to the last section there you found WordPress click on that.
You can also get access the dashboard through this Url
https://your_IP:8090/websites/yoursite.com
4. Once you click this button now you can see a screen asking for the WordPress details.